
A Smart Trading Blueprint playbook
The CZT Playbook: Condition, Zone, Trigger
Presented By Jesse Rogers, Smart Trading Blueprint
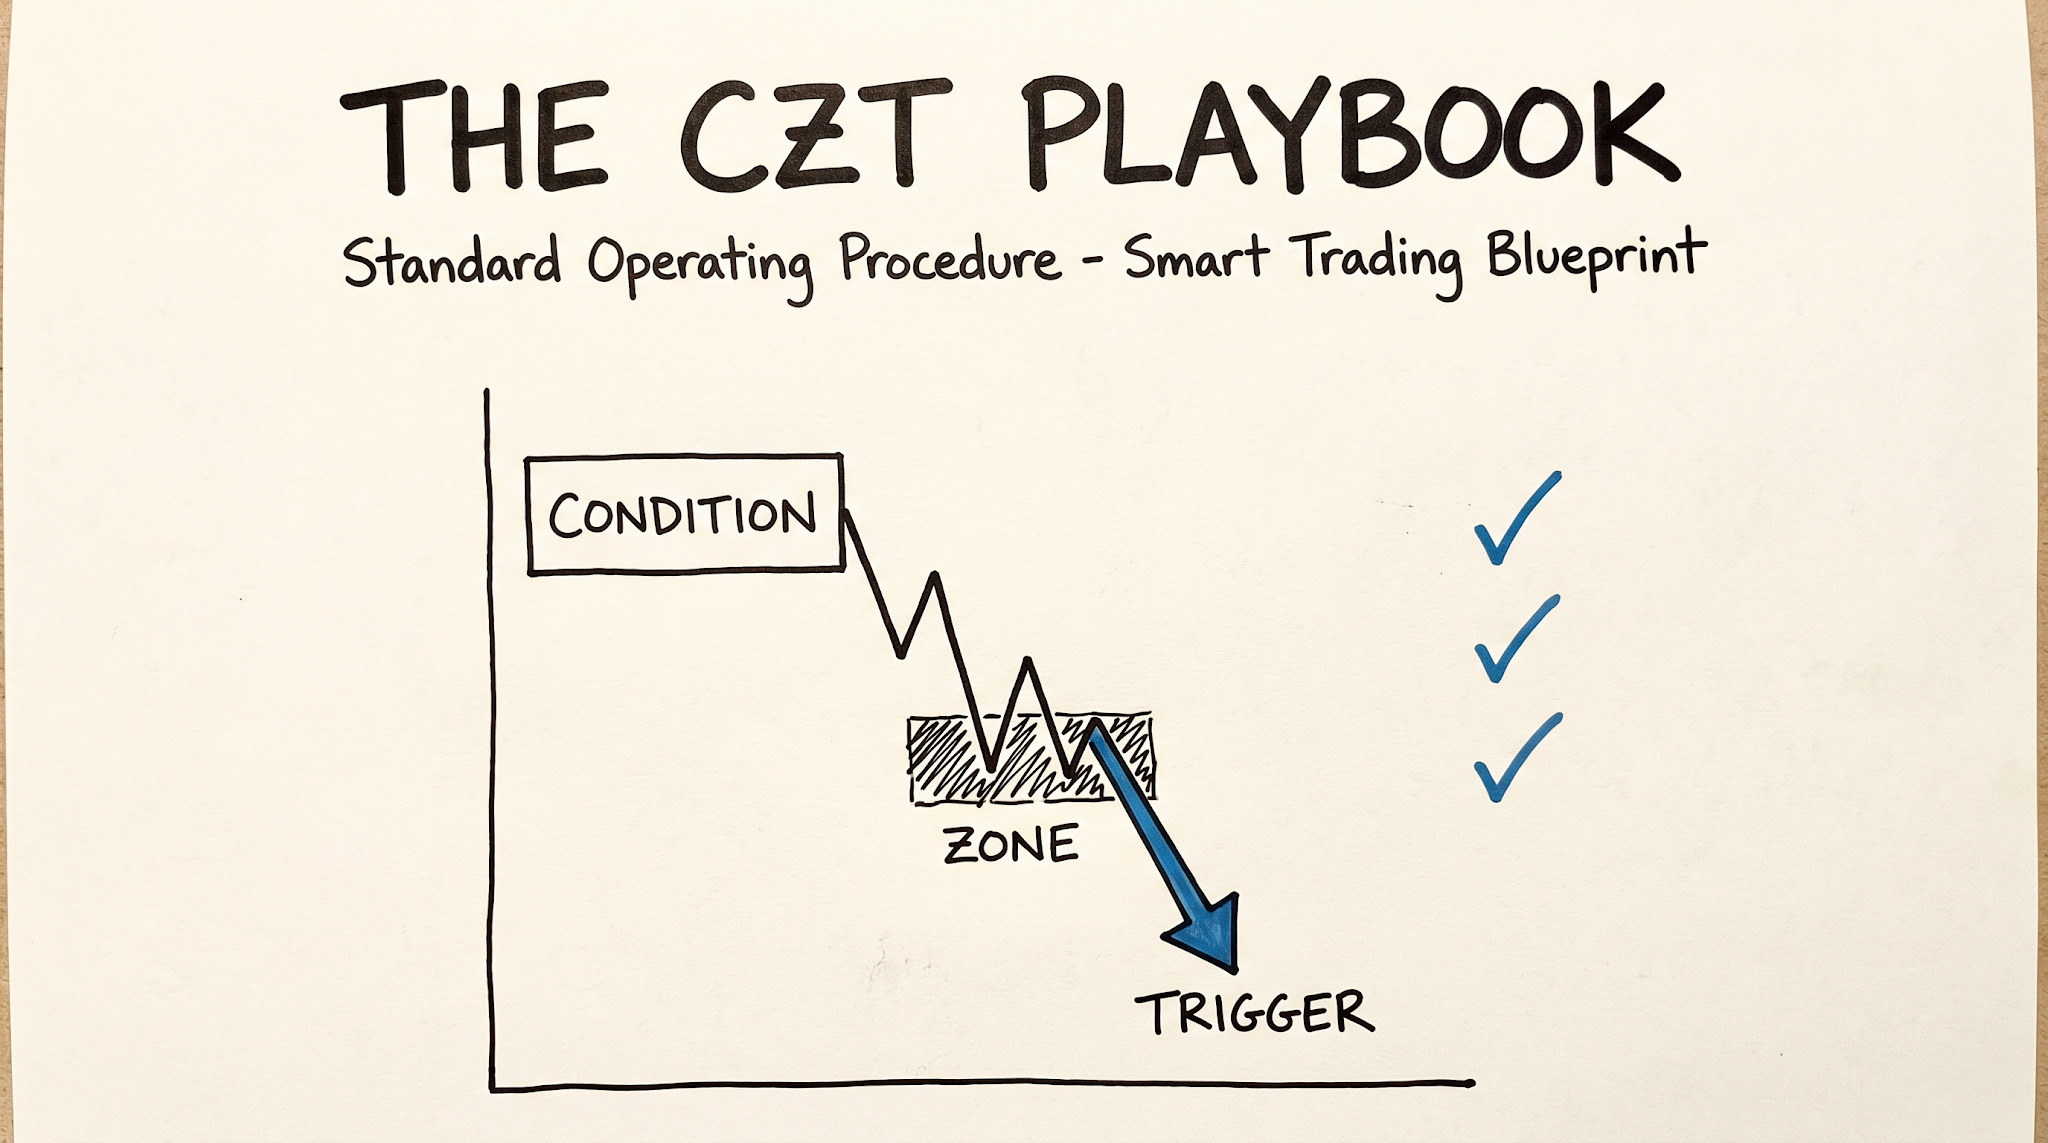
I made this for traders who have collected enough setups to fill a notebook but still freeze when real money is on the line. It is for the trader who can name every pattern on the chart but cannot explain who has to trade, why price should move, or what would prove the idea wrong. It is also for the experienced trader who already has an entry model and wants to understand the market mechanism underneath it so they can select better conditions, manage with conviction, and stop trading blind.
TL;DR
Trading is player versus player. Patterns describe what price looked like, but incentives and constraints explain why it moved. I want to trade when another participant is under pressure and may have to act, then use Condition, Zone, Trigger to decide whether that idea is ready. Condition tells me the market state and directional lean. Zone tells me the exact prices where I will pay attention. Trigger tells me whether the live auction confirms control. Once I enter, I do not predict a perfect destination. I trail behind the newest battle my side has actually won.
This playbook teaches that complete machine, then shows it under live pressure. The July 2 walkthrough is a short that crossed below the 30,000 handle while I moved stops down behind the move. The July 14 walkthrough is a two-trade long sequence where I made six stop moves and every single one had a reason the market handed me. Every tool and term you need gets explained the moment it shows up. The dollars in the screenshots are examples from my own trading, not promises. The transferable result is the decision order.
Part I
How I Think About the Markets
Trading Is PvP
The first thing I need you to understand is that trading is PvP, player versus player. It is not you against a chart. It is not you against your mindset. It is not a video game where you collect enough setups, unlock the secret indicator, and finally beat the boss. Every fill has another side. Every move changes somebody's position. Every breakout creates winners, trapped traders, hedging needs, stops, and new pressure.
Patterns are the surface. Incentives and constraints are the cause.
A candlestick can show me what happened, but it cannot tell me by itself why it should continue. A liquidity sweep can be a useful description, but the name does not create the edge. I want to know who is on the other side, what pressure they are under, what they are likely to do next, and where they become forced to do it. A professional does not stop at a backtest and a setup name. Before putting serious capital behind an idea, they want to know why it works and why that mechanism should still exist tomorrow.
That distinction separates the two kinds of edge I see in markets.
The Two Kinds of Edge
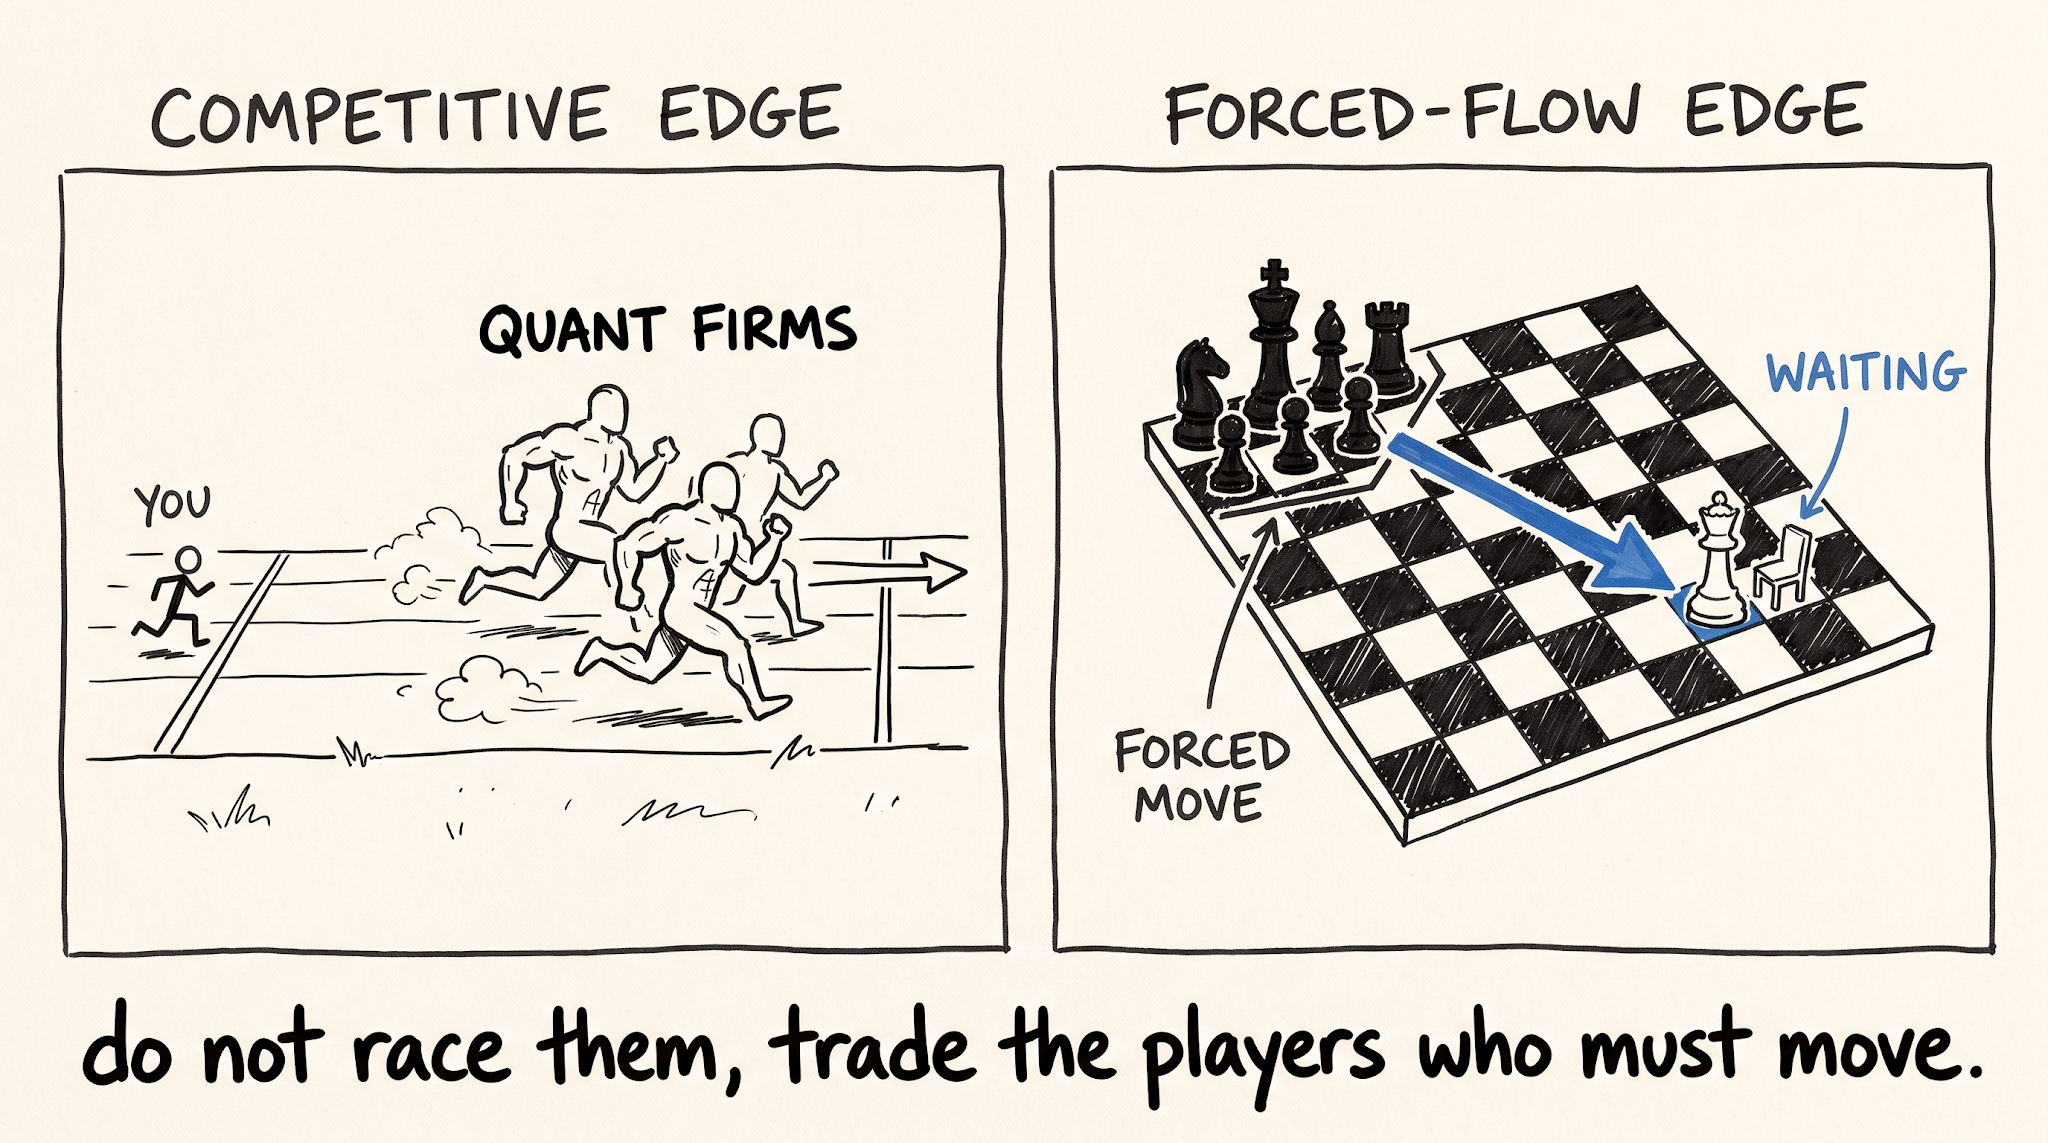
The first is competitive edge. This is the race to know something first, process it faster, model it better, and execute before everyone else. You are racing informed players with superior data, faster connections, better models, specialized teams, and enormous budgets. If a retail trader tries to beat a quantitative firm on speed and computation, that firm will absolutely fucking massacre them. That is the wrong war.
The second is forced-flow edge. Forced flow means trading created by participants who have to buy or sell for reasons beyond a fresh directional opinion. Dealers may have to hedge options inventory. A dealer is a market maker who takes the other side of customer options trades and then buys or sells the underlying market to control risk. Funds rebalance to match mandates. Redemptions force selling. Expirations change hedging needs. Stops turn a trader's pain threshold into a market order. Trapped buyers may have to sell, and trapped sellers may have to buy back shorts.
That is a different game. I am not trying to outrun the biggest players. I am trying to map where somebody's choice is becoming an obligation.
Options flow matters to me for this reason. It is not magic information about where price must go. When dealers take the other side of options demand, they may be forced to hedge as price changes. That pressure can become obligation instead of opinion. In a negative gamma environment, their hedging can push in the same direction as the move. In a positive gamma environment, their hedging can push against it. The tool matters because it maps a constraint.
My shortest rule is also one of my most important: if nobody is forced, you often do not have a trade.
That does not mean I can identify a literal forced buyer behind every tick. It means I want a credible source of pressure. Dealer hedging, trapped positions, stops, a failed auction, a major rebalance, or another participant who becomes wrong in a location that matters. If all I have is a pretty shape and hope, I do not have enough.
Retail Trains for the Wrong War
Retail education usually trains the competitive war with worse tools, then blames mindset when it fails. Learn a pattern. Backtest the picture. Click when the picture appears. If you hesitate, work on discipline. If you lose, add another filter. If you still lose, buy another strategy. The trader ends up with a junk drawer full of labels and no causal model.
It feels like preparation because there is always more information to consume. But when the market opens, those concepts start arguing with one another. One indicator says long, one pattern says short, one influencer says manipulation, and the trader has no order for deciding what matters. Anxiety shows up because the brain correctly recognizes that the person is guessing.
Think of trading like war. Would you rather enter with a full map showing the enemy's strong positions, where they are weak, where your side can take control, and what forces are likely to move next? Or would you rather walk in with a pocket knife because somebody taught you the shape of one footprint?
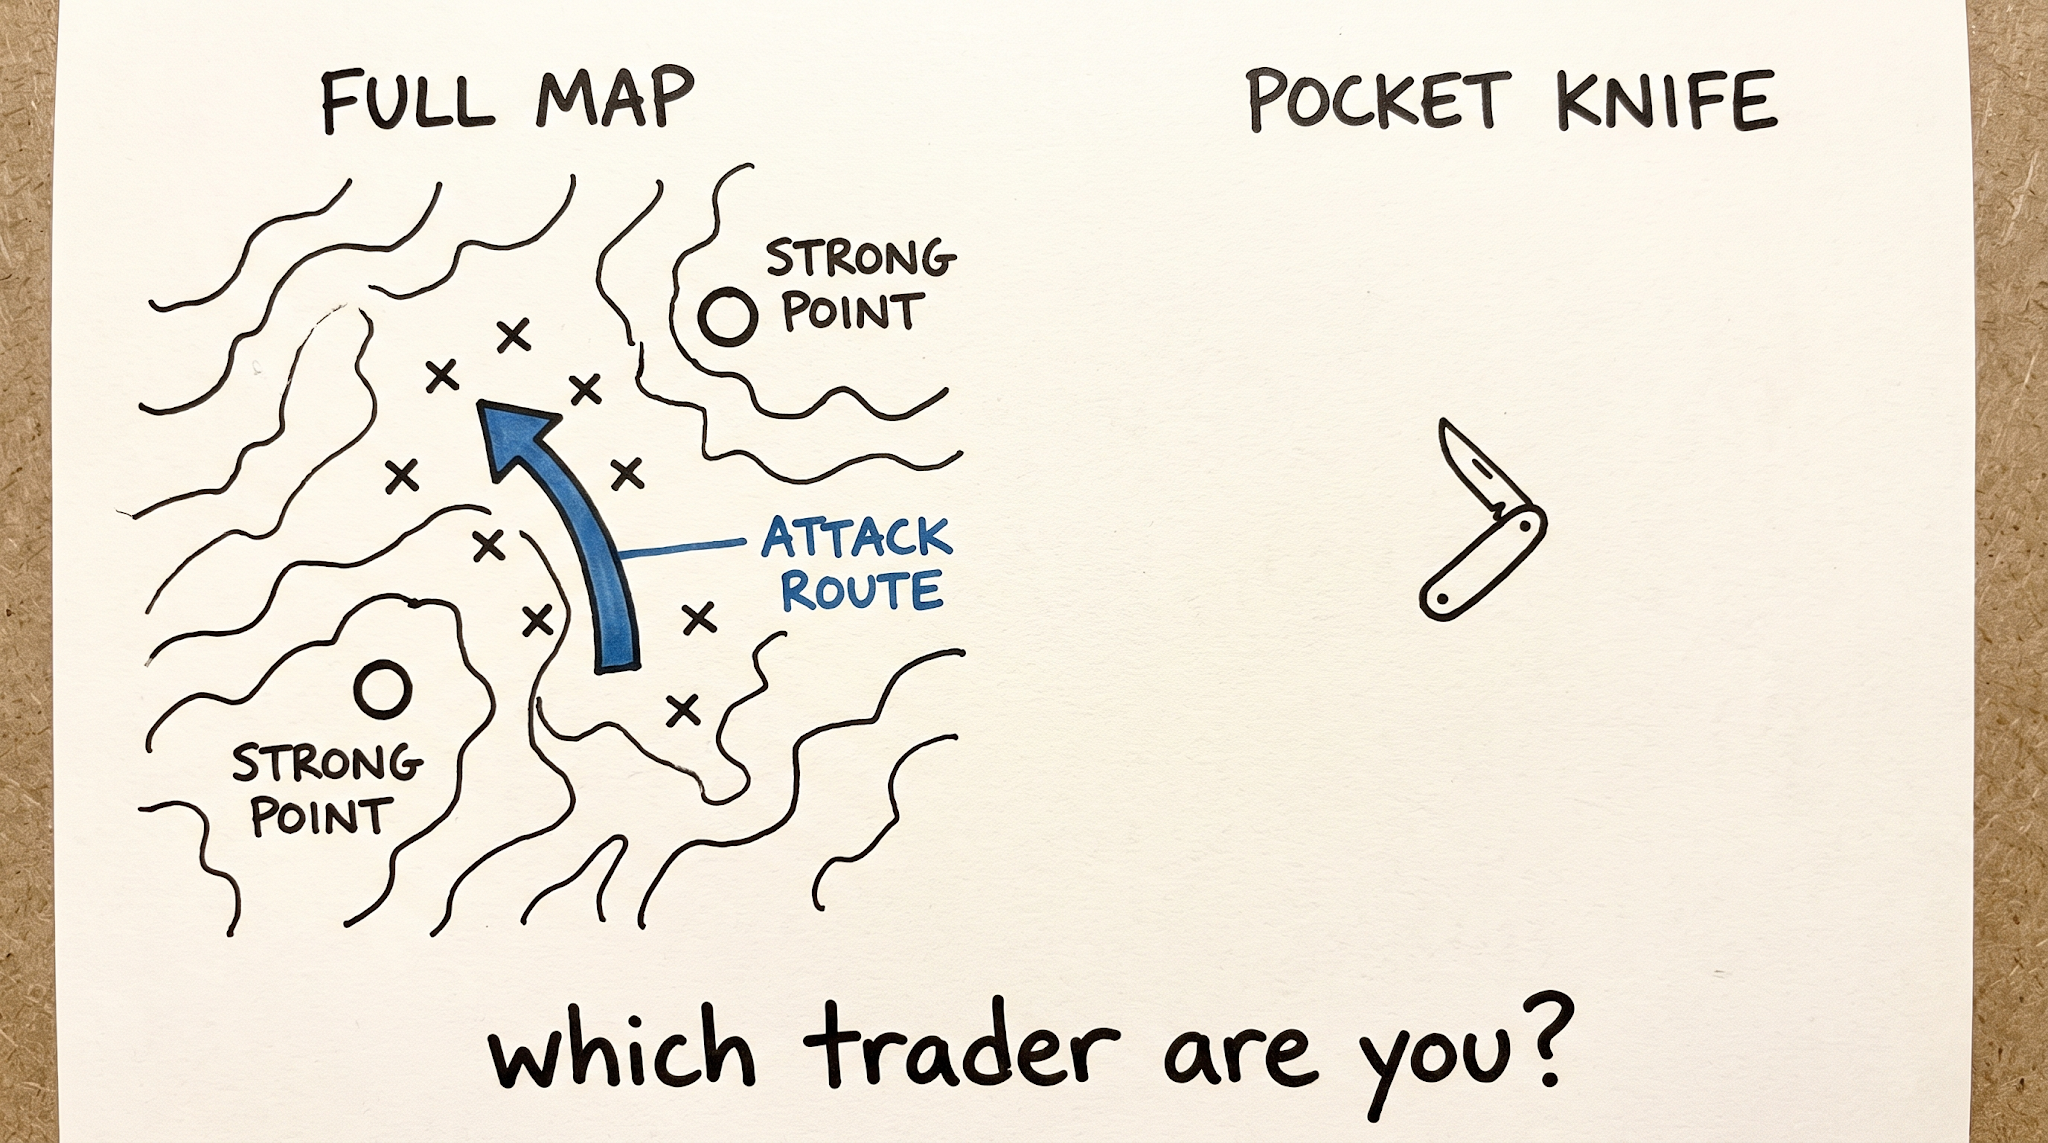
The map is not certainty. No tool gives certainty. The map lets me choose posture. It tells me which wars are worth fighting, where I should wait, and which evidence would prove that the battle has changed. CZT is the method I place on top of that worldview. The worldview asks whether there is an edge worth pursuing. CZT asks whether the specific trade is ready.
Psychology Jujitsu
A lot of what gets called a trading psychology problem is actually your nervous system trying to protect you. If you do not understand why your strategy works, you should feel anxious risking money on it. That anxiety is accurate information. Your brain knows the gap between a familiar candle and a defensible edge, even when your ego does not want to admit it.
If you were fighting a heavyweight UFC champion tomorrow, no amount of affirmations would save you from getting the absolute shit kicked out of you. You would have to train. You would have to learn the skill. You would need rounds, coaching, and a real understanding of the opponent. Trading works the same way.
This is psychology jujitsu. I do not fight the feeling first. I use it. I ask what is missing from my preparation. Can I name the condition? Can I explain why this zone matters? Can I describe what buyers and sellers are doing? Can I identify where control changes? If I cannot, the answer is not to breathe harder and click anyway. The answer is to pass and build competence.
Competence creates confidence. Preparation is confidence. Once the skill exists, performance work matters. Even elite fighters use coaches. But mindset cannot do the job of a skill you do not have yet. The correct order is mechanism, process, reps, then performance refinement.
I learned that through pain, not theory. I lost $383,000 over five years before I ever had a day like the July 2 trade you will see later. Not one bad month. Five years of being wrong and everyone thinking I was crazy. Every trader you look up to stood where you are standing and wanted to quit. The difference is that they kept learning long enough to replace guessing with skill.
That history is not an income promise and it is not an argument for reckless persistence. It is proof that confidence did not arrive because I repeated a mantra. It arrived because I stayed in the game, diagnosed what I did not understand, and built a process I could explain under pressure.
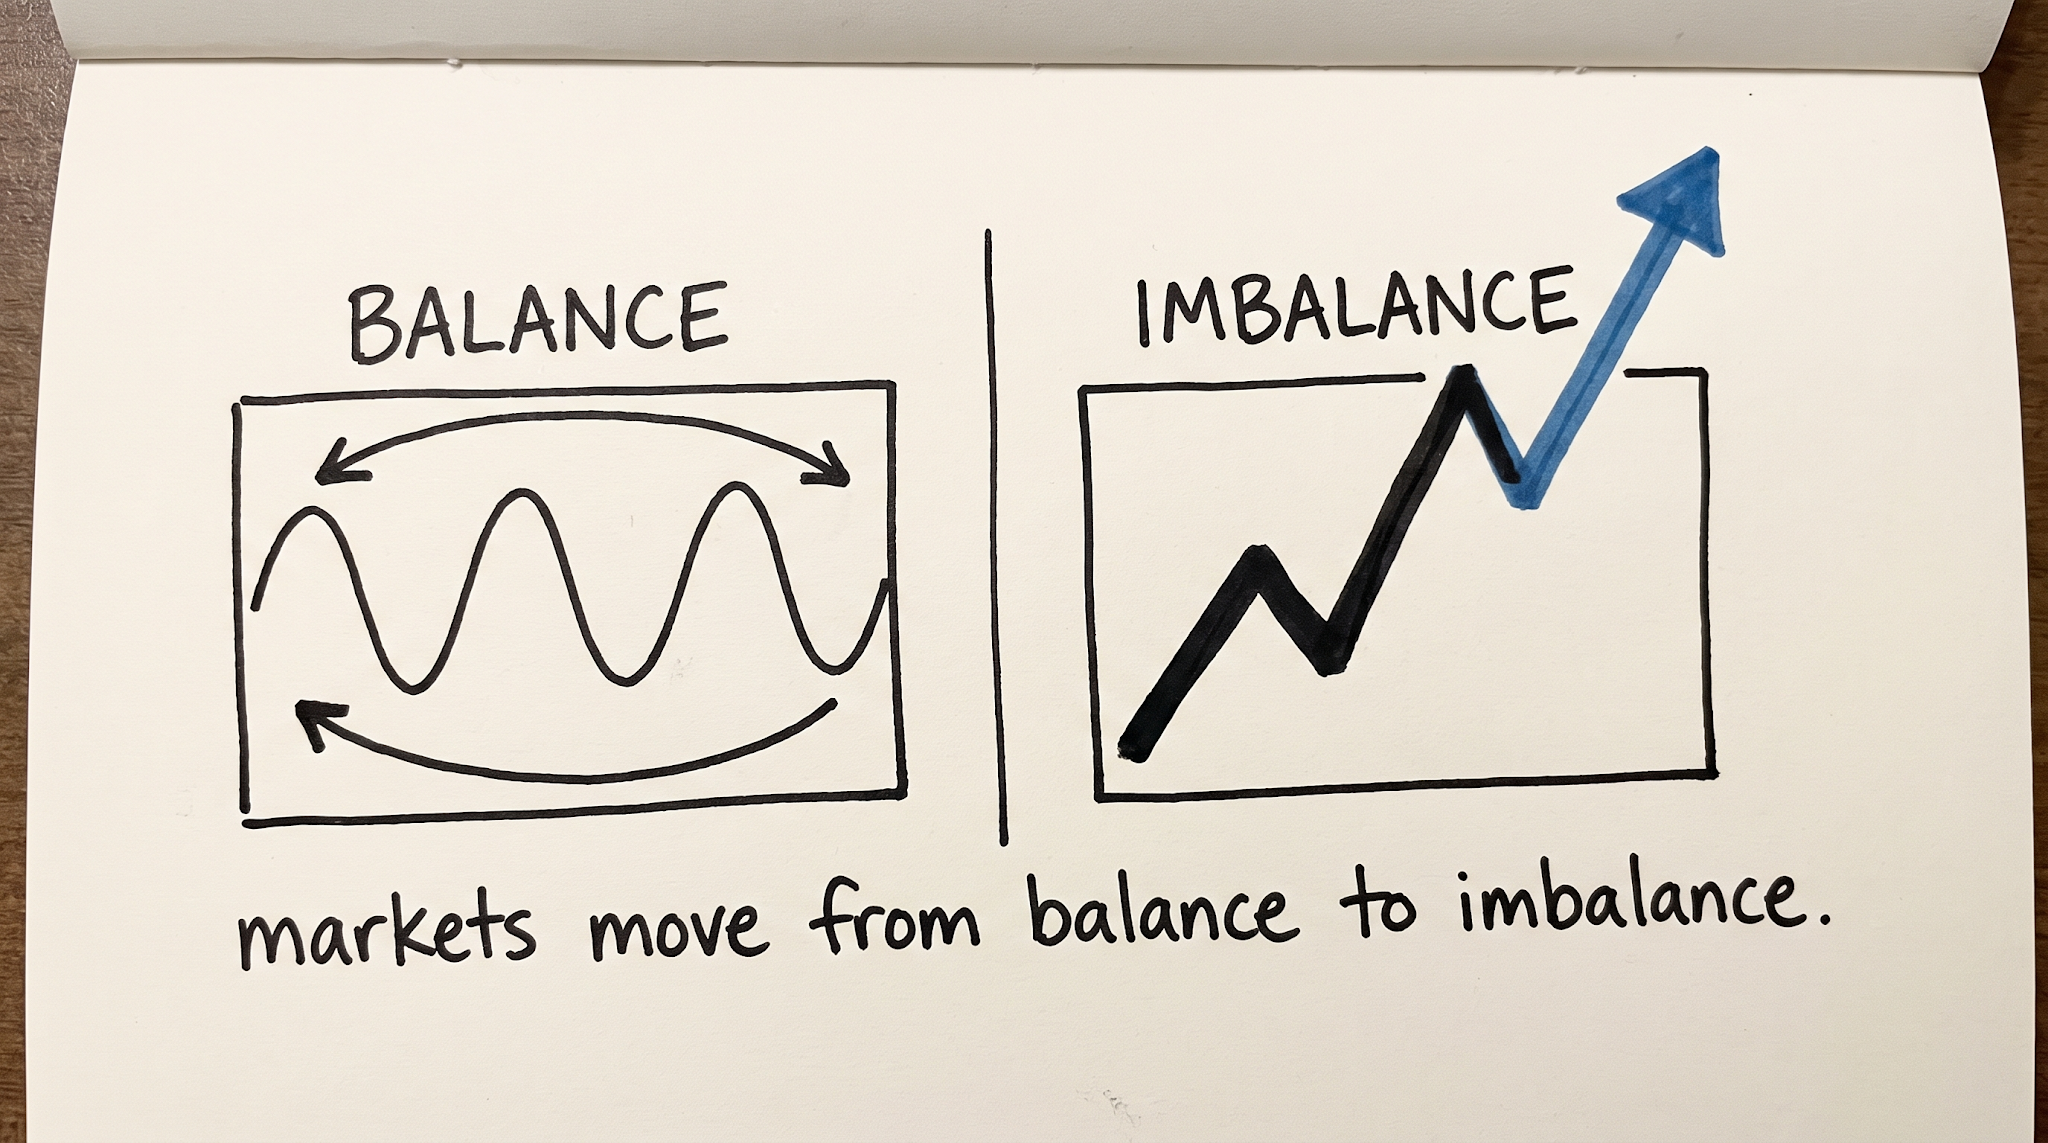
The process is Condition, Zone, Trigger.
Part II
The CZT Method
The Junk Drawer and the Missing Order
For years I did what almost every trader does. I tested complicated strategies, indicators, signal groups, and patterns from people online. Every one made perfect sense while I watched the explanation. Then I took it into the live market and discovered some nuance nobody mentioned. I lost, went looking for another answer, and made the drawer fuller and the picture blurrier.
Eventually I saw the embarrassing truth. Every strategy that had ever worked for me was answering the same three questions underneath. Every strategy that kept costing me money had skipped one of them.
First, Condition. What state is the market in? Am I looking up or down? Should I expect expansion or contraction?
Second, Zone. Where exactly am I interested? Not the whole chart. Which objective price area is likely to matter?
Third, Trigger. What must happen at that zone before I enter? Once I am in, what evidence says control remains, and what says it changed?
Condition. Zone. Trigger. CZT.
Occam's razor says that when a simple explanation and a complicated one explain the same thing, prefer the simpler one. Da Vinci said simplicity is the ultimate sophistication. I spent years assuming the answer had to be more complicated. My trading improved when I stopped adding and started stripping the process down.
You do not have a discipline problem. You have an order problem.
Think of a factory. One station feeds the next. If a bottleneck jams the line, running around and adjusting every machine creates more chaos. Most traders try to fix mindset, entries, risk, indicators, and discipline at once. Their actual bottleneck is that nothing tells them, in order, when to stay out, where to focus, and what evidence earns the click. With CZT, Condition filters the environment, Zone narrows the location, and Trigger confirms the live event. If a step is missing, the line stops.
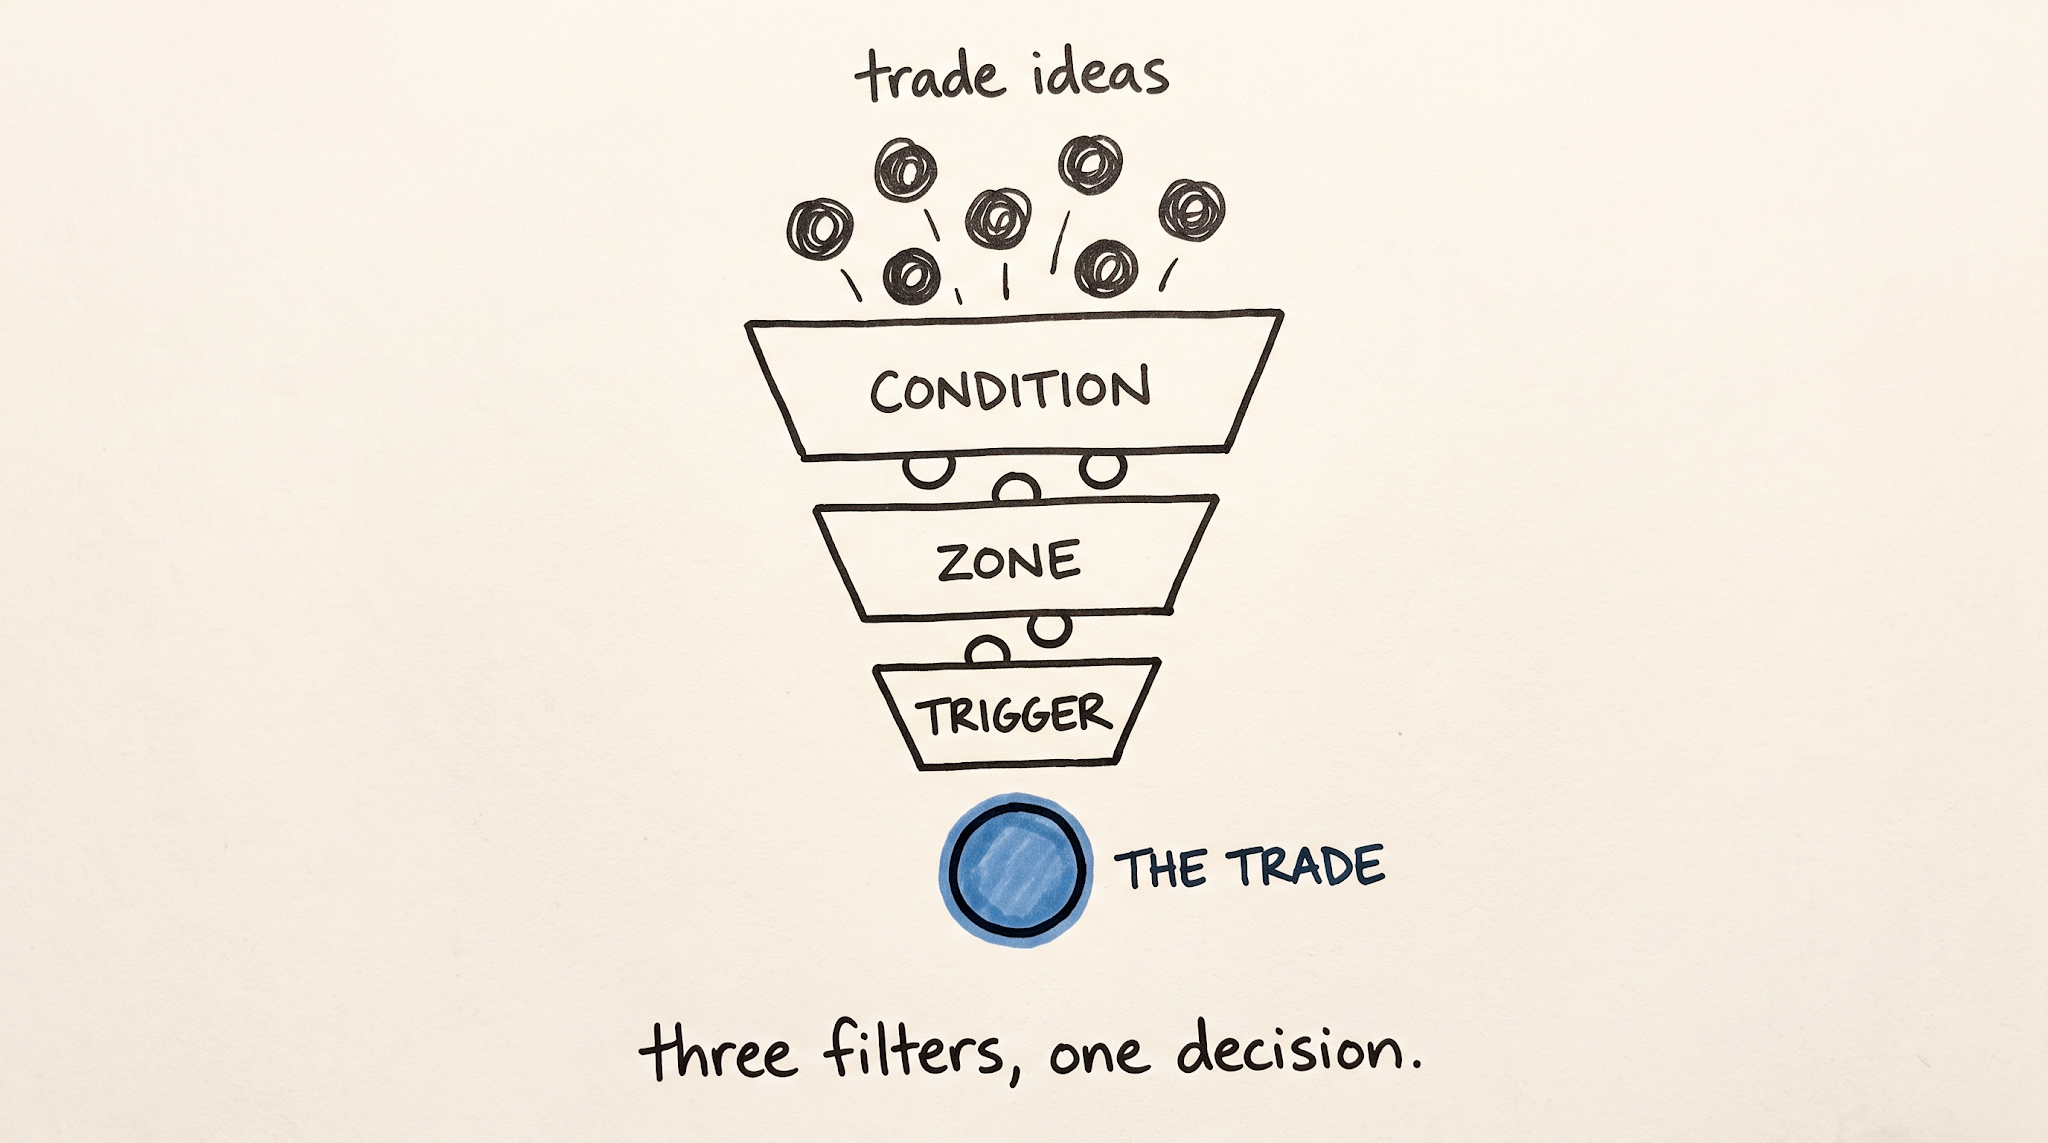
Condition: What State Is the Market In?
Condition is the context that decides what kind of trade deserves attention. I am asking three practical questions. Where is price relative to value? What is the gamma environment? What is ahead in the path?
Start with value. A volume profile is a sideways histogram that shows how much trading occurred at each price. Where the profile is fat, a lot of business happened and the market cares about that price. Where it is skinny, little business happened and price can move quickly because fewer positions are anchored there.
The value area is the range where most of the session's volume traded, the prices the market treated as fair. I use the previous day's value area as the primary reference. Above yesterday's value leans bullish because price is holding above the area the market previously accepted as fair. Below yesterday's value leans bearish. Inside yesterday's value suggests balance and chop because price is back in the area where buyers and sellers previously agreed.
These are leans, not commands. Above value does not mean buy anything. It means a confirmed long has the condition at its back. Below value does not mean short blindly. It means a valid short is aligned. Inside value lowers the priority of breakout trades and raises the odds of rotation or mean reversion, which means price moving back toward an accepted average.
Next is gamma. Gamma describes how an option's sensitivity changes as the underlying market moves. I do not need you to become an options mathematician. I need you to understand the hedging behavior it can produce.
In negative gamma, dealer hedging tends to push with the move. If price rises, dealers may need to buy more. If price falls, they may need to sell more. That feedback supports expansion, breakouts, and faster movement. In positive gamma, dealer hedging tends to push against the move. Dealers may sell rallies and buy dips, which supports contraction, reversals, and failed breakouts.
Negative gamma means expect expansion. Positive gamma means expect the fade. Neither makes an outcome certain. It tells me which setup type fits the pressure.
The third question is what lies ahead. Low volume means fewer established positions in the path and often gives price room to travel. High volume means more people are positioned there, so fighting and chop are more likely. A major prior high, low, value boundary, or other key level can cap the move. A breakout into open low volume is different from a breakout directly into a wall.
Put the three reads together. Outside value, negative gamma, and low volume ahead point toward imbalance, meaning one-sided movement and expansion. Inside value, positive gamma, and high volume ahead point toward balance, meaning two-sided trade, rotation, and fades. Mixed inputs mean reduced conviction, smaller size, or no trade.
This is where CZT connects to the separate Sizing SOP. Use that SOP to assign the A, B, or C grade and position size. I do not duplicate the risk ladder here because this playbook is about selecting and managing the trade.
Zone: Where Something Is Likely to Happen
A zone is not a prediction. It is an appointment with the market.
I mark my zones before the session so the hard decisions happen before emotion arrives. The previous day's value area high, abbreviated VAH, is the upper boundary of accepted value. The previous day's value area low, abbreviated VAL, is the lower boundary. The point of control, abbreviated POC, is the single price where the most volume traded. VWAP means volume weighted average price, the session's average price weighted by the volume at each price. In this playbook VWAP matters for one reason: it is one of the zones I mark in advance, a level where I expect a real fight and start reading the auction closely.
Those levels tell me where participants are positioned and where their behavior may change. They do not tell me to click. If price reaches yesterday's VAL, I become alert. If it slices through without the behavior I need, the zone failed and I move on. I react to the level that holds. I do not demand that my line control the market because I drew it first.
The fat and skinny areas of a volume profile also become zones. A high volume node is a fat bulge where a lot of trade occurred. It often acts like a crowd and creates rotation. A low volume node is a thin area where little trade occurred. It can act like a doorway between accepted areas. Previous week value, major session highs and lows, and clearly defined plan levels can matter too.
I do not cover the chart with lines. More zones do not create more precision. They create more excuses. I mark the areas tied to real positioning, then write what I need to see at each one. If price never reaches them, I do not manufacture a trade in the middle.
Trigger: Read the Live Auction
The trigger is the part most traders skip. They see price touch a zone and treat location as confirmation. I need live evidence about control.
All markets move between balance and imbalance. Balance is a fight. Buyers and sellers are both active, price rotates sideways, and the market searches for an accepted price. Imbalance is one-sided control. One side overwhelms the other and price leaves the range.
I watch two categories of information. First is what traders are doing, meaning executed orders. Second is what they are offering to do, meaning resting orders.
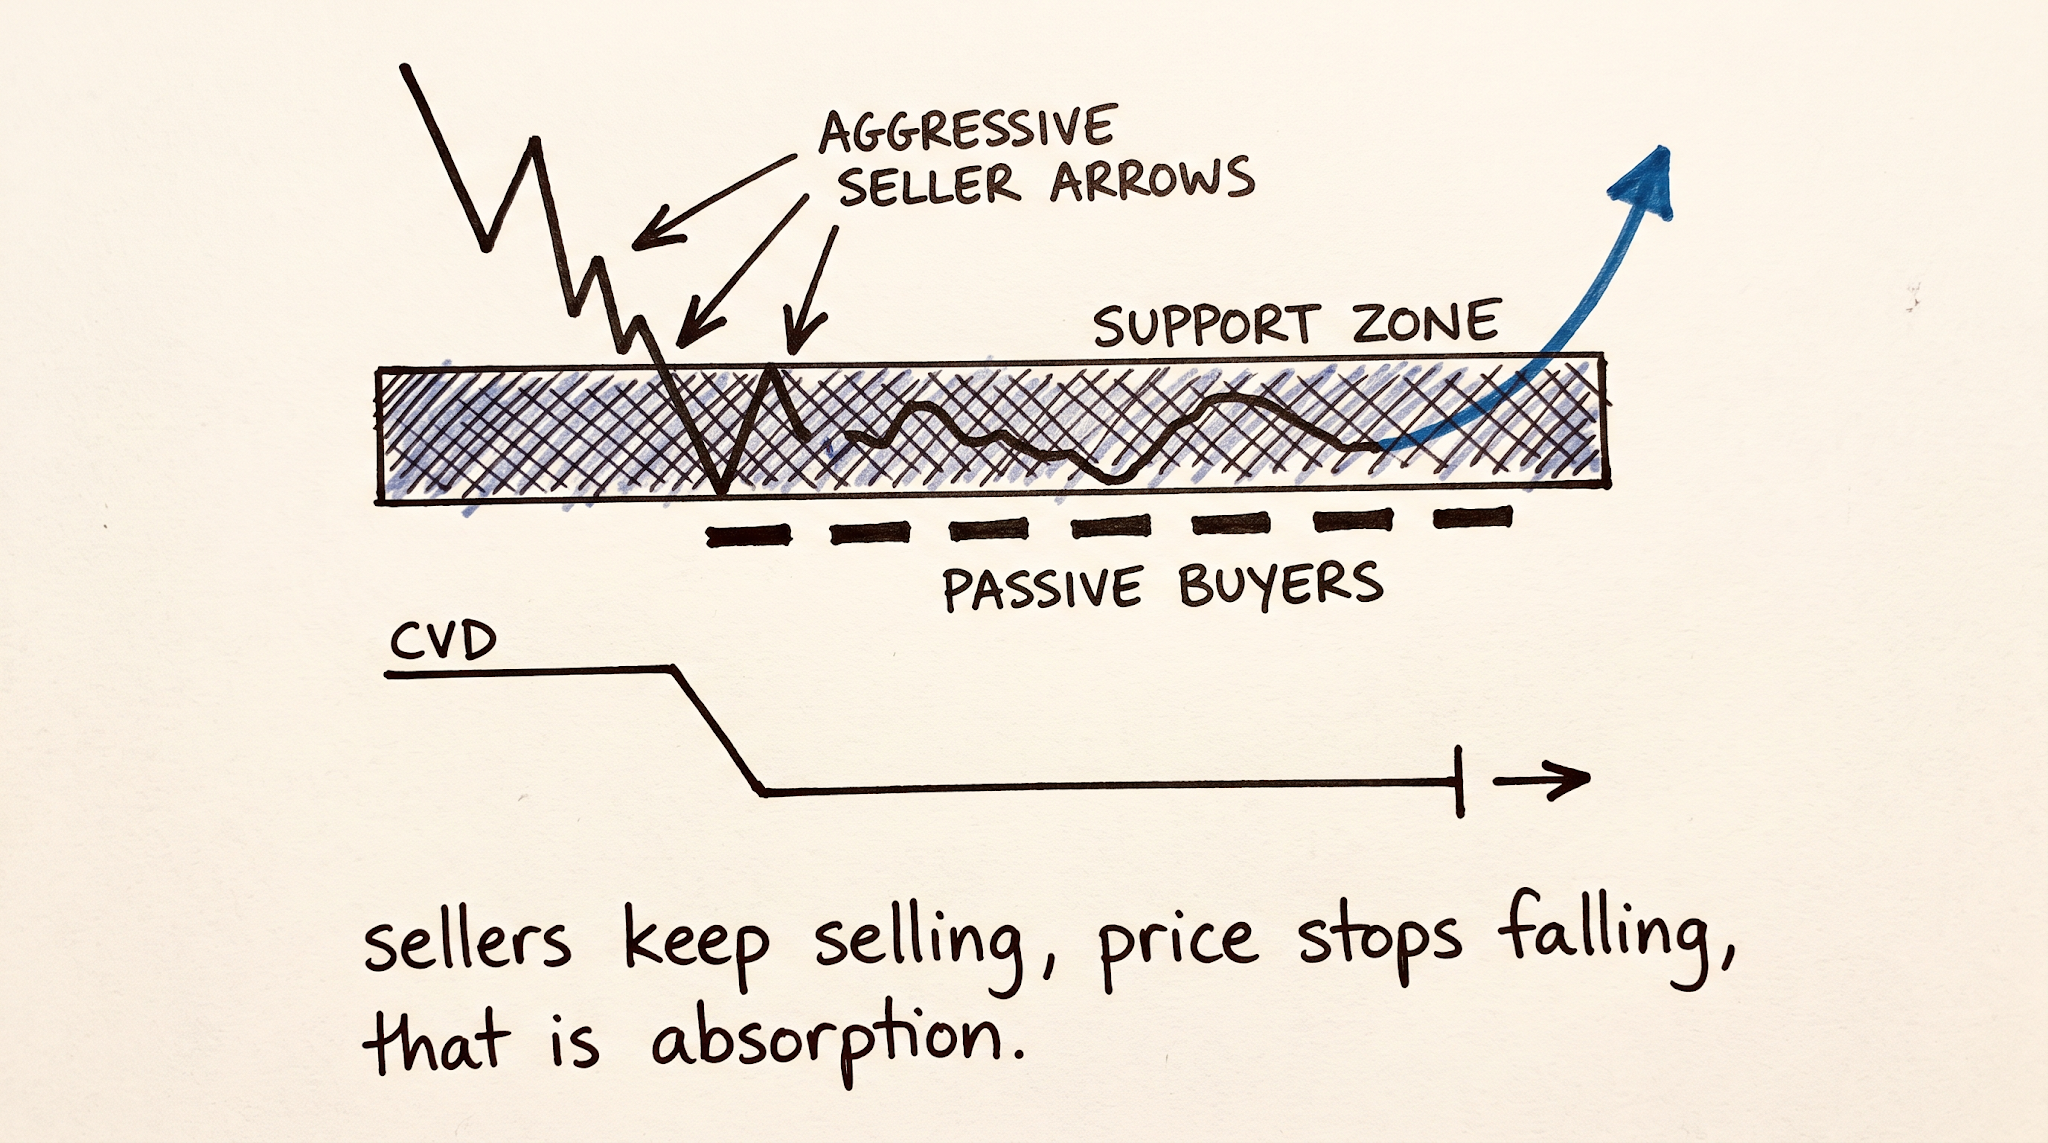
Executed aggression comes from market orders. A market buyer accepts the available offer to get filled now. A market seller hits the available bid. CVD, cumulative volume delta, adds the difference between aggressive buying and aggressive selling over time. When CVD rises, aggressive buyers are outhitting aggressive sellers. When it falls, aggressive sellers are outhitting aggressive buyers.
Aggression does not equal direction. Green does not automatically mean up. I ask what the effort achieved. If sellers attack with a large increase in volume and falling CVD but price stops falling, a passive buyer may be absorbing everything they sell. Absorption is effort without result. The same works in reverse when aggressive buyers cannot lift price because passive sellers absorb them.
Resting liquidity is visible on a heatmap, a chart that colors limit orders waiting in the order book. Bright areas show larger resting orders. Those orders are offers, not completed actions. They can move or disappear. I watch whether buyers reload after fills, add size, or raise bids underneath price. I watch whether a seller wall gets eaten, disappears, or reloads repeatedly.
Executed trades tell me who is fighting. Resting orders tell me where the armies are camped. Price tells me who is winning.
Acceptance completes the read. Acceptance means volume increases and price holds beyond the relevant area for more than a few seconds. A wick is not acceptance. A momentary poke is not acceptance. Volume without price holding is not acceptance. Price is the ultimate judge.
For a long reversal, I may see aggressive sellers hit a zone, fail to push price lower, passive buyers hold or lift, buyer aggression increase, and price accept above the balance. For a short, mirror it. Aggressive buyers fail to advance, passive sellers hold, seller aggression arrives, and price accepts below the balance.
This is why the perfect entry is a myth. A good trade is a valid idea about who controls the market paired with a valid place where that control changes. I do not need to know the entire future. I need to know who is winning now and where they lose.
Management: Trail What the Market Proves
I do not use take-profit orders in my own advanced management. A take-profit order assumes I know the exact price where the market will reverse. I do not have that business. My job is to define who is in control and where that changes. That location evolves as the trade evolves.
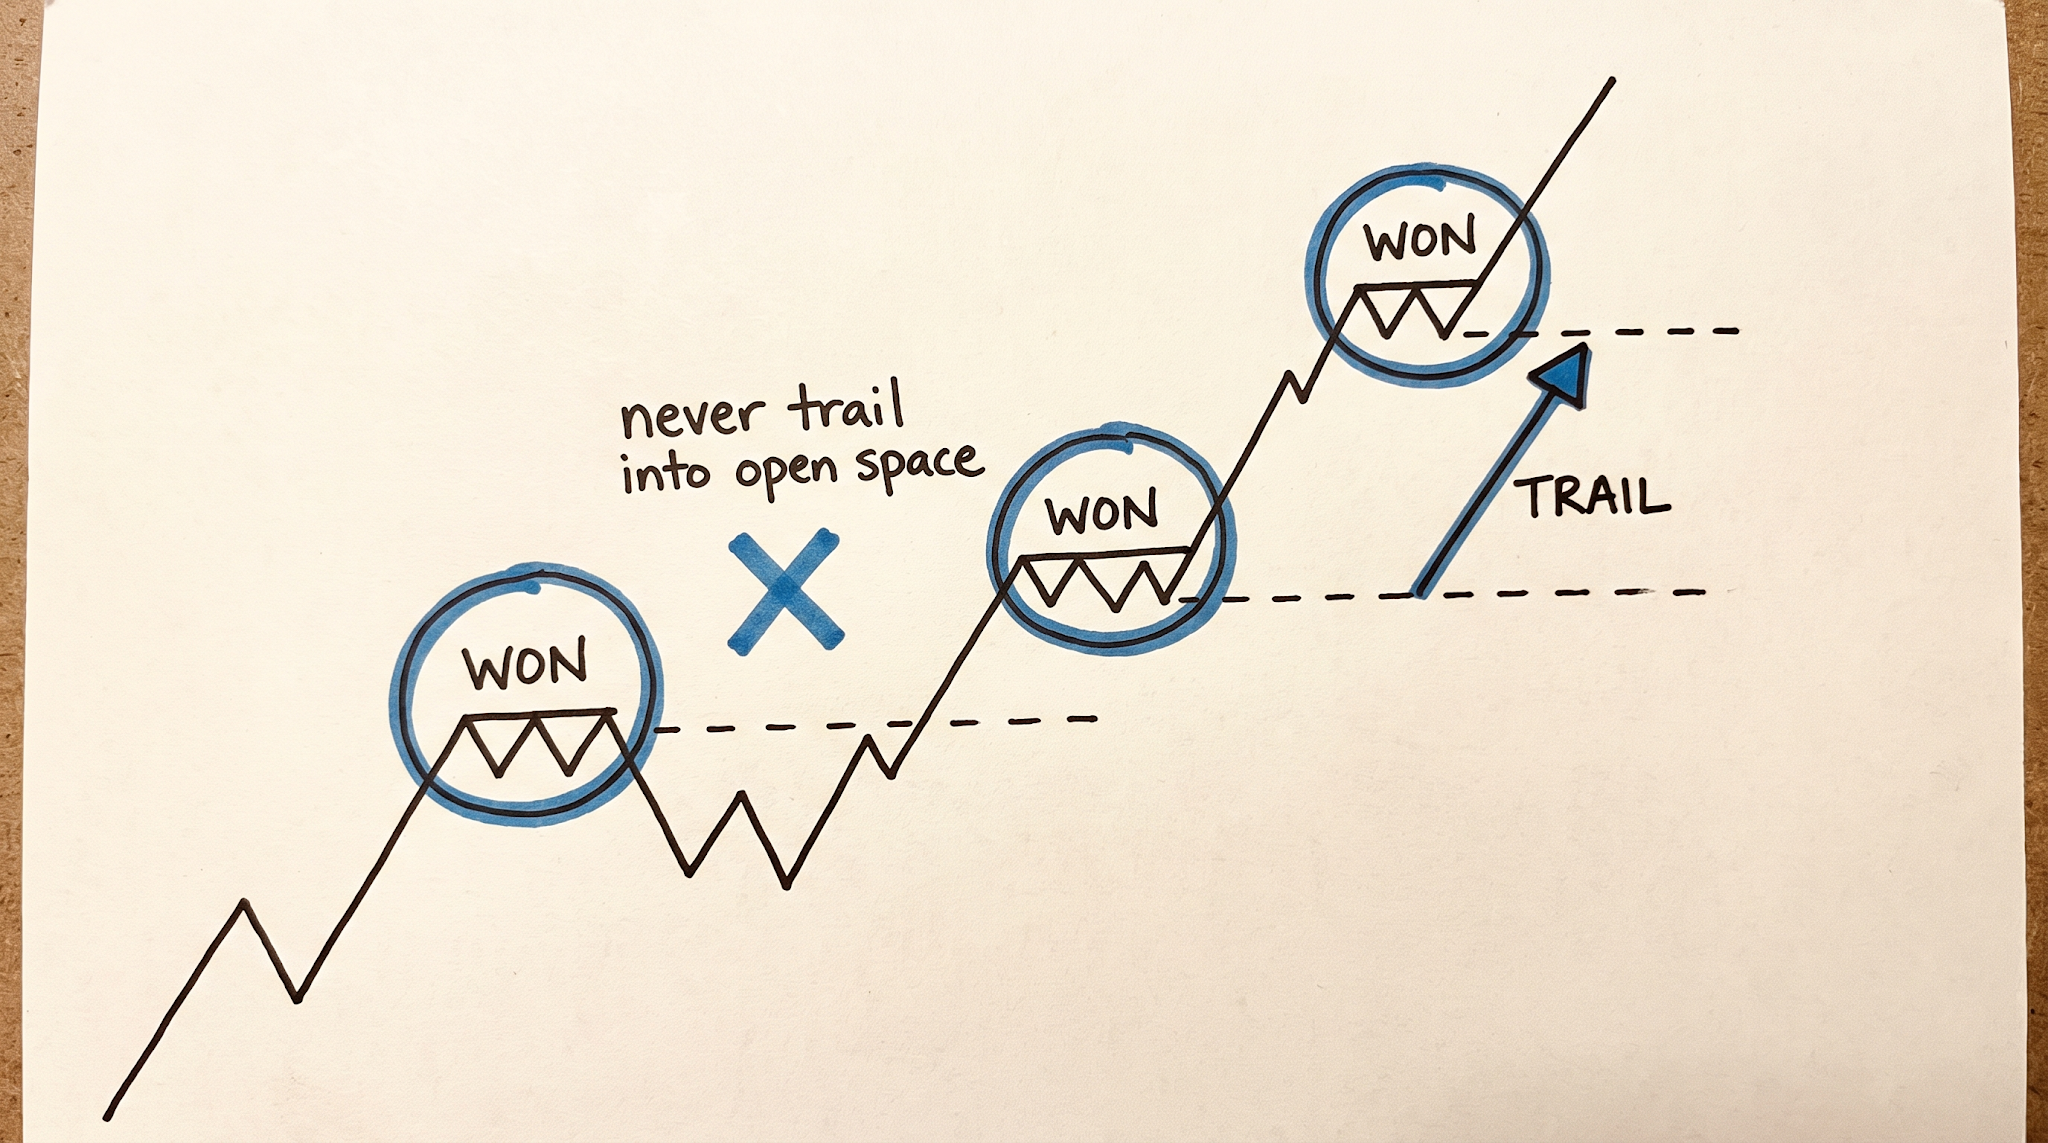
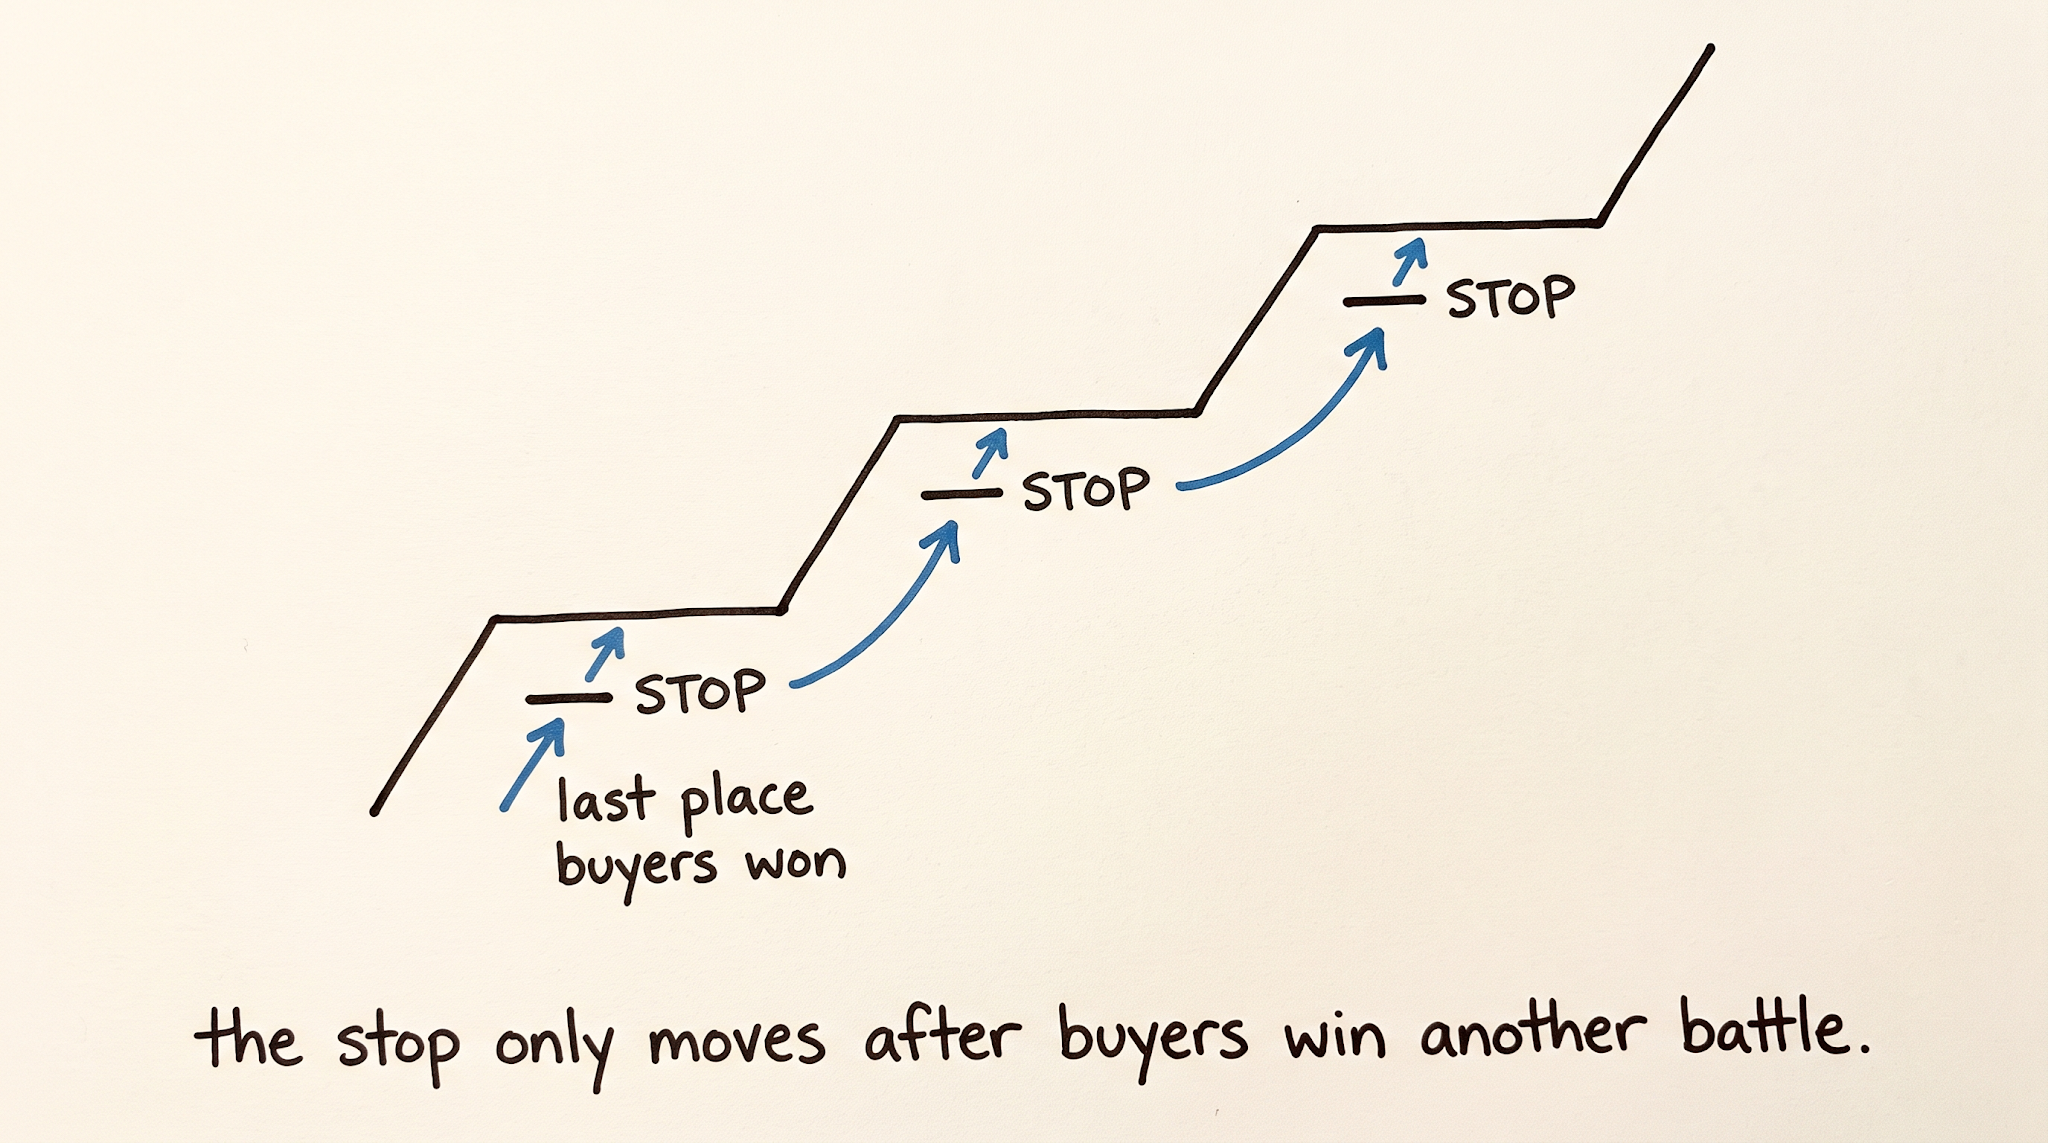
My initial stop goes beyond the location that invalidates the trigger. After entry, I want a successful auction, meaning my side wins a meaningful fight and price moves away. Before I trail normally, I want another successful auction that creates a fresh reference point. Then I move the stop behind the newest place my side proved control.
I call this the new-battle rule. A favorable wiggle is not a new battle. A few ticks of open profit are not proof. If I move to break-even while price is still inside the same fight that created my entry, ordinary rotation can stop me out even though the thesis remains valid.
When context weakens, I tighten. A major level ahead, an extended move, weakening aggression, a wall that reloads, or a cluster of newly trapped traders can justify less room. Near them I may read smaller slices of the auction and place the stop directly behind a newer pivot. The stop still follows market information. It simply responds more aggressively because the consequence of losing that battle is larger.
There is another reason I manage this way. A stop protects financial capital, but it also protects mental capital. Watching a strong winner round-trip can change the next decision. I consider that second-order effect without letting emotion invent a level. The standard remains the same: what new information did the market provide?
The complete philosophy is simple. No predicted destination. No moving a stop because the floating P&L looks exciting. No widening after invalidation. The stop only moves when the market proves something, and it moves to a place that says exactly what must remain true.
Part III
Live Walkthrough One, July 2, 2026
The Plan Was the Trade Before the Trade
At 8:10 AM Central, I posted the NQ plan and told the room the day should be fun. NQ is the Nasdaq 100 futures contract. The plan mattered because it locked the condition and zones before the move could trigger emotion.
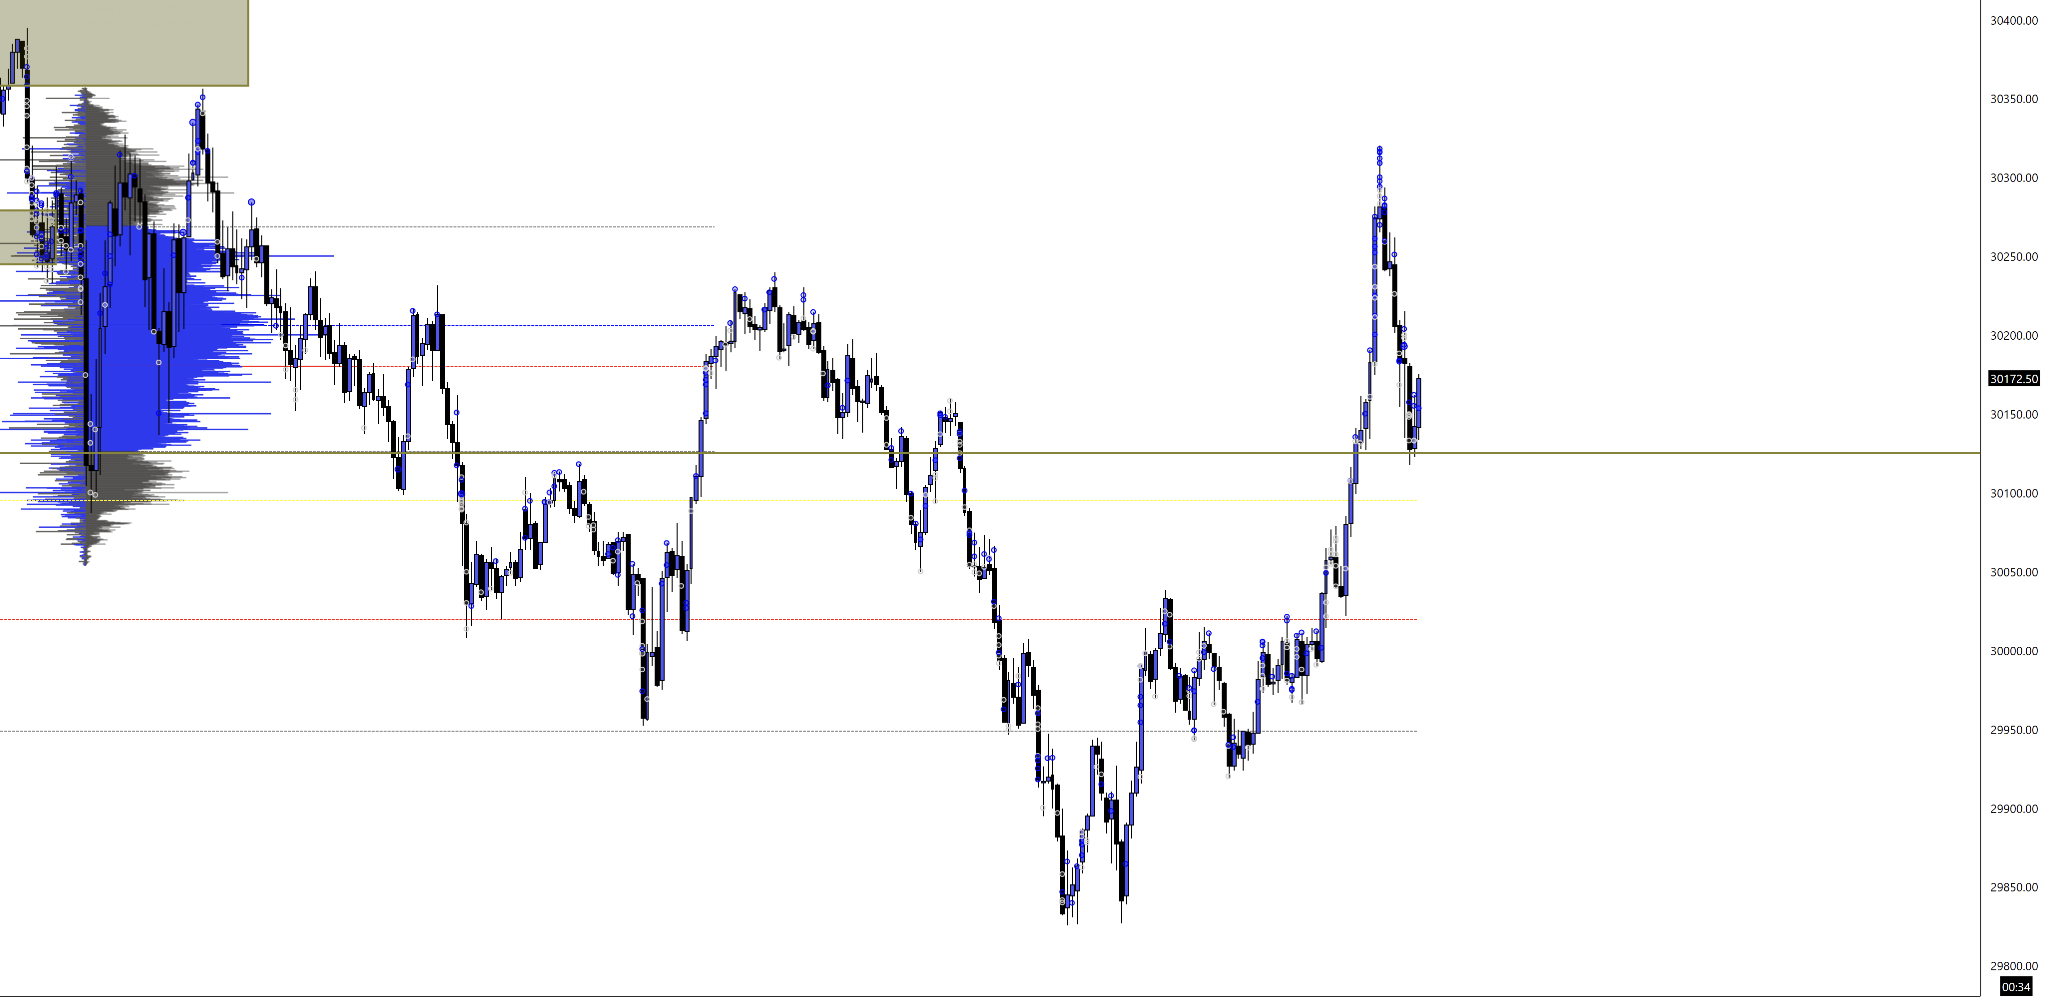
The condition was negative gamma. At 8:10 AM I wrote the plain translation: breakouts and fast price movements are more likely. Dealer hedging could reinforce expansion, so I wanted a continuation trade that aligned with value rather than a casual fade against it.
At 8:19 AM, I made the directional branch explicit. Under 30,125, yesterday's VAL, I was looking for shorts heavy. Yesterday's VAL was the previous day's value area low. Holding beneath it meant price was outside accepted value on the bearish side. Negative gamma and bearish location were pointing in the same direction.
No Dice Means No Dice
The setup did not immediately hand me an entry. At 8:44 AM I wrote, "No dice on the retest as of yet." I was watching for price to move out of the previous value area. Otherwise I was sidelined.
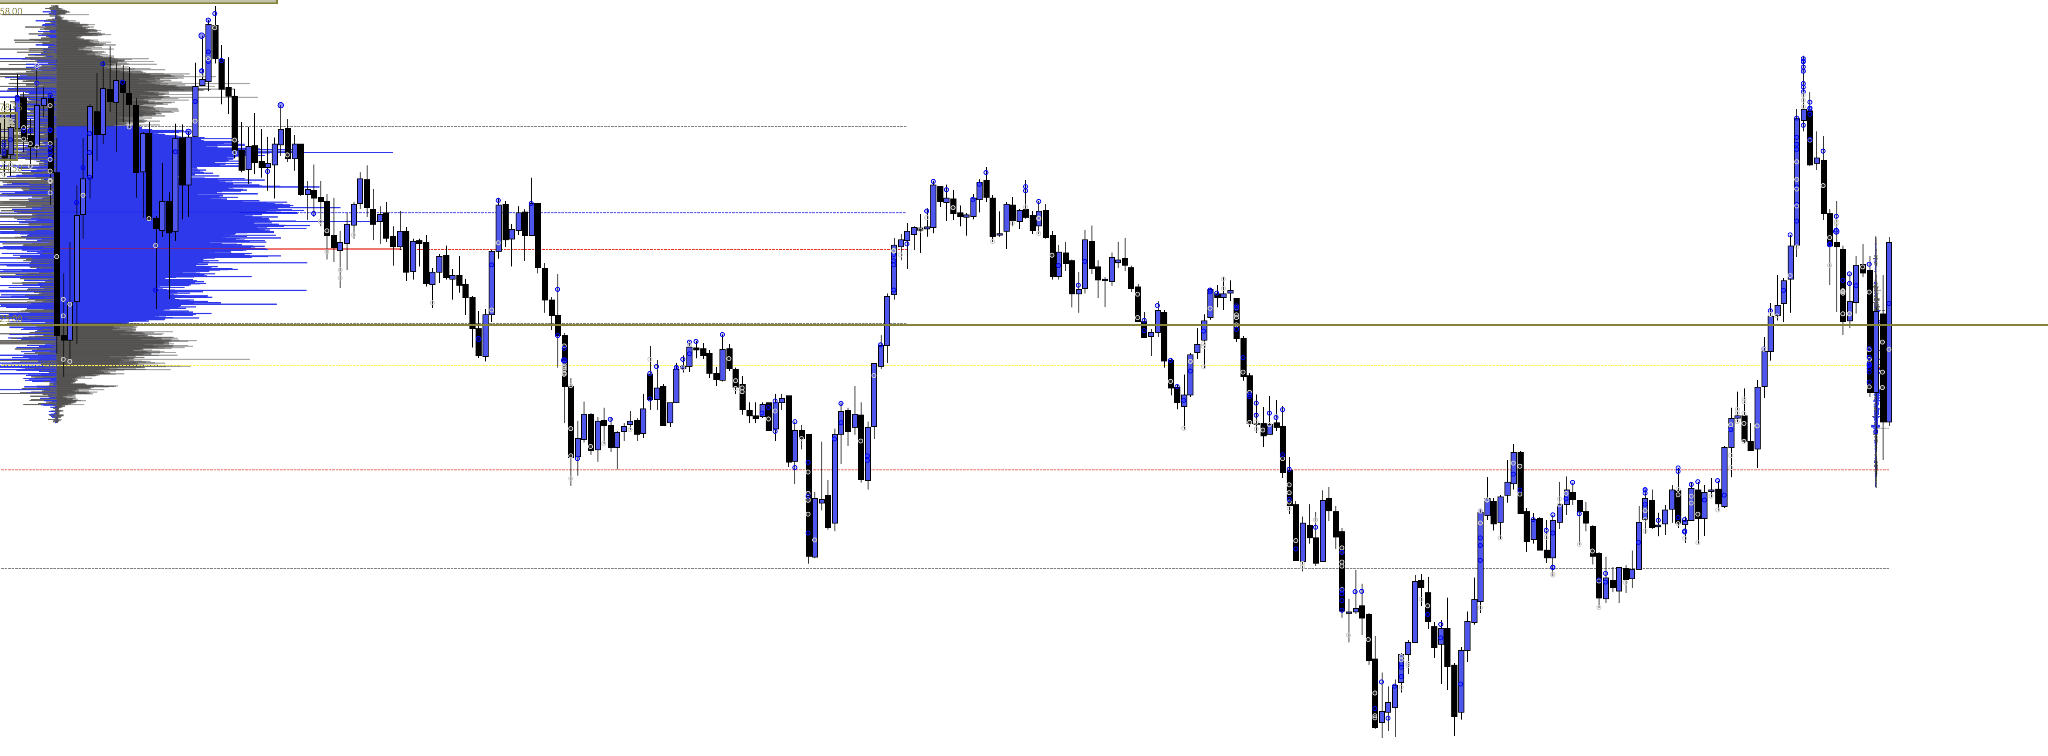
That sentence is the whole CZT filter in real life. The condition was strong, and the zone mattered, but I did not yet have the trigger. Negative gamma is not permission to short every red candle. A level is not permission to enter because it got touched. If the third step is missing, I sit out.
At 8:50 AM, price was back in an area that could become ideal. I wrote the failure branch before acting: if price reclaimed above yesterday's POC or VWAP, I would pass. The POC was the prior session's most traded price. Reclaiming it and VWAP would put price back into accepted trade and weaken the short thesis.
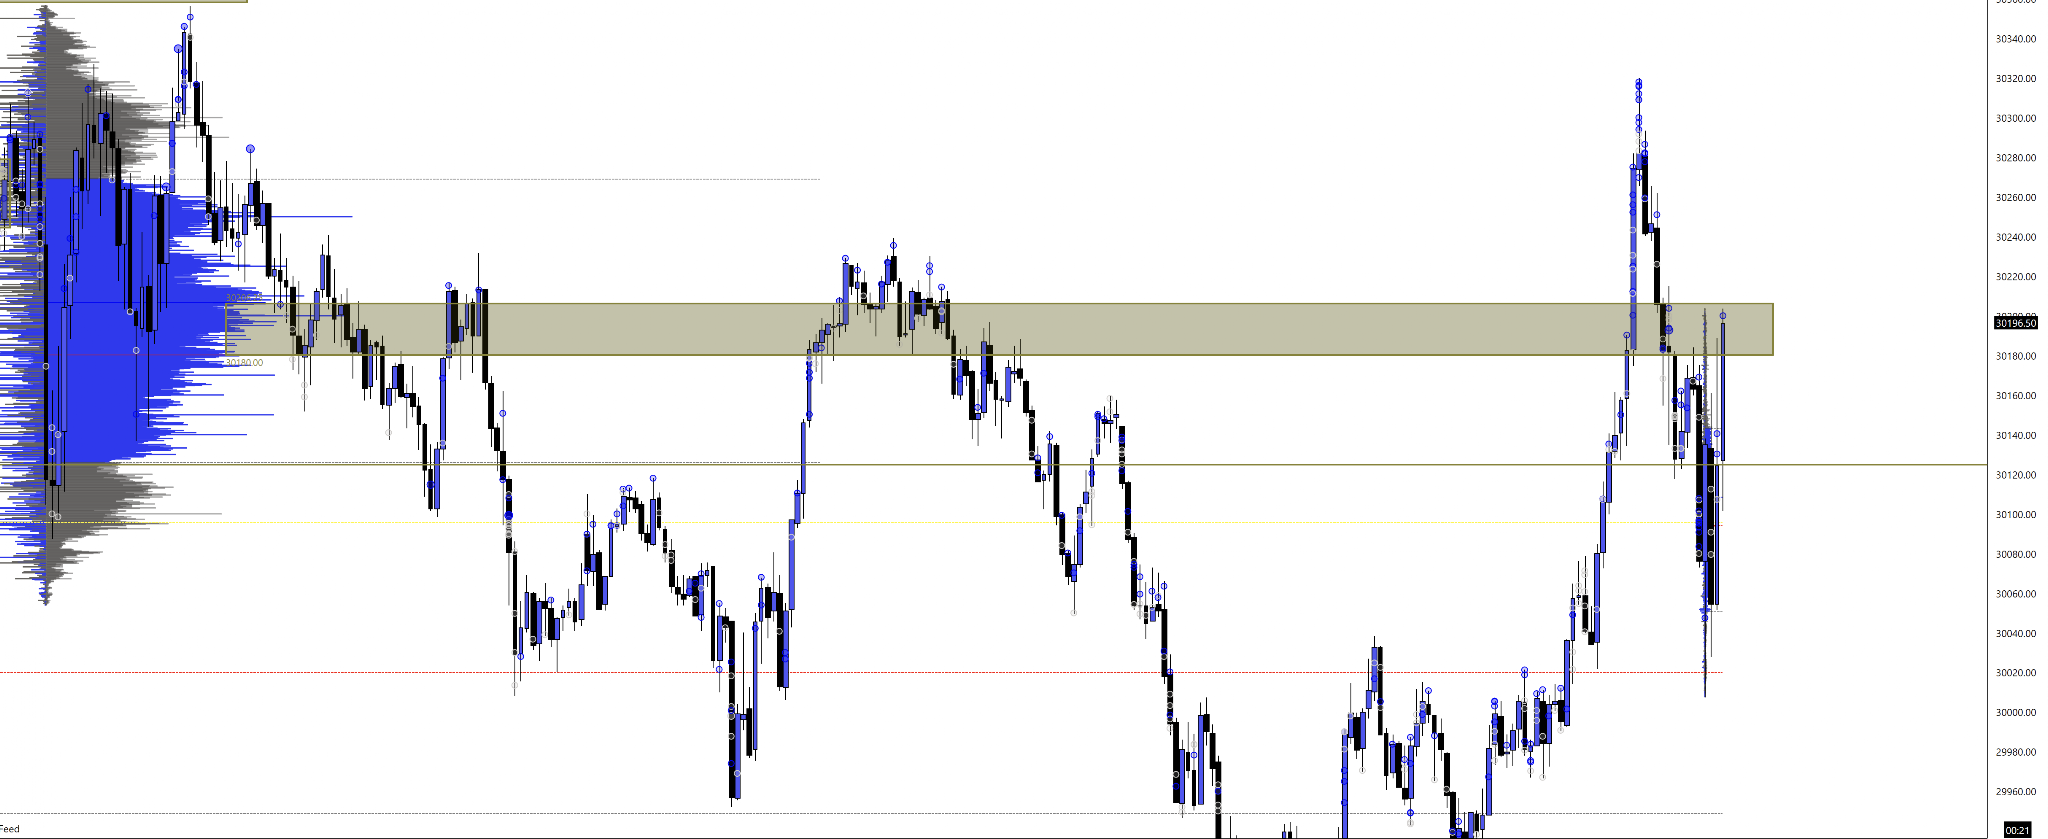
Then I stated exactly what the trigger needed: clear absorption, plus volume and aggression to the downside before entering. For a short, I wanted buyer effort to fail at the zone, sellers to become aggressive, and price to confirm lower. That kept me from confusing a bearish opinion with an executed trade.
At 9:04 AM I was still watching at the previous day's VAH, the value area high. The plan had narrowed the chart into objective decision points. I did not chase between them.
The Entry and the Ladder Down
The trigger eventually arrived and I entered short. The raw messages begin documenting management once the move was underway. Because this was a short, protection moved down as price fell. Each lower stop reduced risk or locked more of the move while staying above a reference the market had already left behind.
At 9:23 AM, I moved stops into profit.
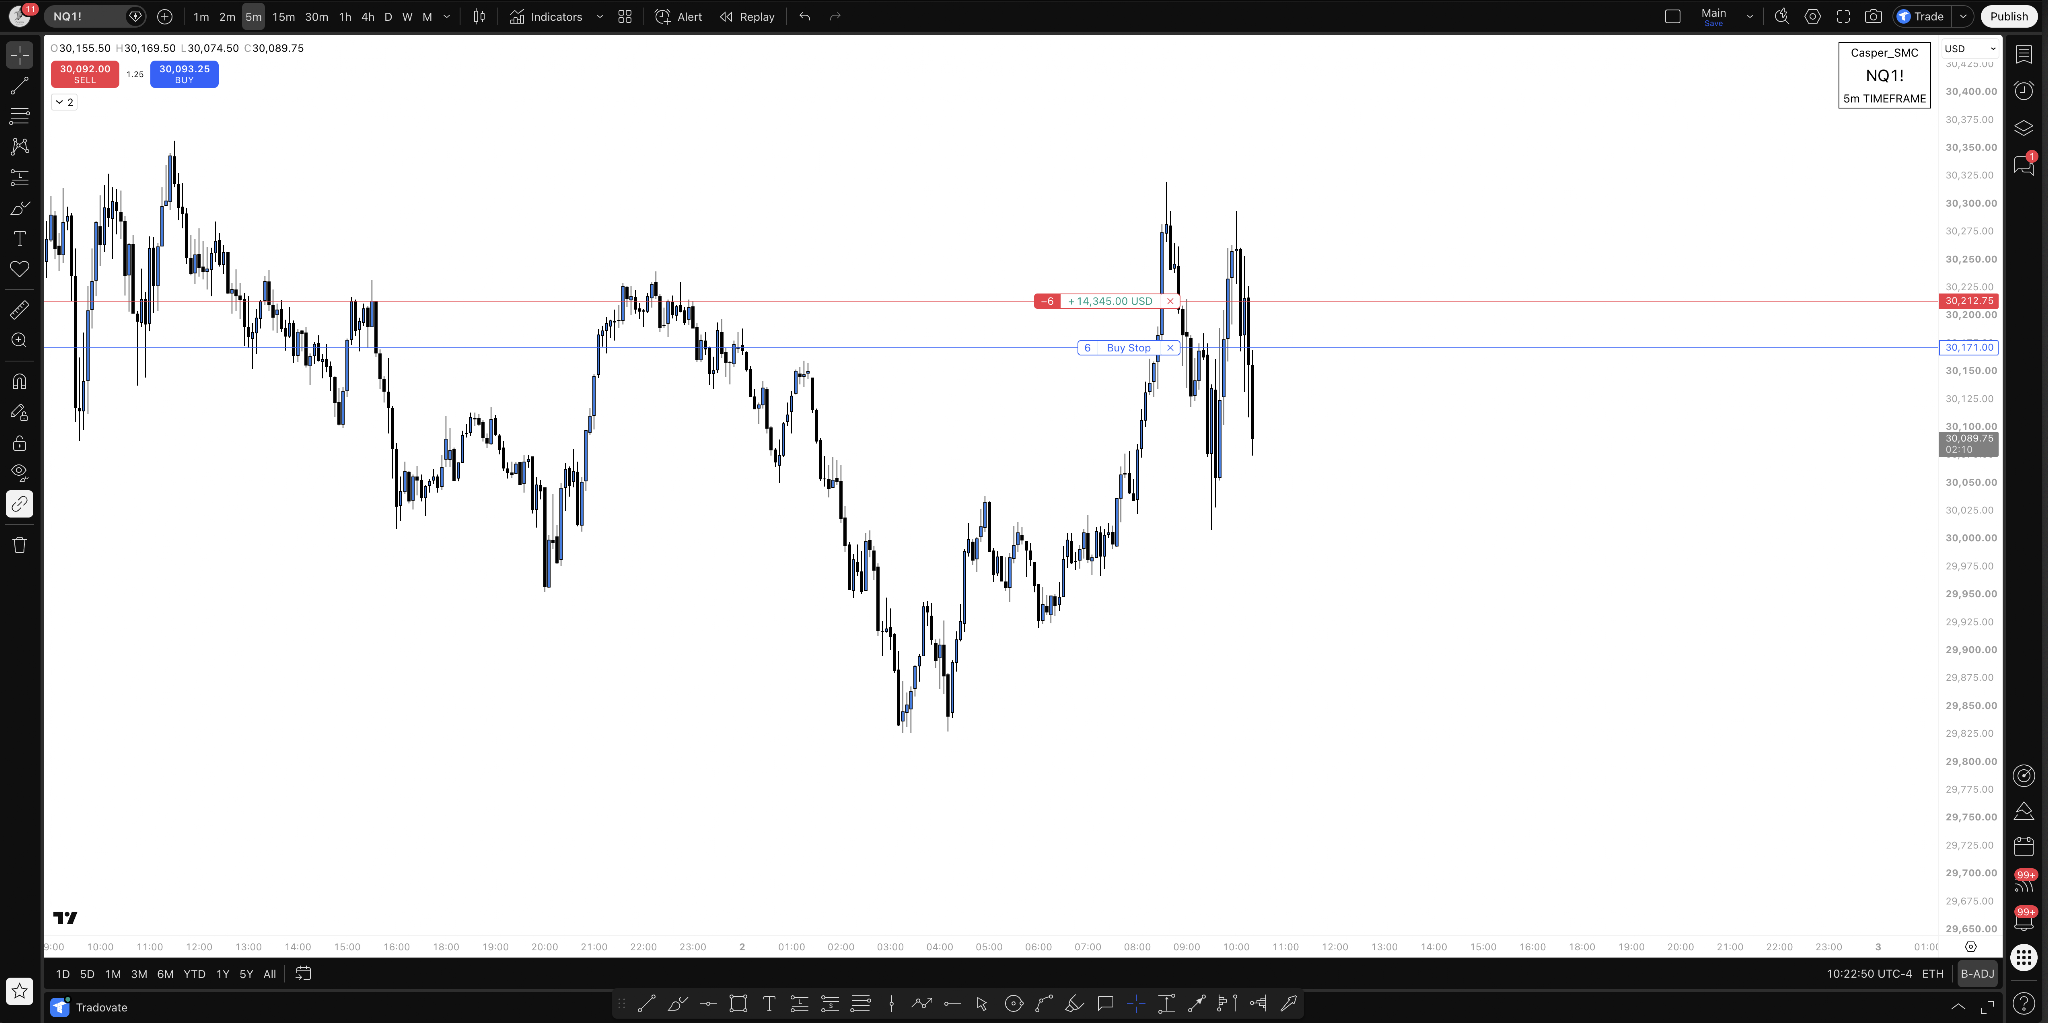
At 9:26 AM, stops moved to 30,141. In the Discord I wrote "141" because NQ was trading around 30,000 and everyone following live could see the handle. I am decoding it here so there is no ambiguity.
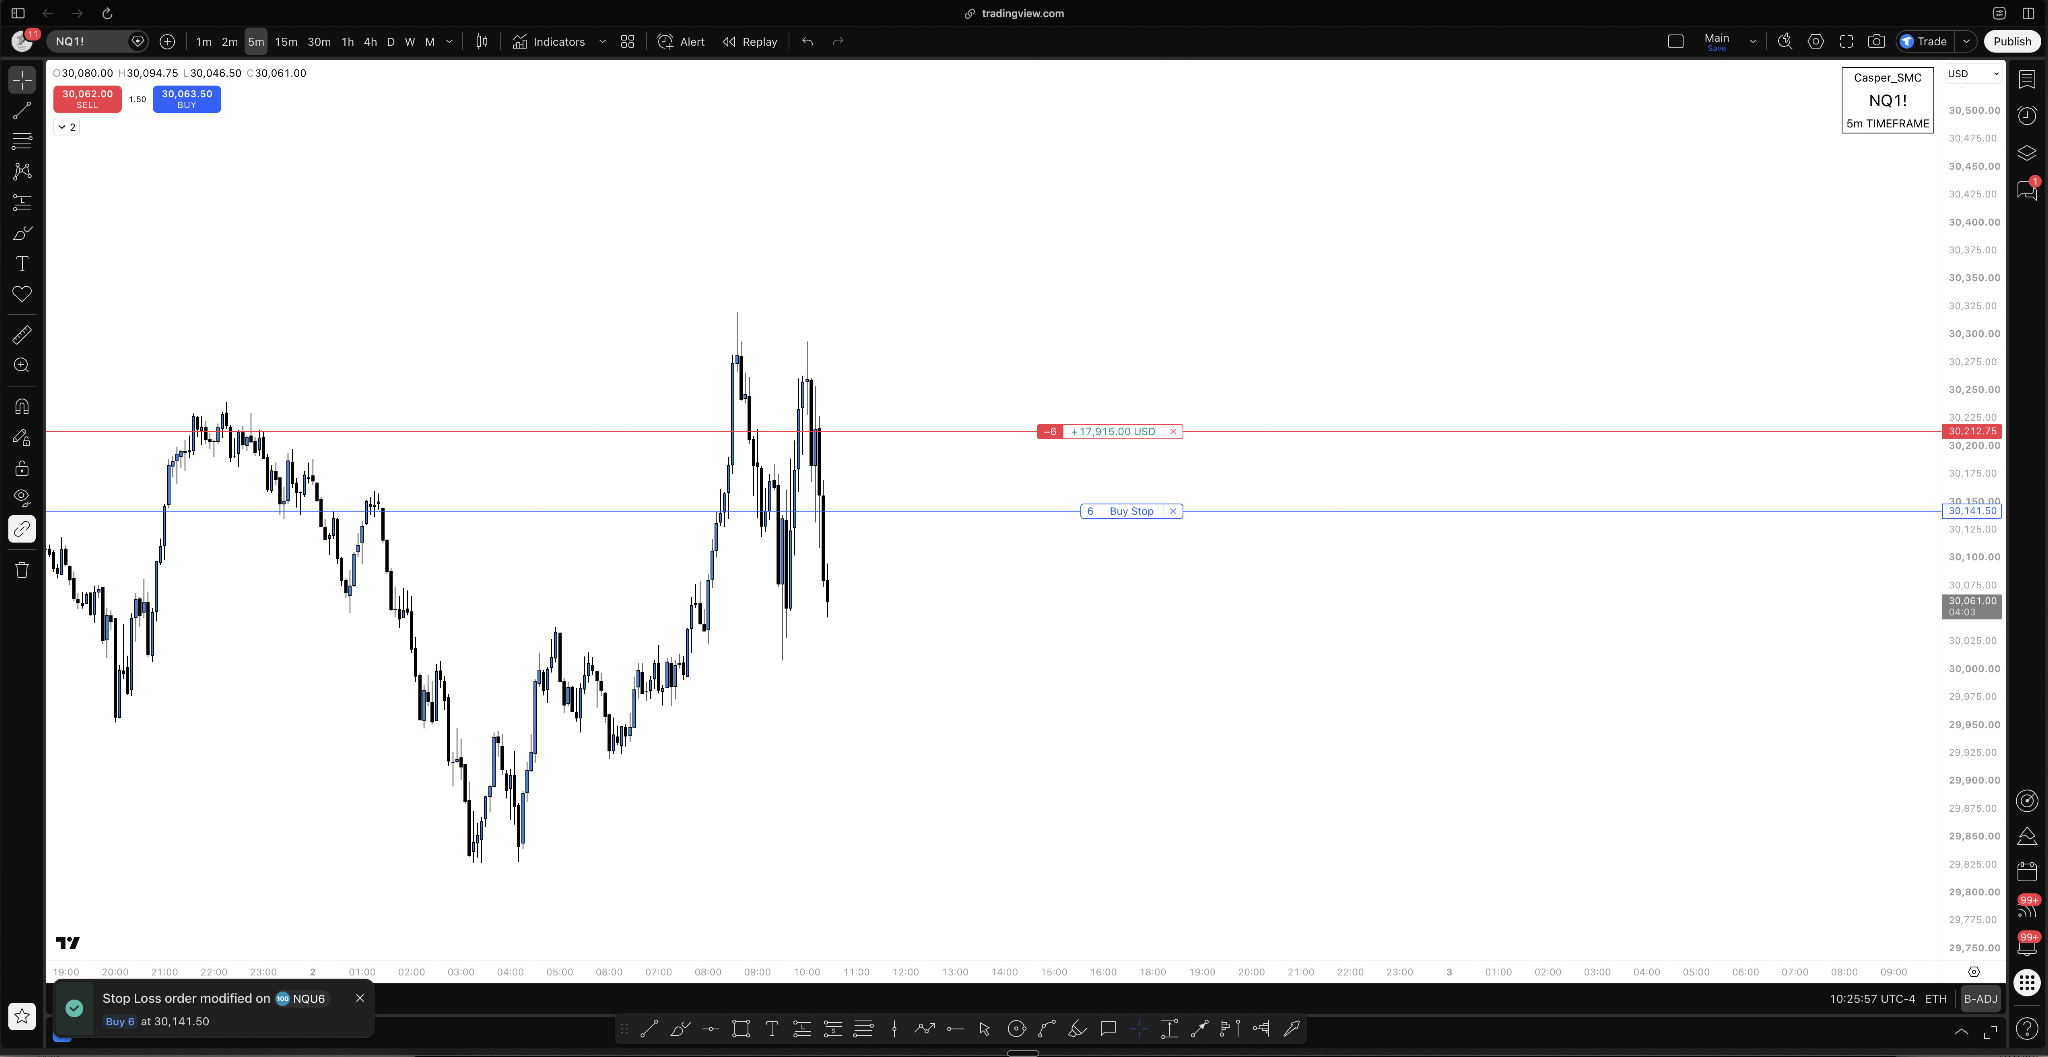
At 9:28 AM, stops moved to 30,084. The screen showed $33,000 floating. Floating means open profit at that moment. It was not the realized result and it was not permission to loosen management.
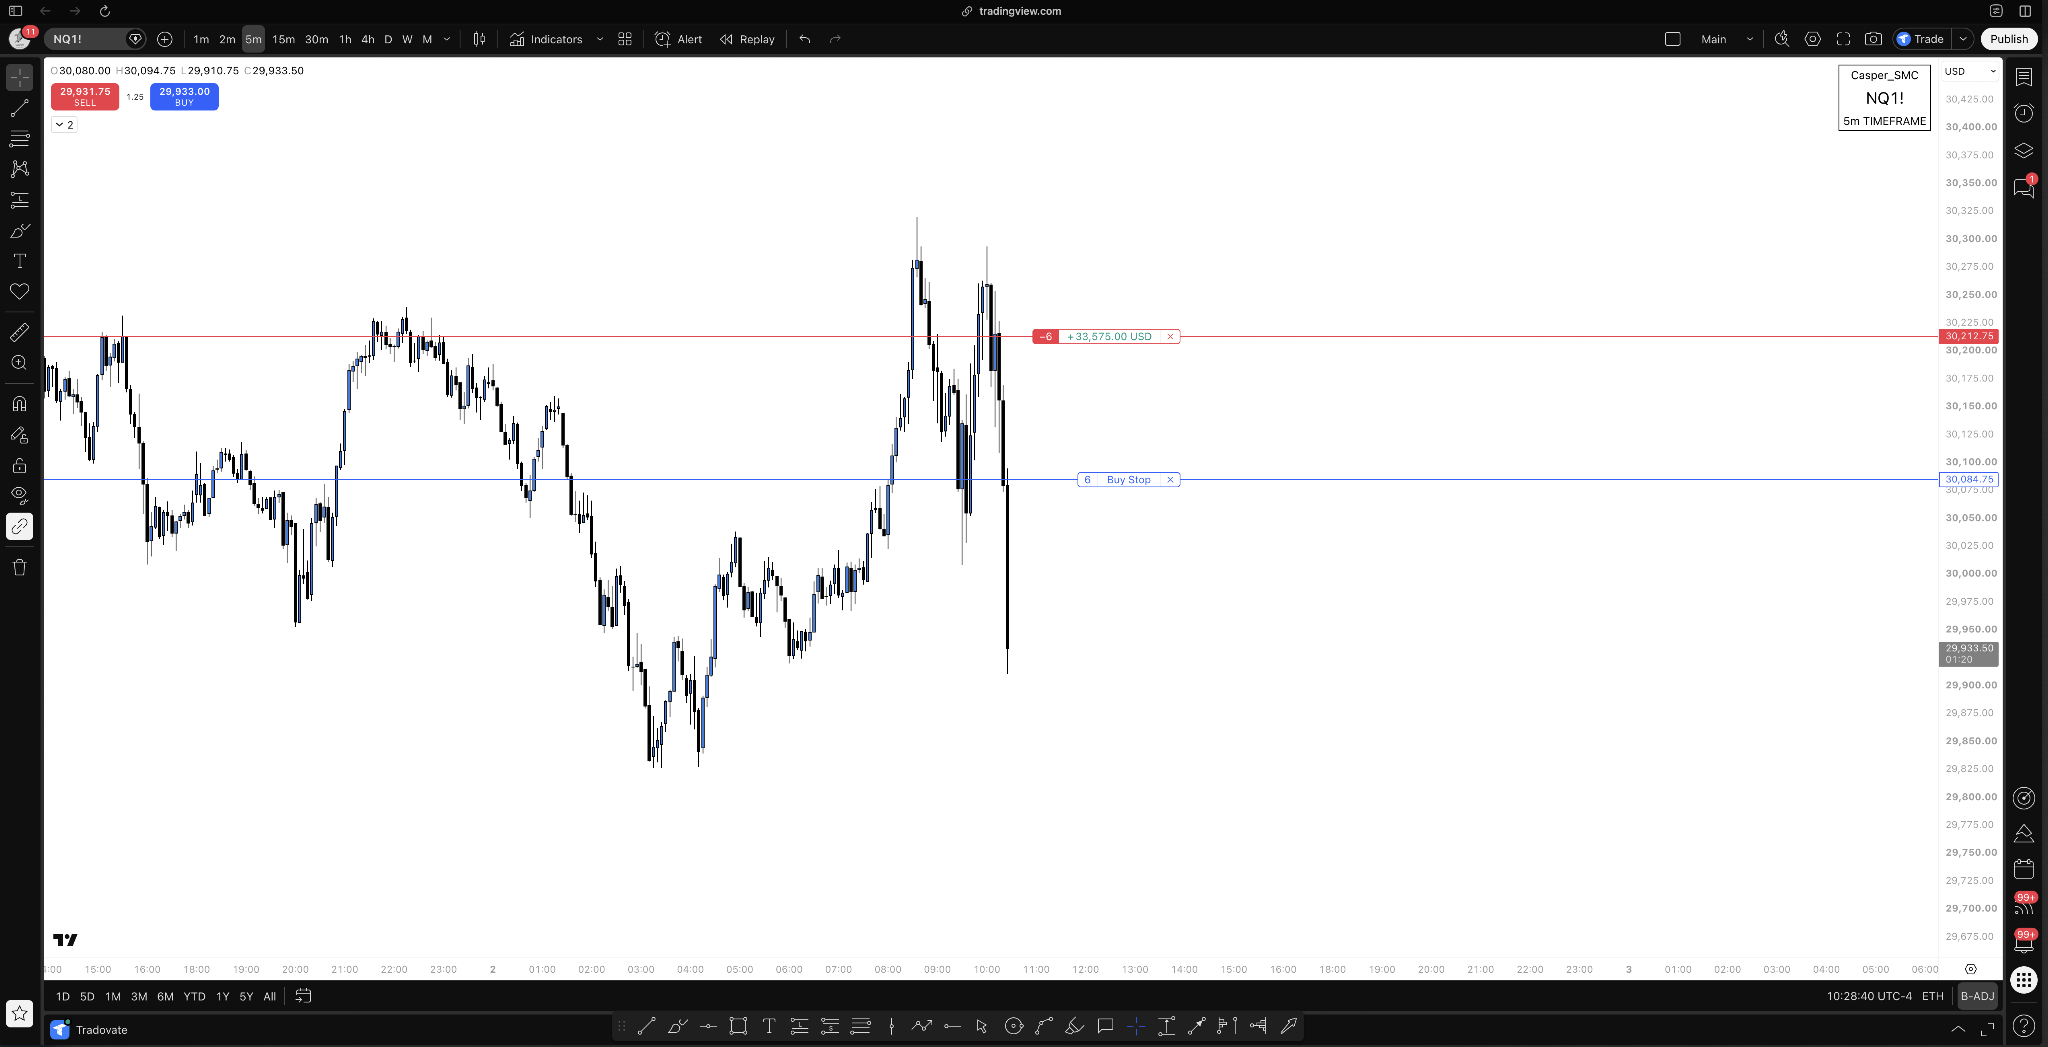
At 9:33 AM, stops moved to 30,006.
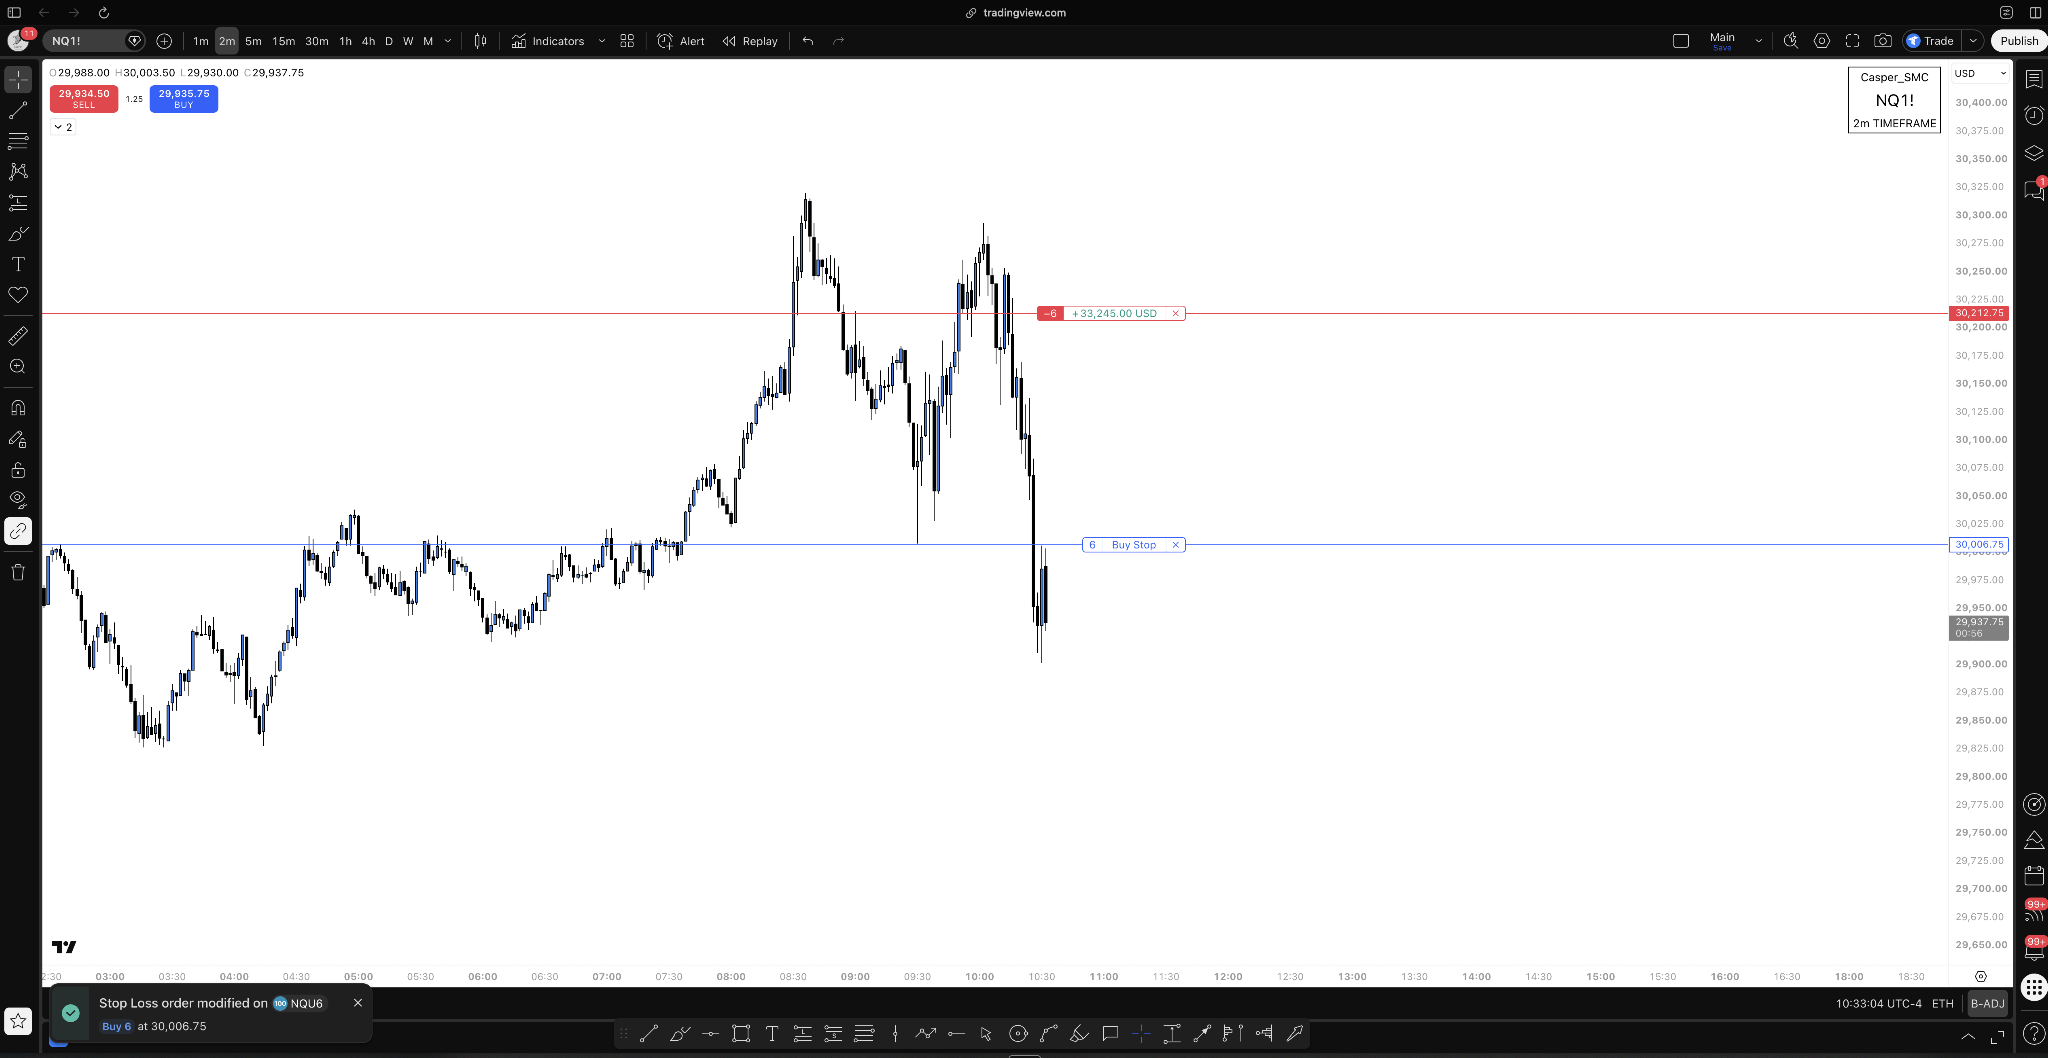
At 9:41 AM, stops moved to 29,986. This is where the shorthand crosses the 30,000 handle. "986" means 29,986, not 30,986. The stop sequence confirms it. A short stop ladder protecting a falling market must descend, and 29,986 is below 30,006.
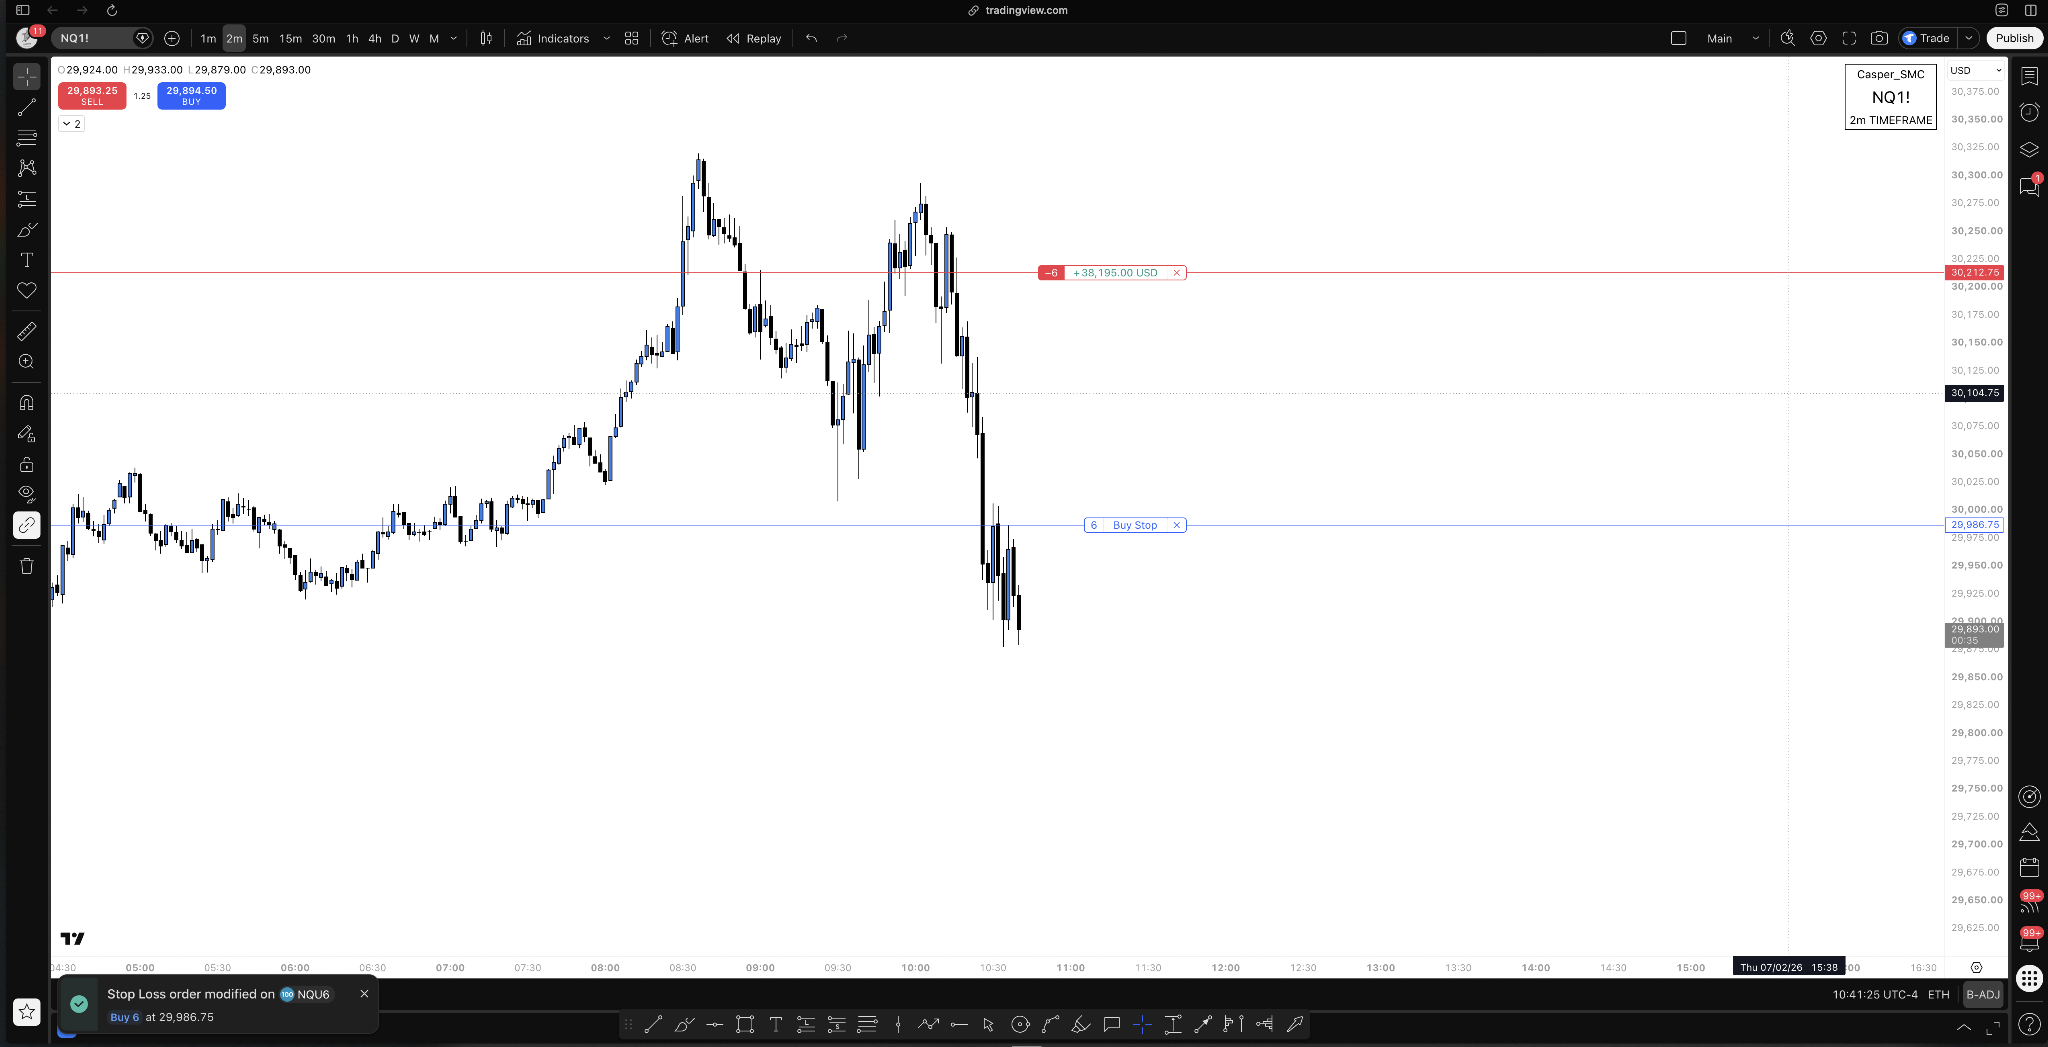
At 9:43 AM, stops moved to 29,911. The screen showed $50,000 floating, again open and not realized.
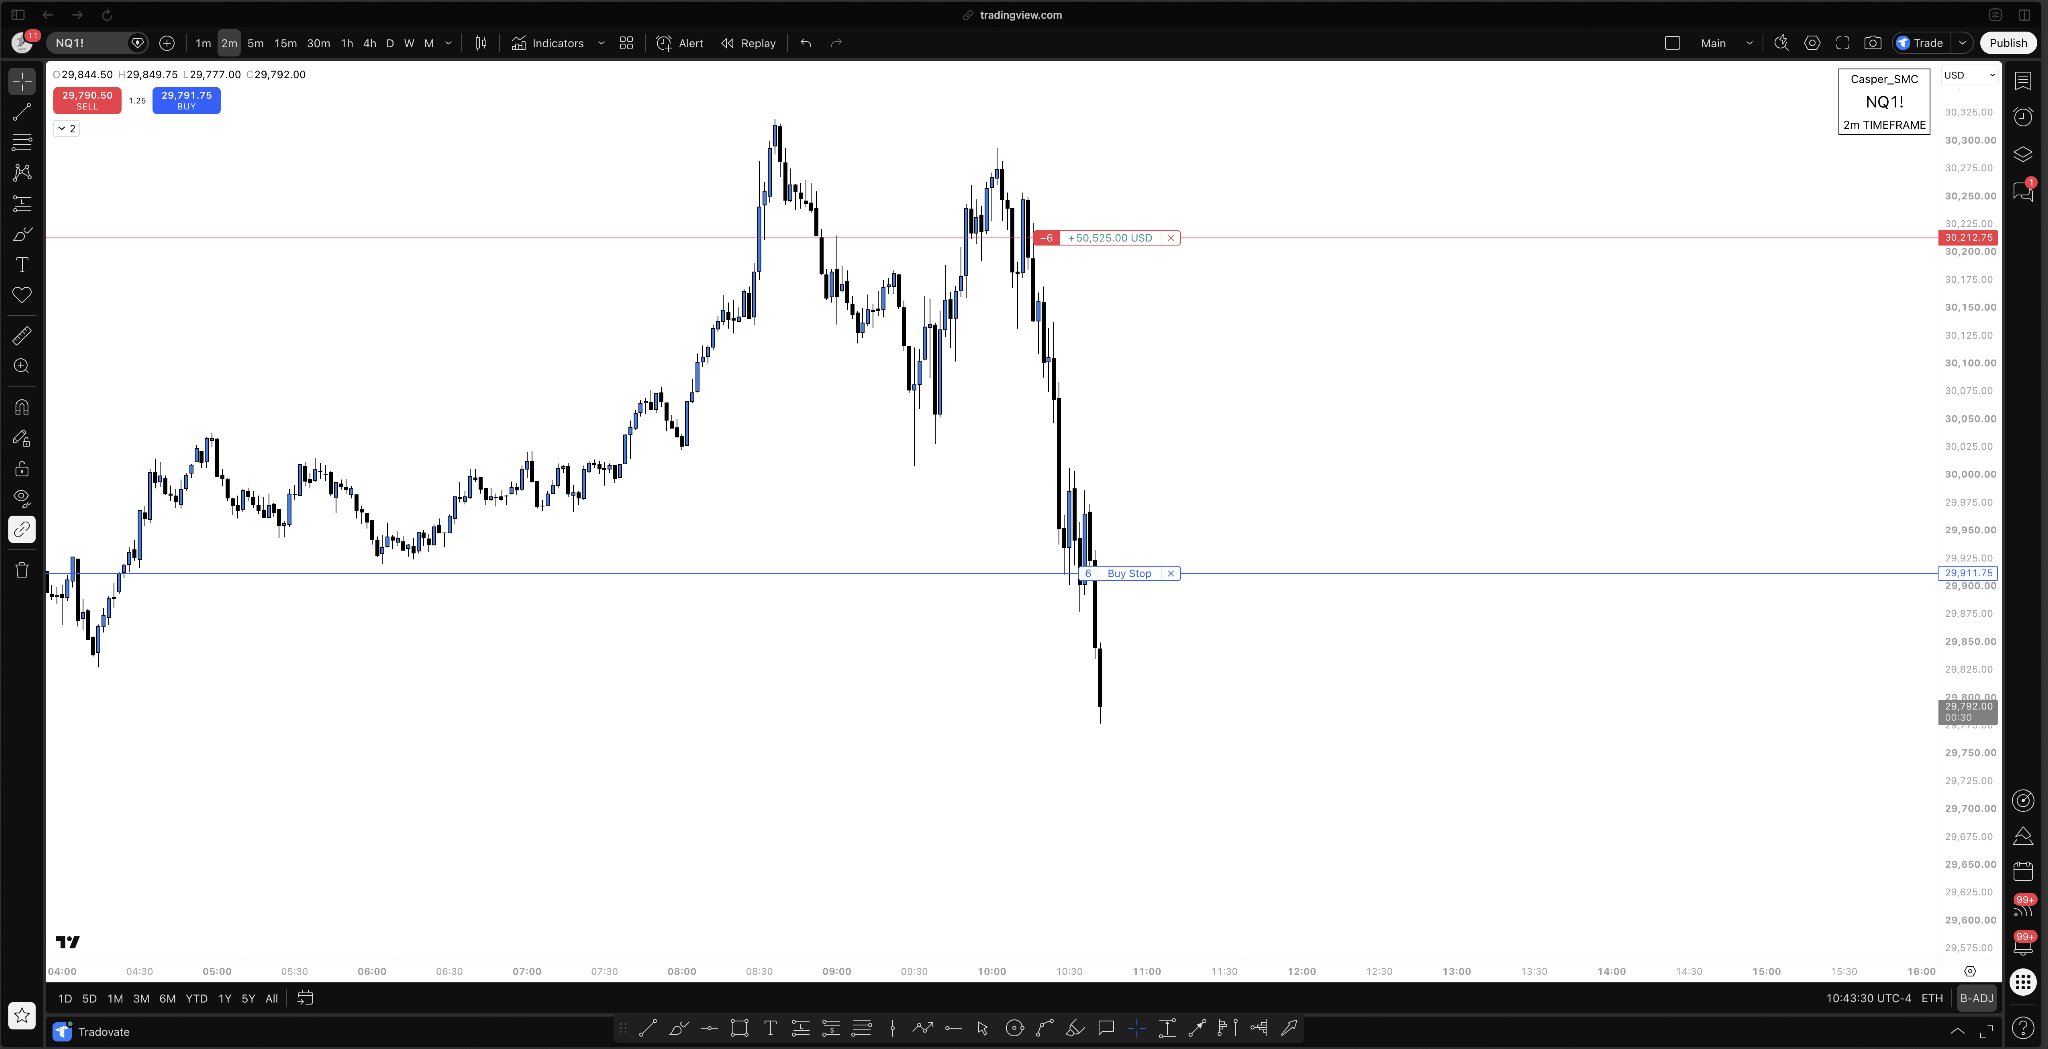
At 9:54 AM, I posted that stops were up again, without a precise level. The next precise stop I posted was 29,852.
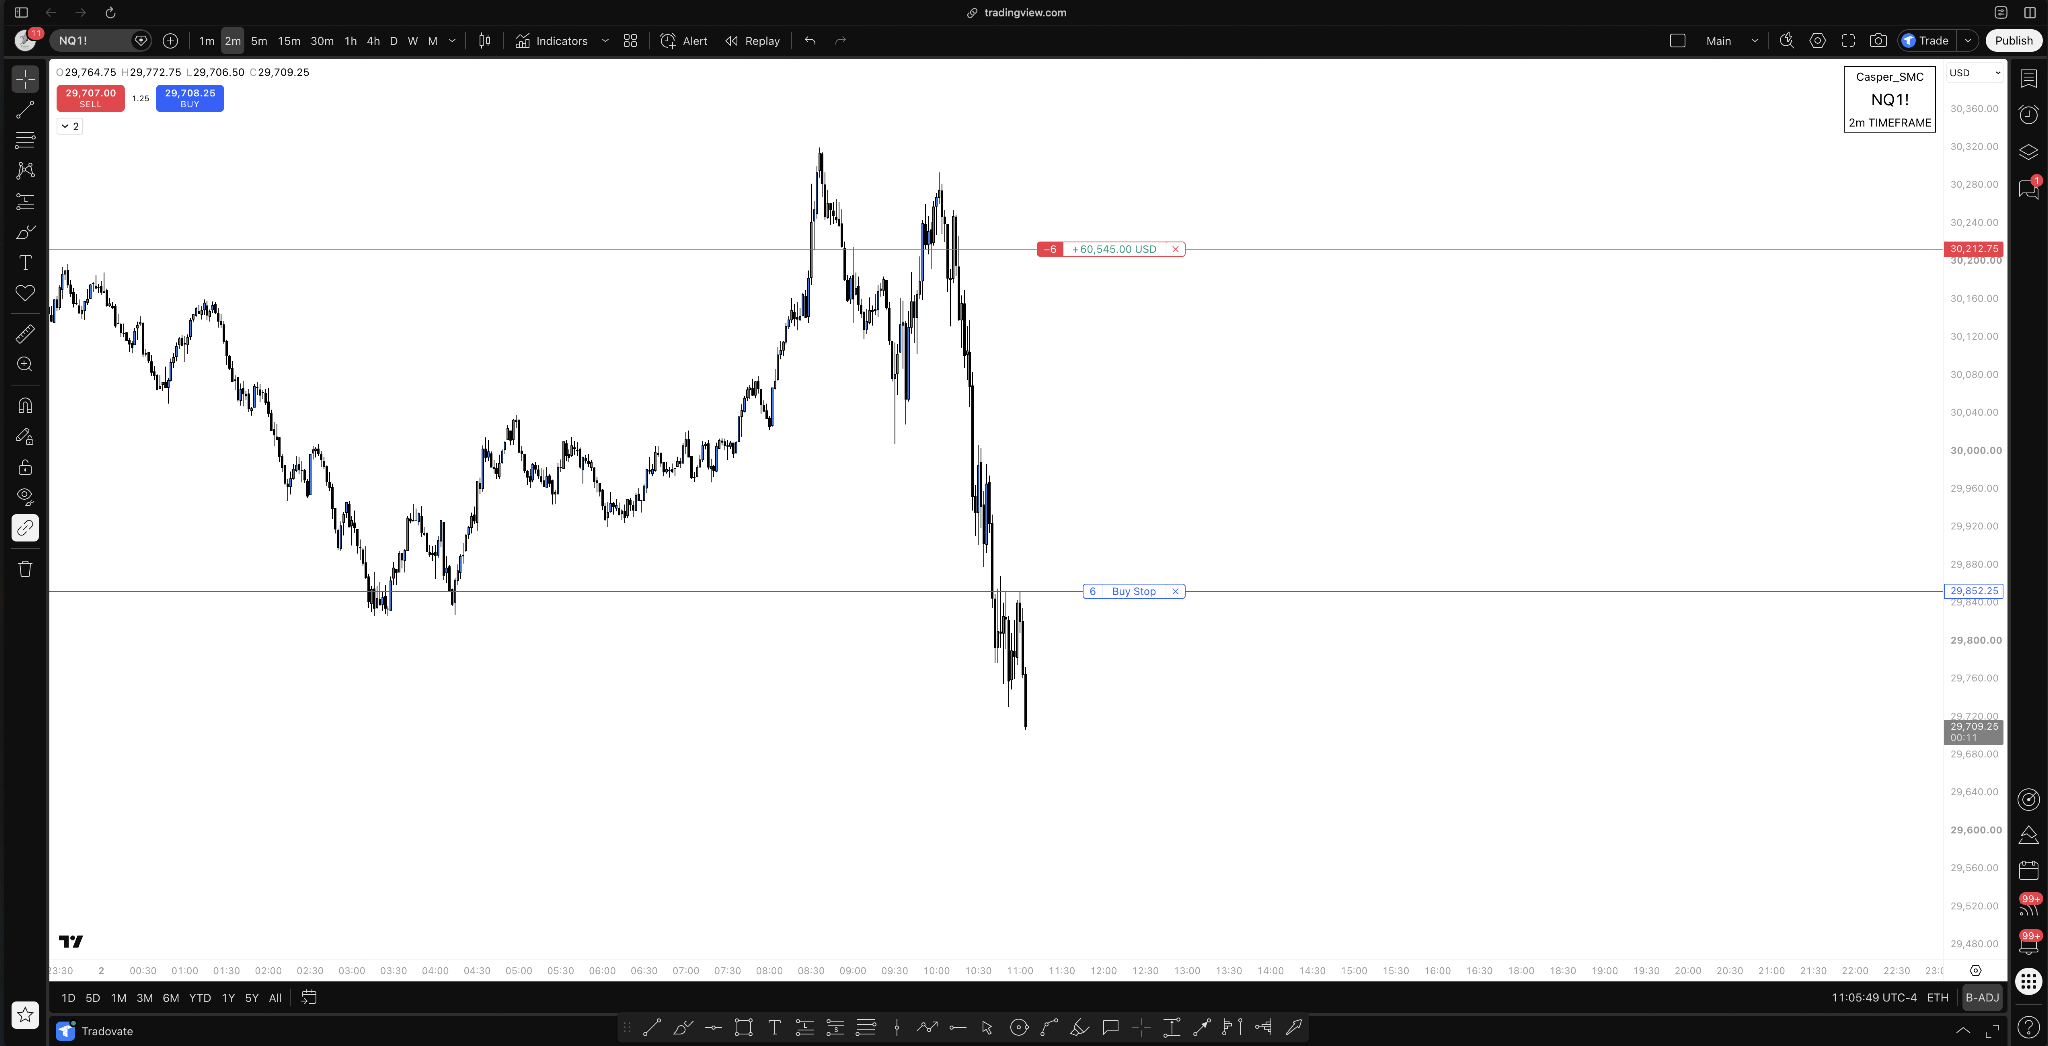
At 10:05 AM, stops moved to 29,852. At 10:06 AM, the position showed $60,000 floating. That was still open profit.
At 10:19 AM, stops moved to 29,778.
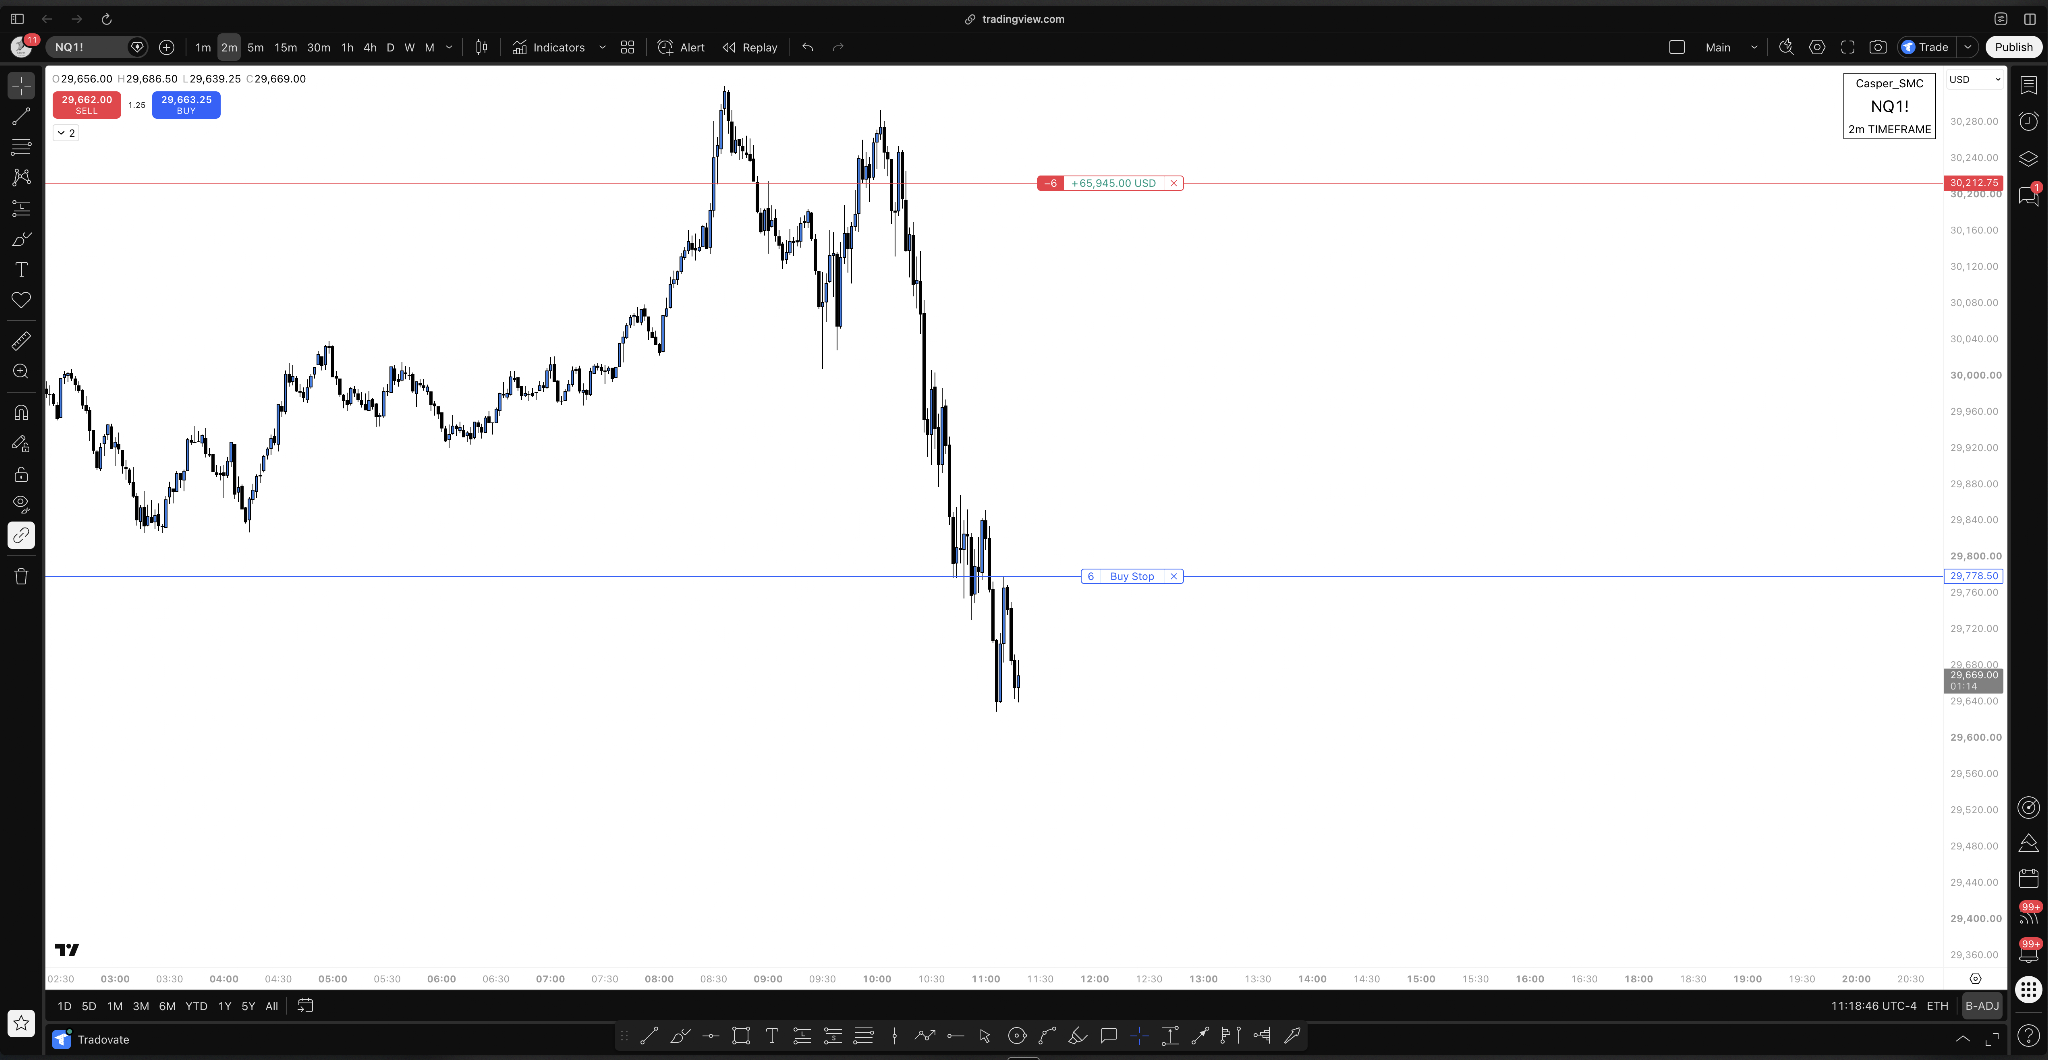
At 10:35 AM, I was fully out.
Read the decoded ladder in order: profit, 30,141, 30,084, 30,006, 29,986, 29,911, another protection update, 29,852, and 29,778. It descends correctly for a short and crosses beneath the 30,000 handle between 30,006 and 29,986. The shorthand was efficient live. The full prices make the logic obvious in review.
What the Dollar Figure Does Not Teach
In the middle of that move, at 10:10 AM, I stopped and told the room what the screenshot could not explain. I lost $383,000 over five years before I ever had a day like this. Not one bad month. Five years of being wrong and everyone thinking I was crazy. Every trader you look up to stood where you are standing and wanted to quit. The only difference is they did not.
I do not include that to romanticize losses or imply that persistence guarantees a result. It does not. I include it because people see a clean stop ladder and assume the trader on the other side was born calm. I was not. The calm came from years spent replacing random patterns with a real read.
That evening, at 5:04 PM and 5:05 PM Central, I came back to the lesson. See how powerful having the gamma data is. When you are operating on real data, many of your "trading psychology" problems go away. Most of you do not, and never did, have a mindset problem. You are just literally trading fucking blind, basing what you do off some random pattern, and deep down you know it.
That is the chapter close because it is the worldview, the method, and the trade in one line. The negative gamma condition told me expansion was plausible. Value gave me the bearish location and the reclaim that would make me pass. Order flow supplied the trigger. The stop ladder managed what the market proved. Without that order, the same chart is just another shape in the junk drawer.
Part IV
Live Walkthrough Two, July 14, 2026
Phase 1: Build the Plan Before the Market Asks Me to Act
The July 14 session shows the same machine from the long side and makes the management layer even clearer. I posted the NQ plan at 7:47 AM Central. Every zone used during execution was defined before live pressure.
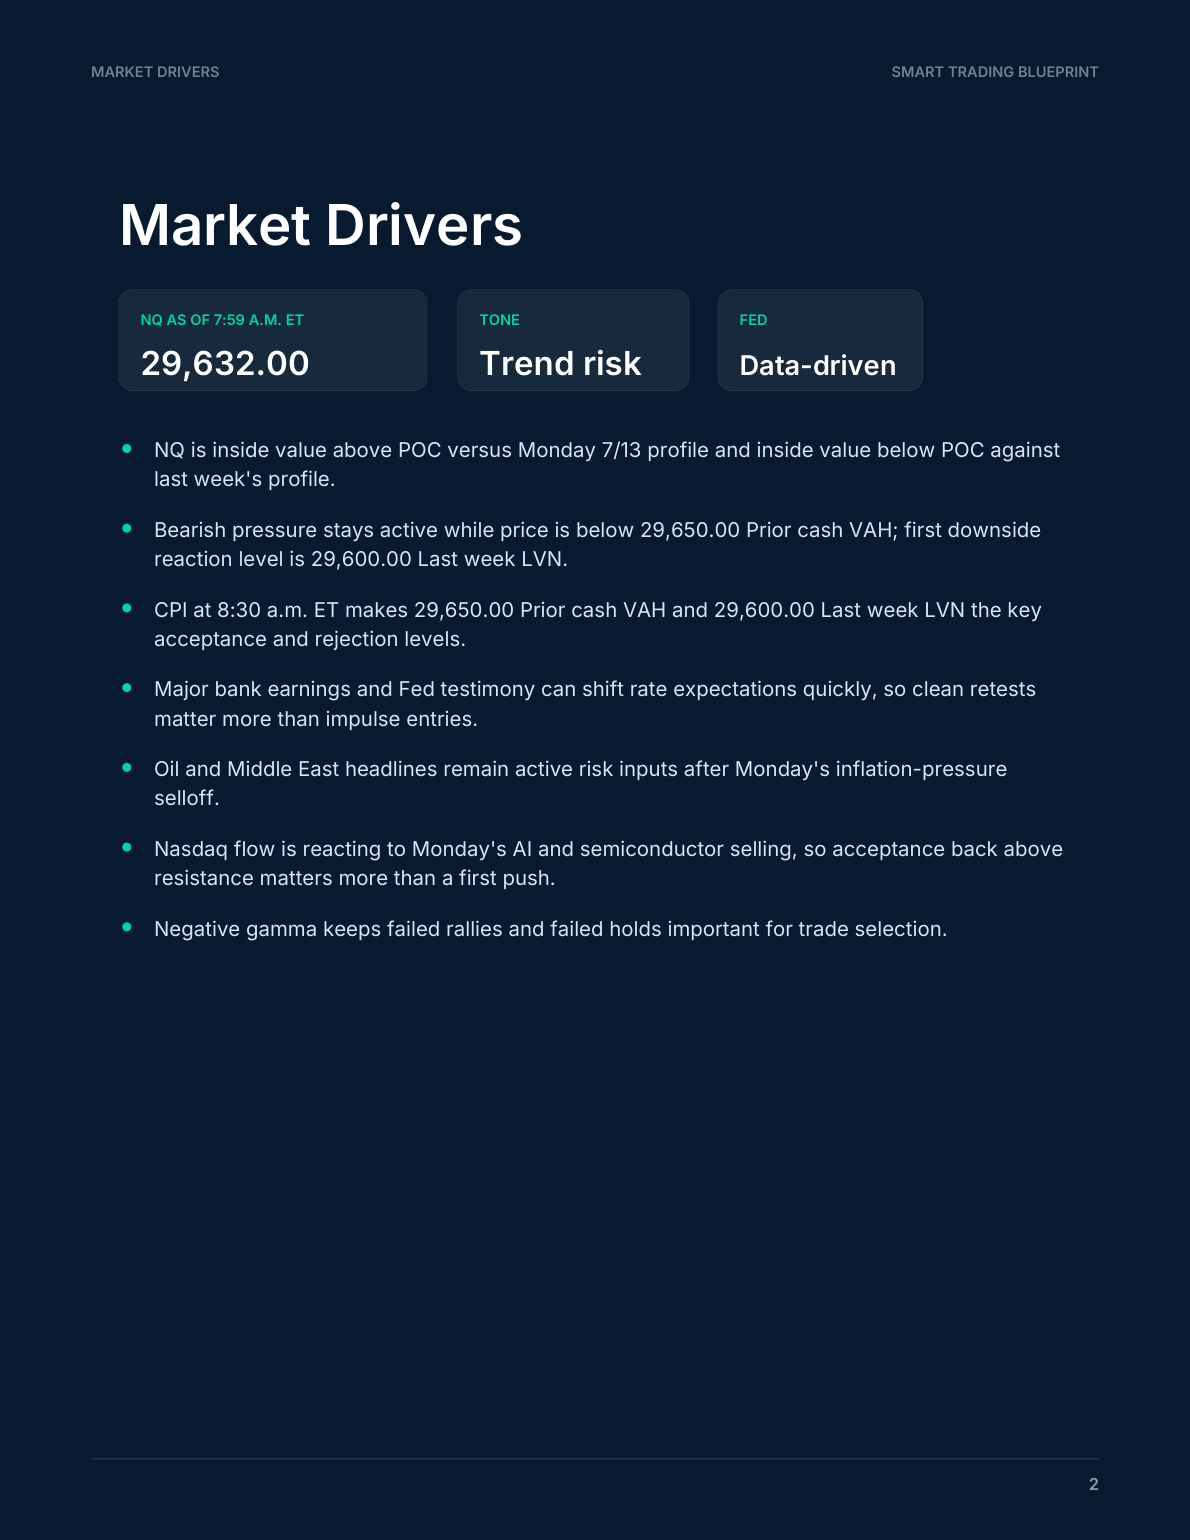
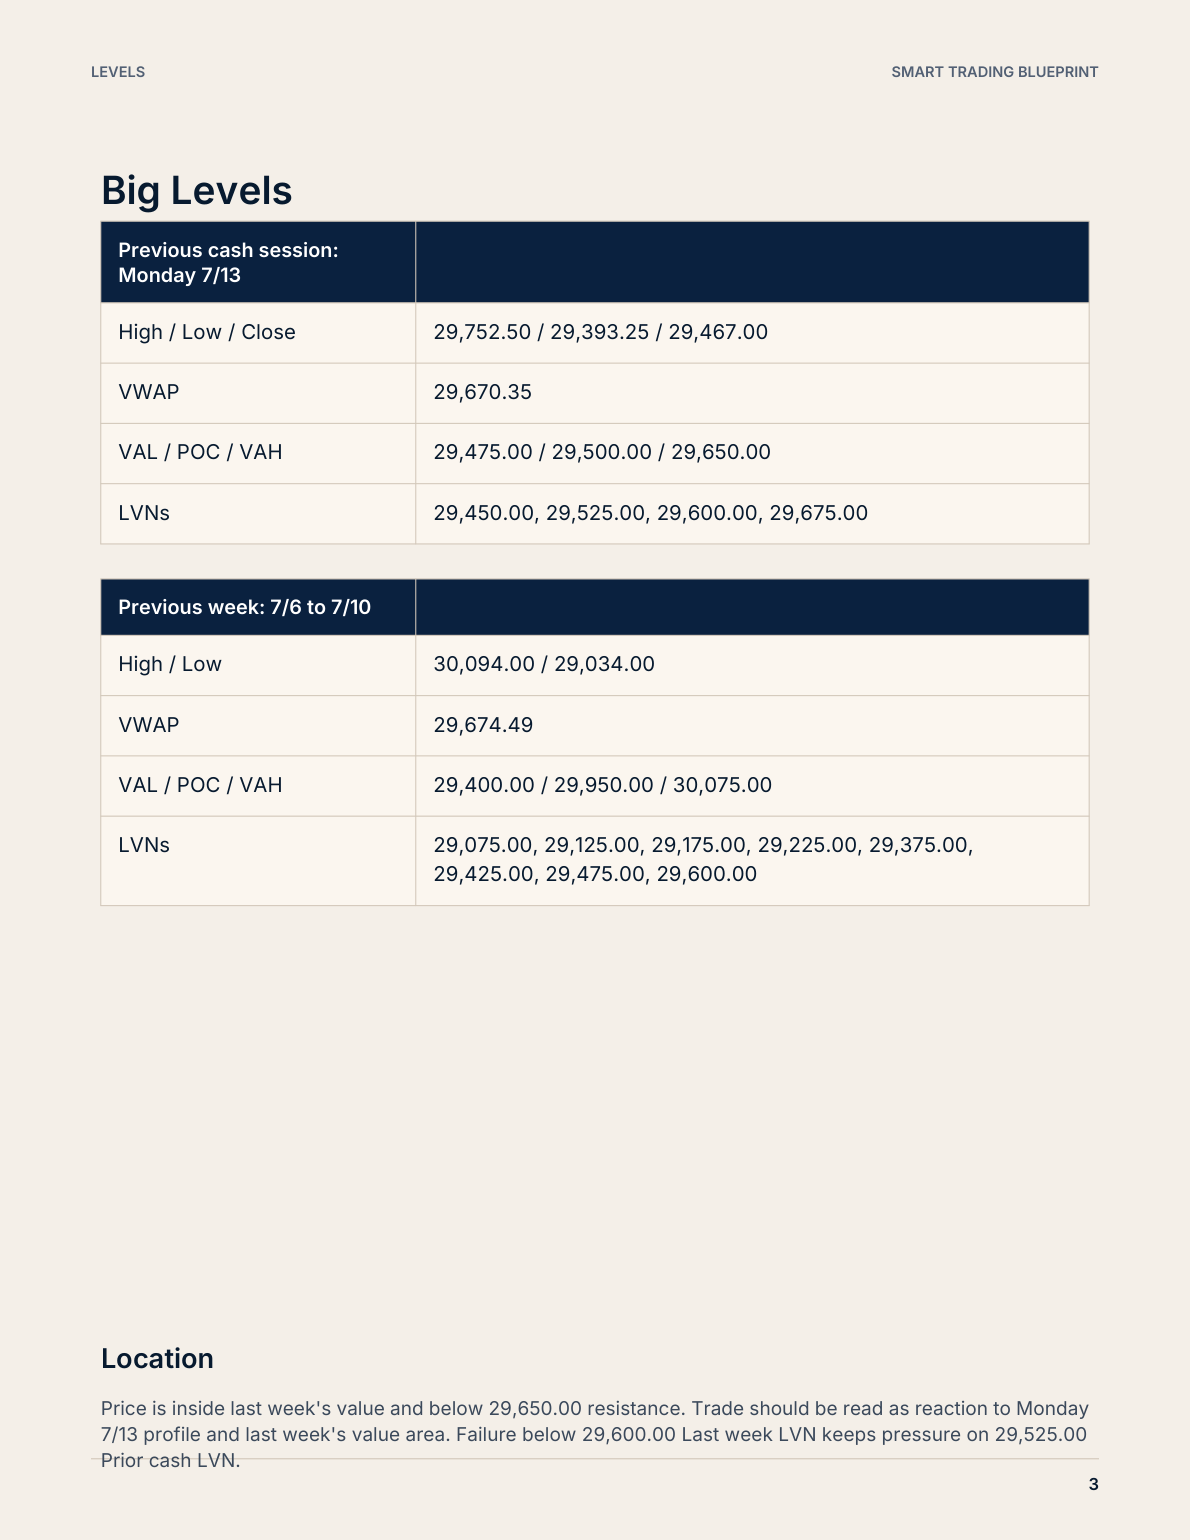
NQ was above yesterday's value, so I came in bullish. The first zone was the previous day's VAH. The next zone beneath it was the previous day's VWAP. I wanted a long only after seller effort failed, passive buyers proved real, buyer activity improved, and price accepted above balance.
If the first zone gave me nothing, I would rotate to the second. Bias did not obligate me to defend a level. It told me which confirmed trigger I preferred.
Phase 2: Ask the Balance Question at the First Zone
At 9:08 AM, price reached the previous day's VAH. I watched instead of entering on touch.
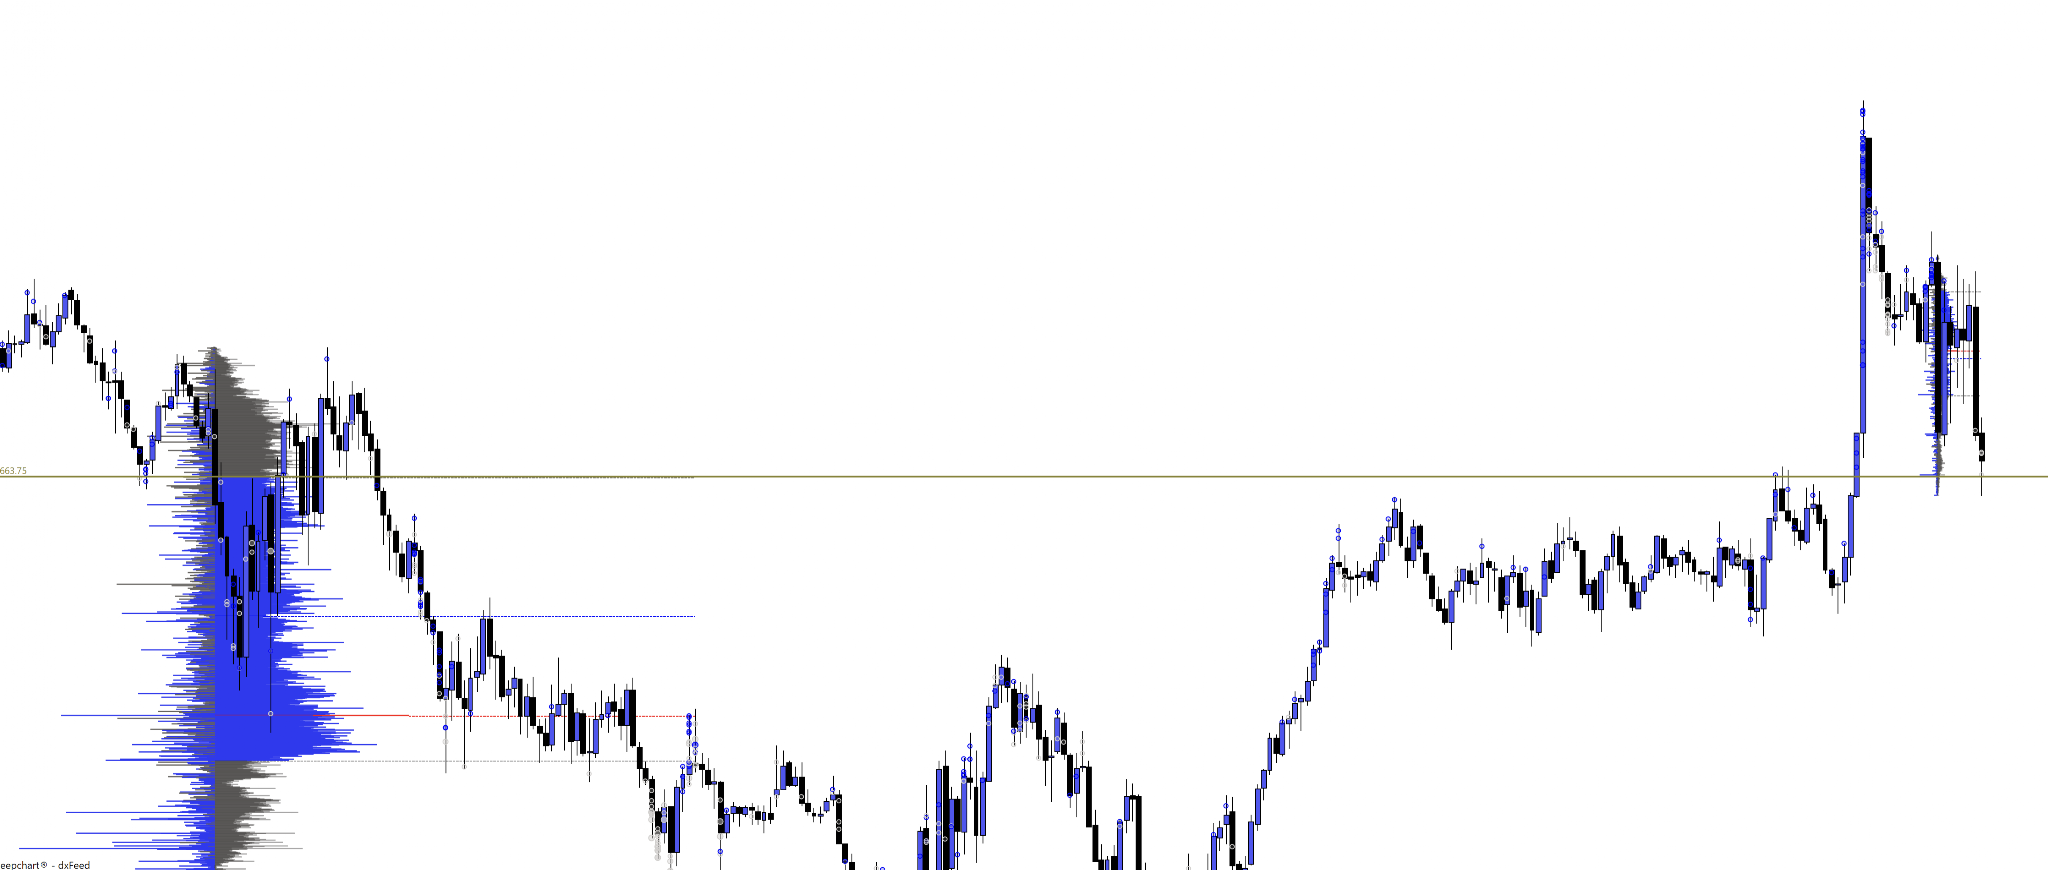
A range began to form. The heatmap showed passive buyers below, but I needed to know whether they had deeper pockets than the aggressive sellers. A long required seller effort to weaken, buyer aggression and volume to increase, and price to hold above the balance.
A sell trigger could have appeared if sellers melted through the bids and pushed lower. I was less interested in executing that branch because the daily condition was bullish. Condition filters which triggers deserve risk. It does not erase the live tape.
That distinction matters. A lot of traders turn a bullish daily read into blindness. They decide sellers cannot be in control because their plan says long. I do not do that. The auction can be bearish locally while the larger condition still makes the short unattractive. I can acknowledge seller control, refuse a cramped counter-condition trade, and wait for the next long zone without contradicting myself.
The long confirmation never arrived. No dice. I moved to VWAP.
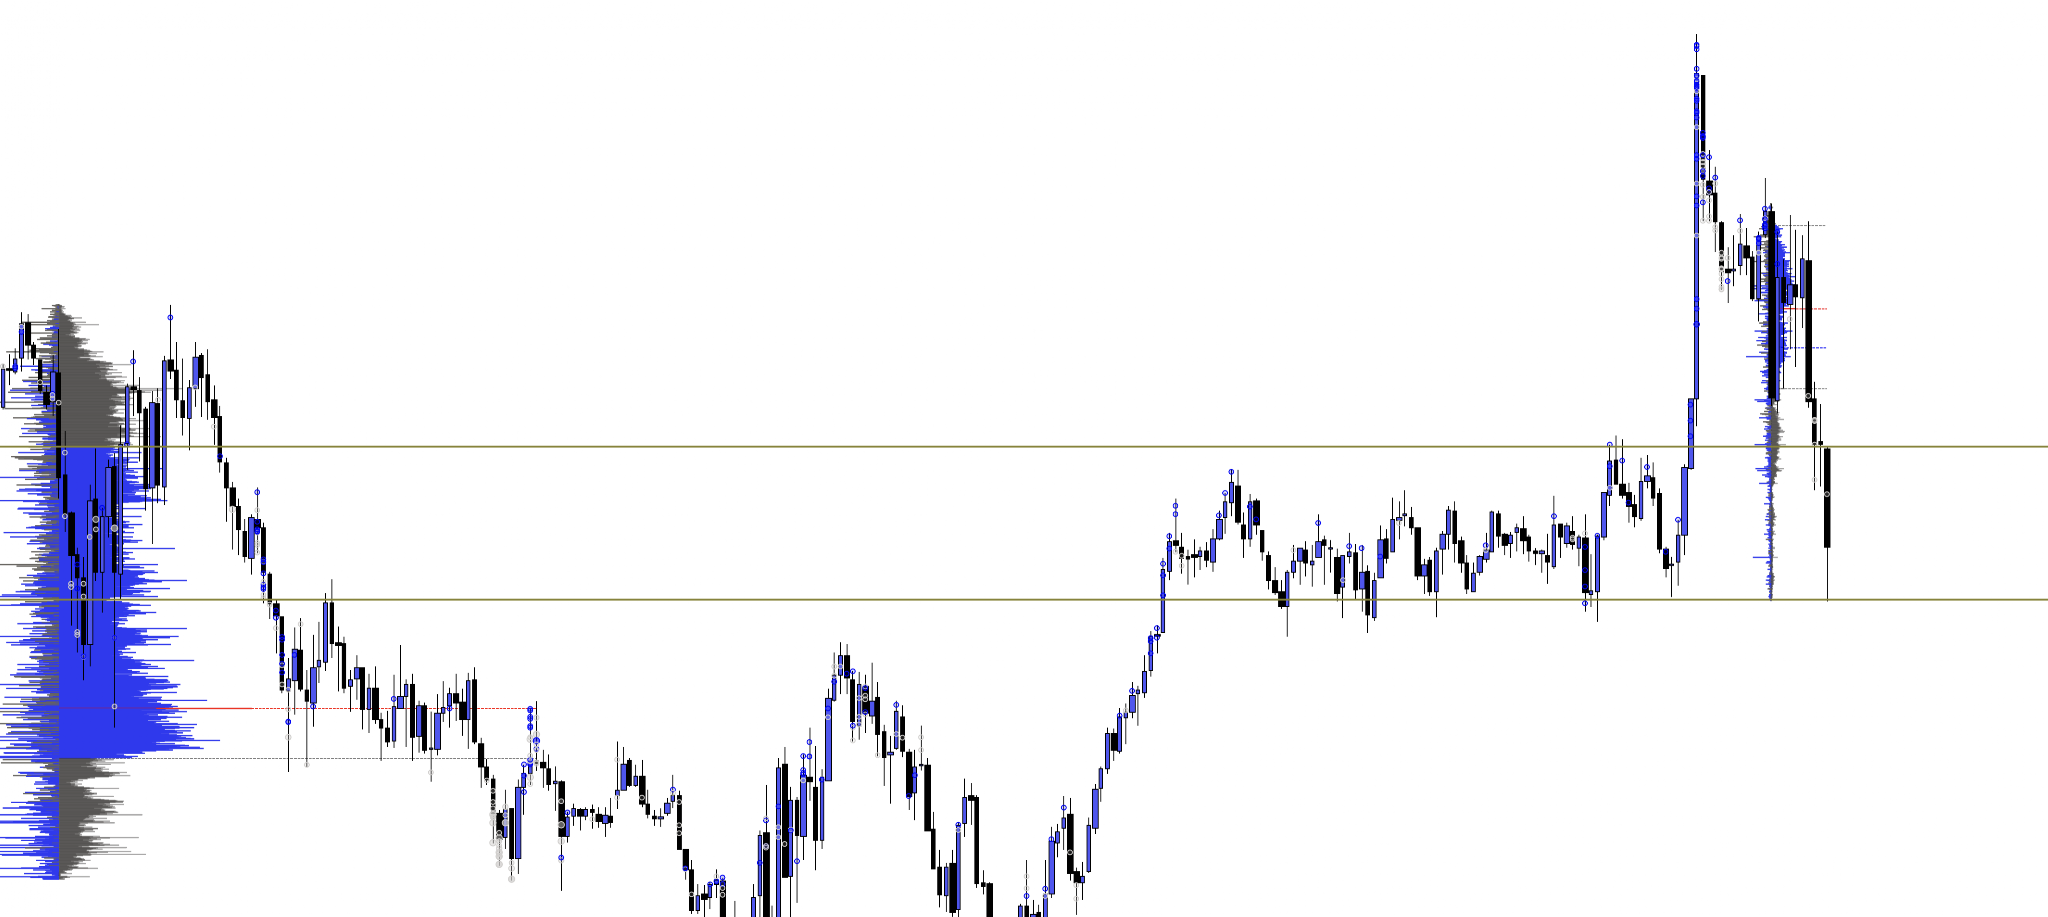
I also passed on a possible short from VAH to VWAP because there was not enough room. A failed level can create continuation, but only when the distance to the next meaningful area supports the risk. Sometimes reacting means waiting at the next zone.
Phase 3: Read Absorption at VWAP and Execute Trade One
At 9:19 AM, sellers hit VWAP with a massive increase in volume and aggression, but price paused. Their effort did not get the expected result. That was the beginning of the absorption read.
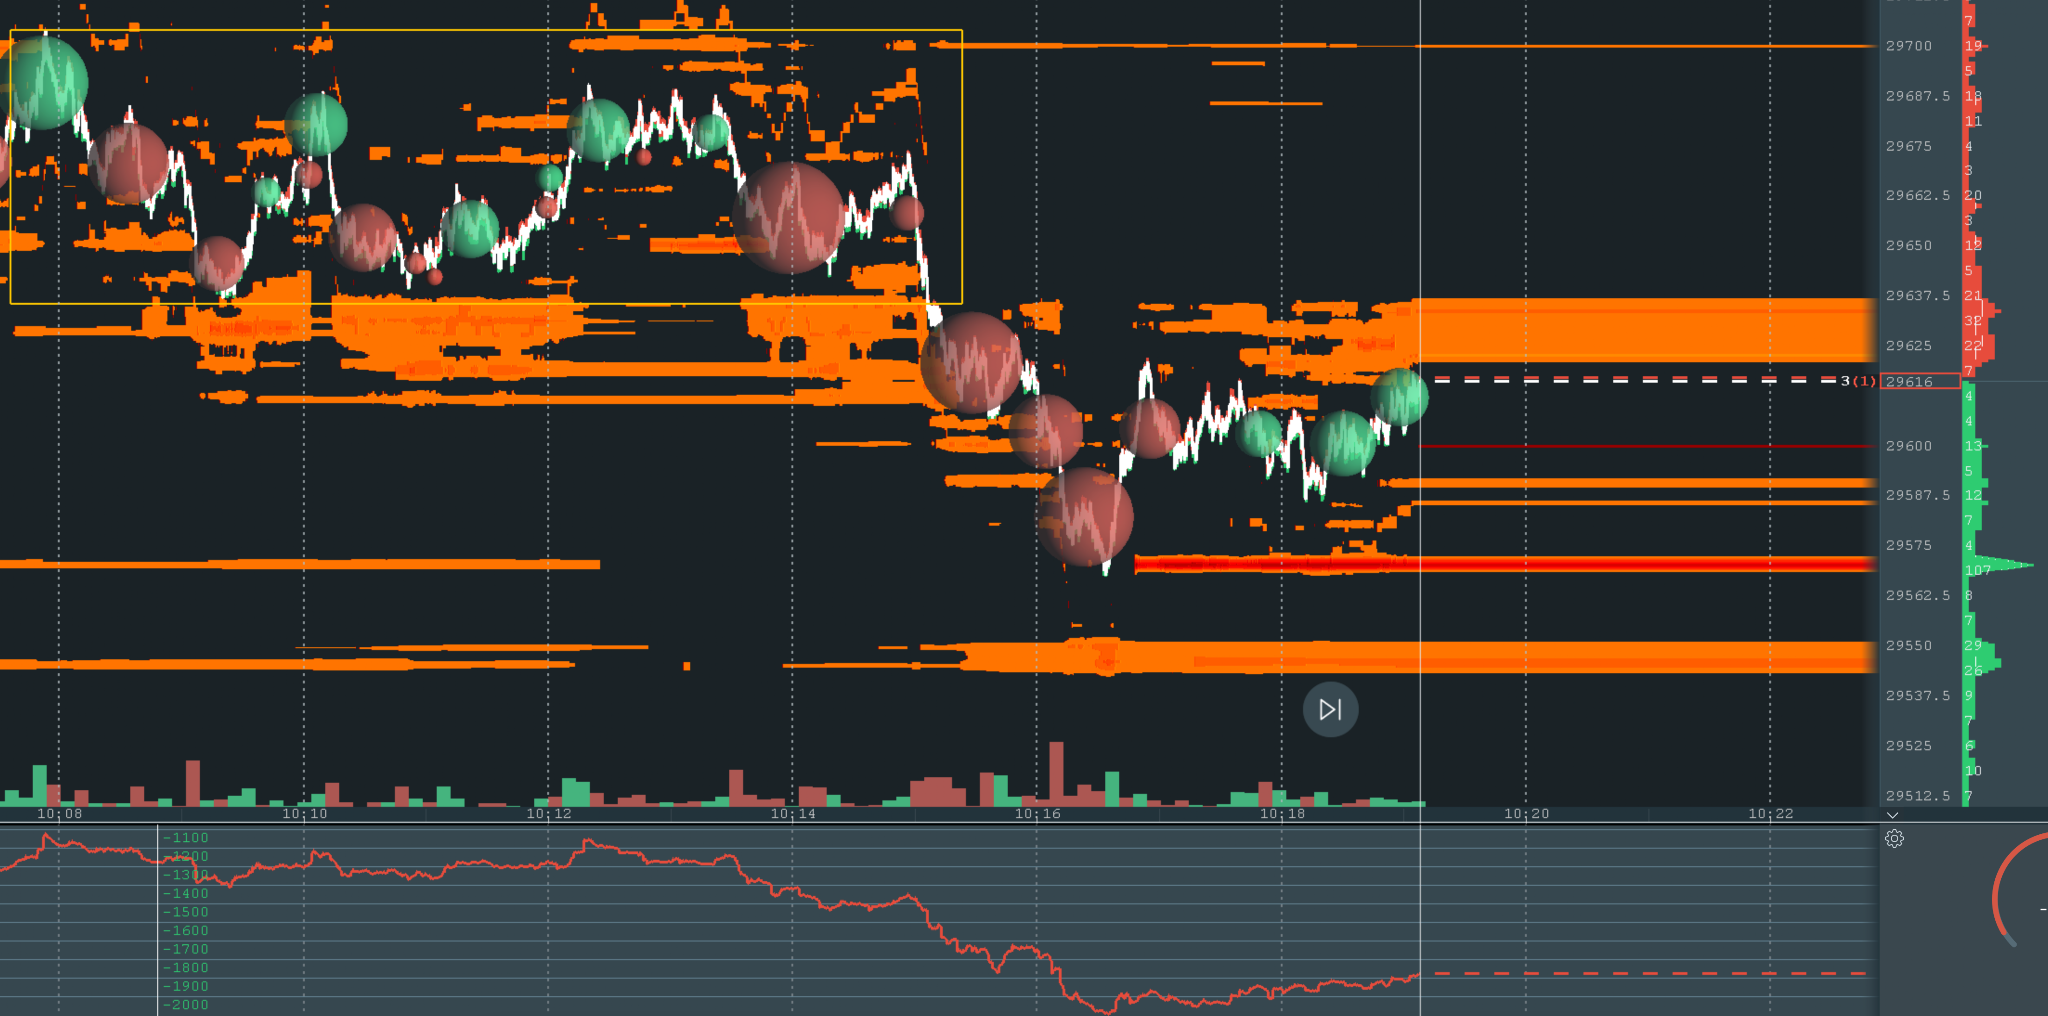
I did not assume visible bids were real. I watched whether passive buyers reloaded after fills, added size, or lifted their limits. Then the pieces arrived. Volume increased. Heatmap liquidity rose with price. A large passive order remained down at 106, while other buyers raised bids and showed a willingness to pay higher. Buyer aggression and buyer volume increased. I would have preferred a little more aggression, which affected the setup grade and risk, but the decision stack was present.
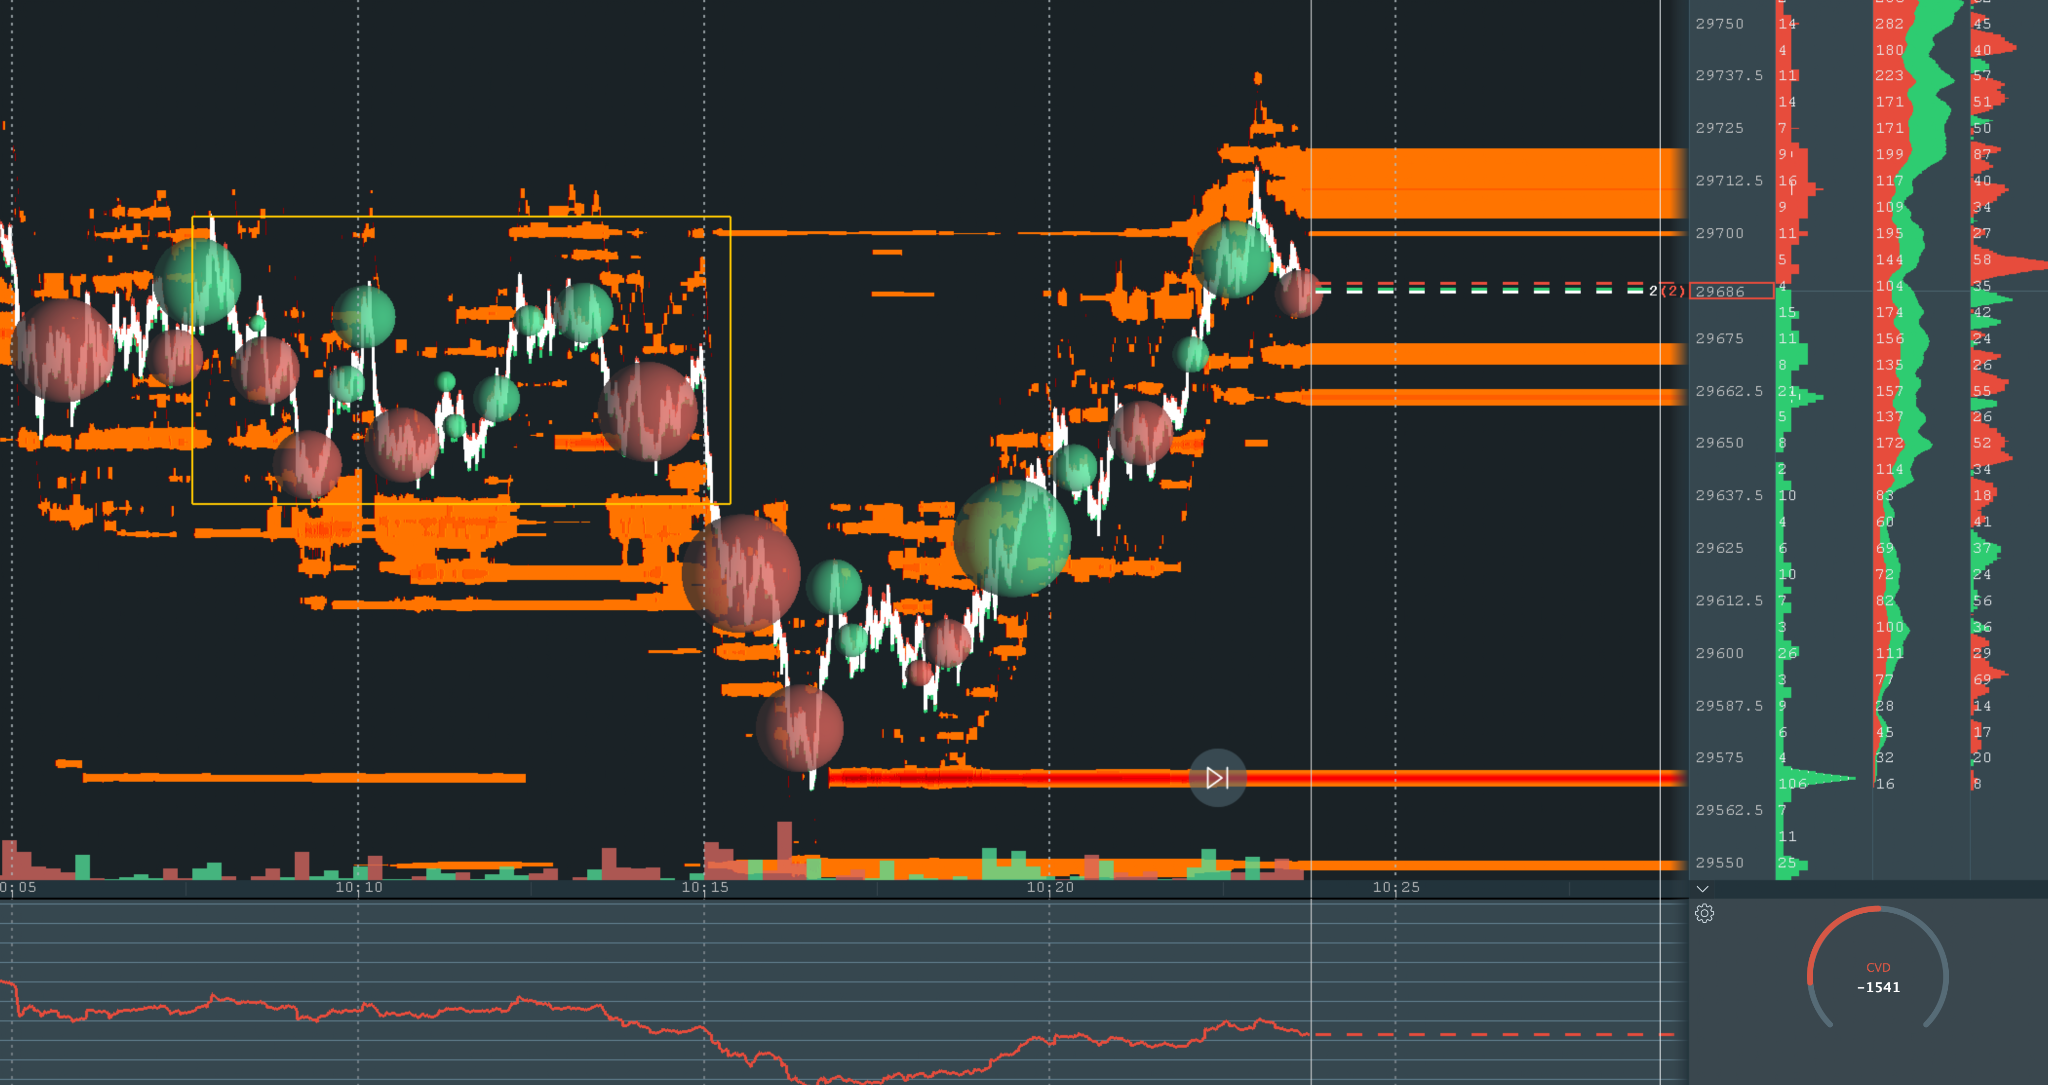
I was bullish above yesterday's value. Price reached a planned zone below. Sellers were absorbed. Buyers lifted and price confirmed. I executed the long. My system made the decision for me.
This is how order flow improves an existing setup. I do not need to throw away every pattern name. A liquidity sweep is an auction in which one side attacks and fails. A breakout is a key level failing and price accepting beyond it. Understanding the participants underneath the label tells me which version is real enough to trade.
Phase 4: Build the First Stop Ladder From New Control
The initial stop belonged at the base of the move, the last pivot where the long thesis would fail. I would not trim it just because price moved in my favor. I wanted a second balance or another leg with acceptance above the high.
At 9:27 AM, price popped above the high with plenty of volume, but it had not held for more than a few seconds. The battle was unresolved. Until buyers created a new reference point, the original stop stayed at the base.
That waiting is a decision. Moving to break-even from nerves can place the stop inside the same battle that justified entry. Normal rotation takes you out even though control never changed.
I widened my Bookmap view to roughly two-minute slices and treated the larger range as the active balance. Bookmap is the order book visualization platform shown in the screenshots. Its time slices change the visual zoom. There is no magical timeframe. I used the view that made a meaningful fight readable and kept it consistent so I could not manufacture tiny pivots to justify what I already wanted.
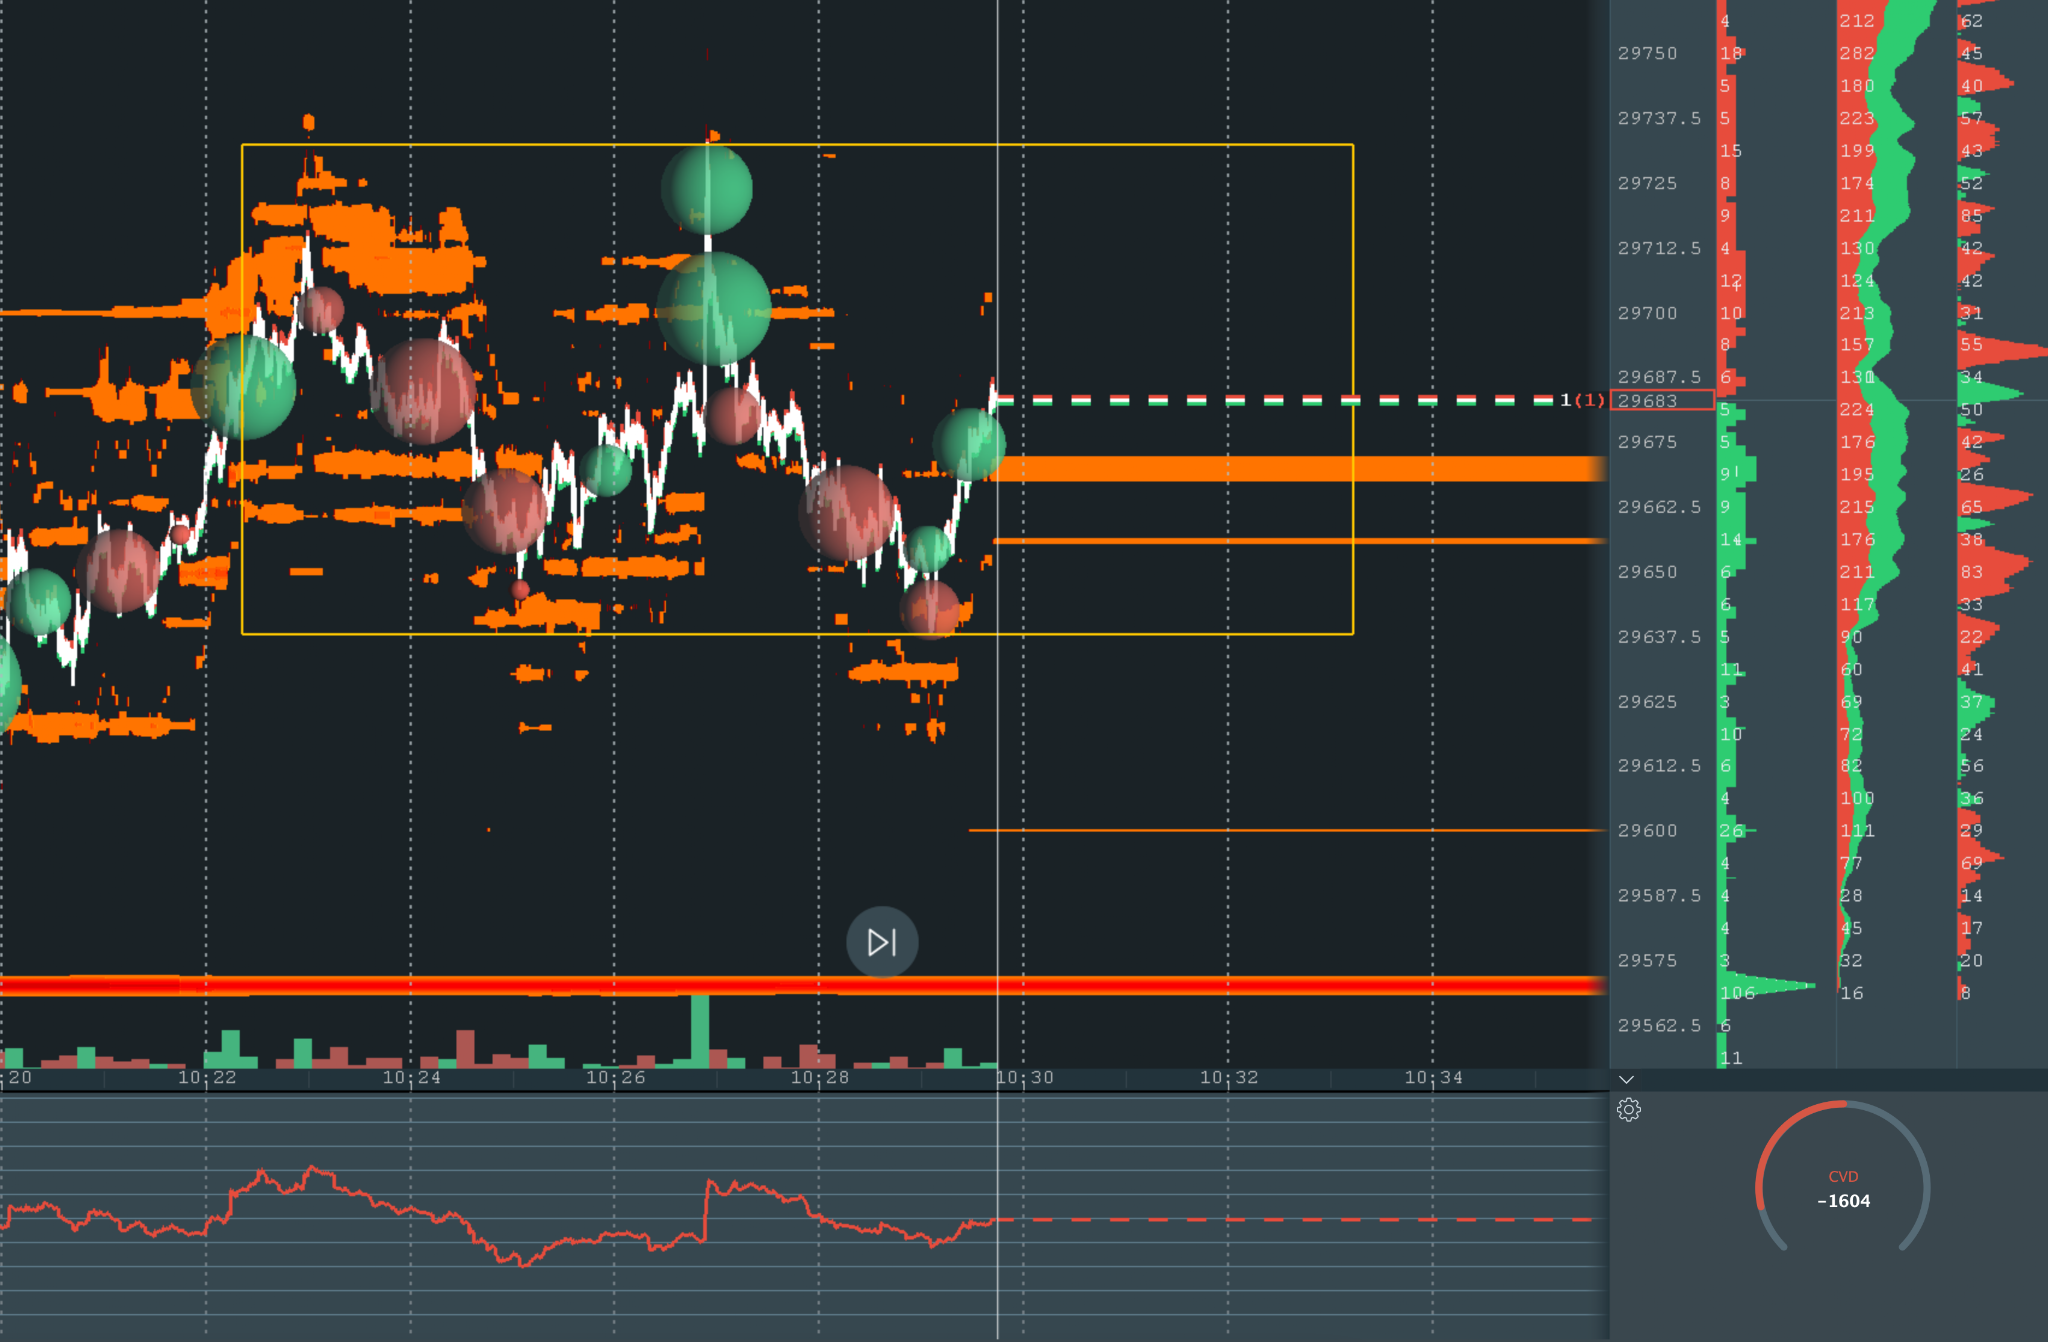
At 9:34 AM, passive buyers trailed their limits higher beneath price. A sharp move followed, giving me a new won battle and a new stop reference.
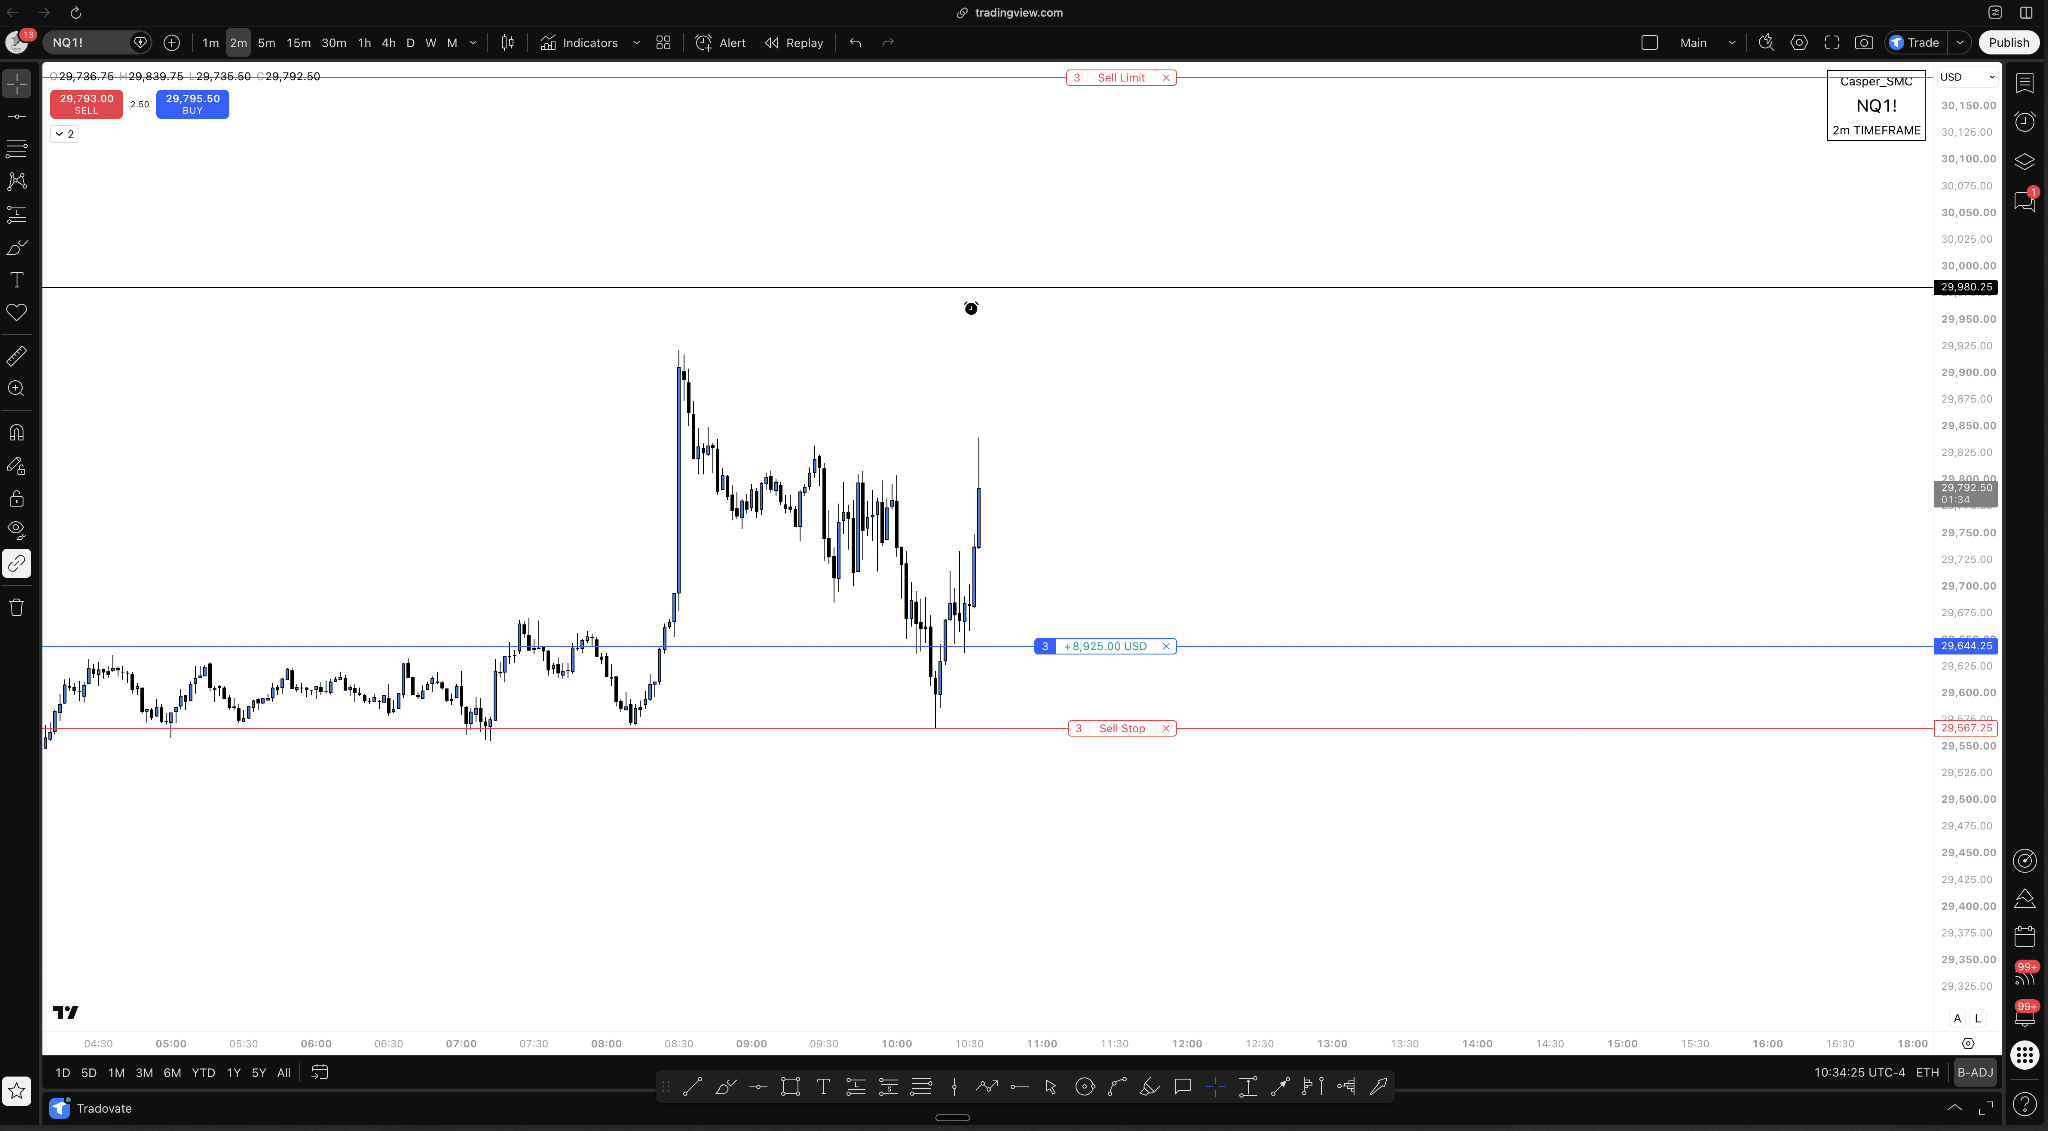
I also checked Deepcharts, software that marks unusually large executed trades with bubbles. The large aggressive buyers became positions I did not want price to hold beneath. A tap could be normal. Sustained trade below them could trap those buyers and turn them into selling fuel.
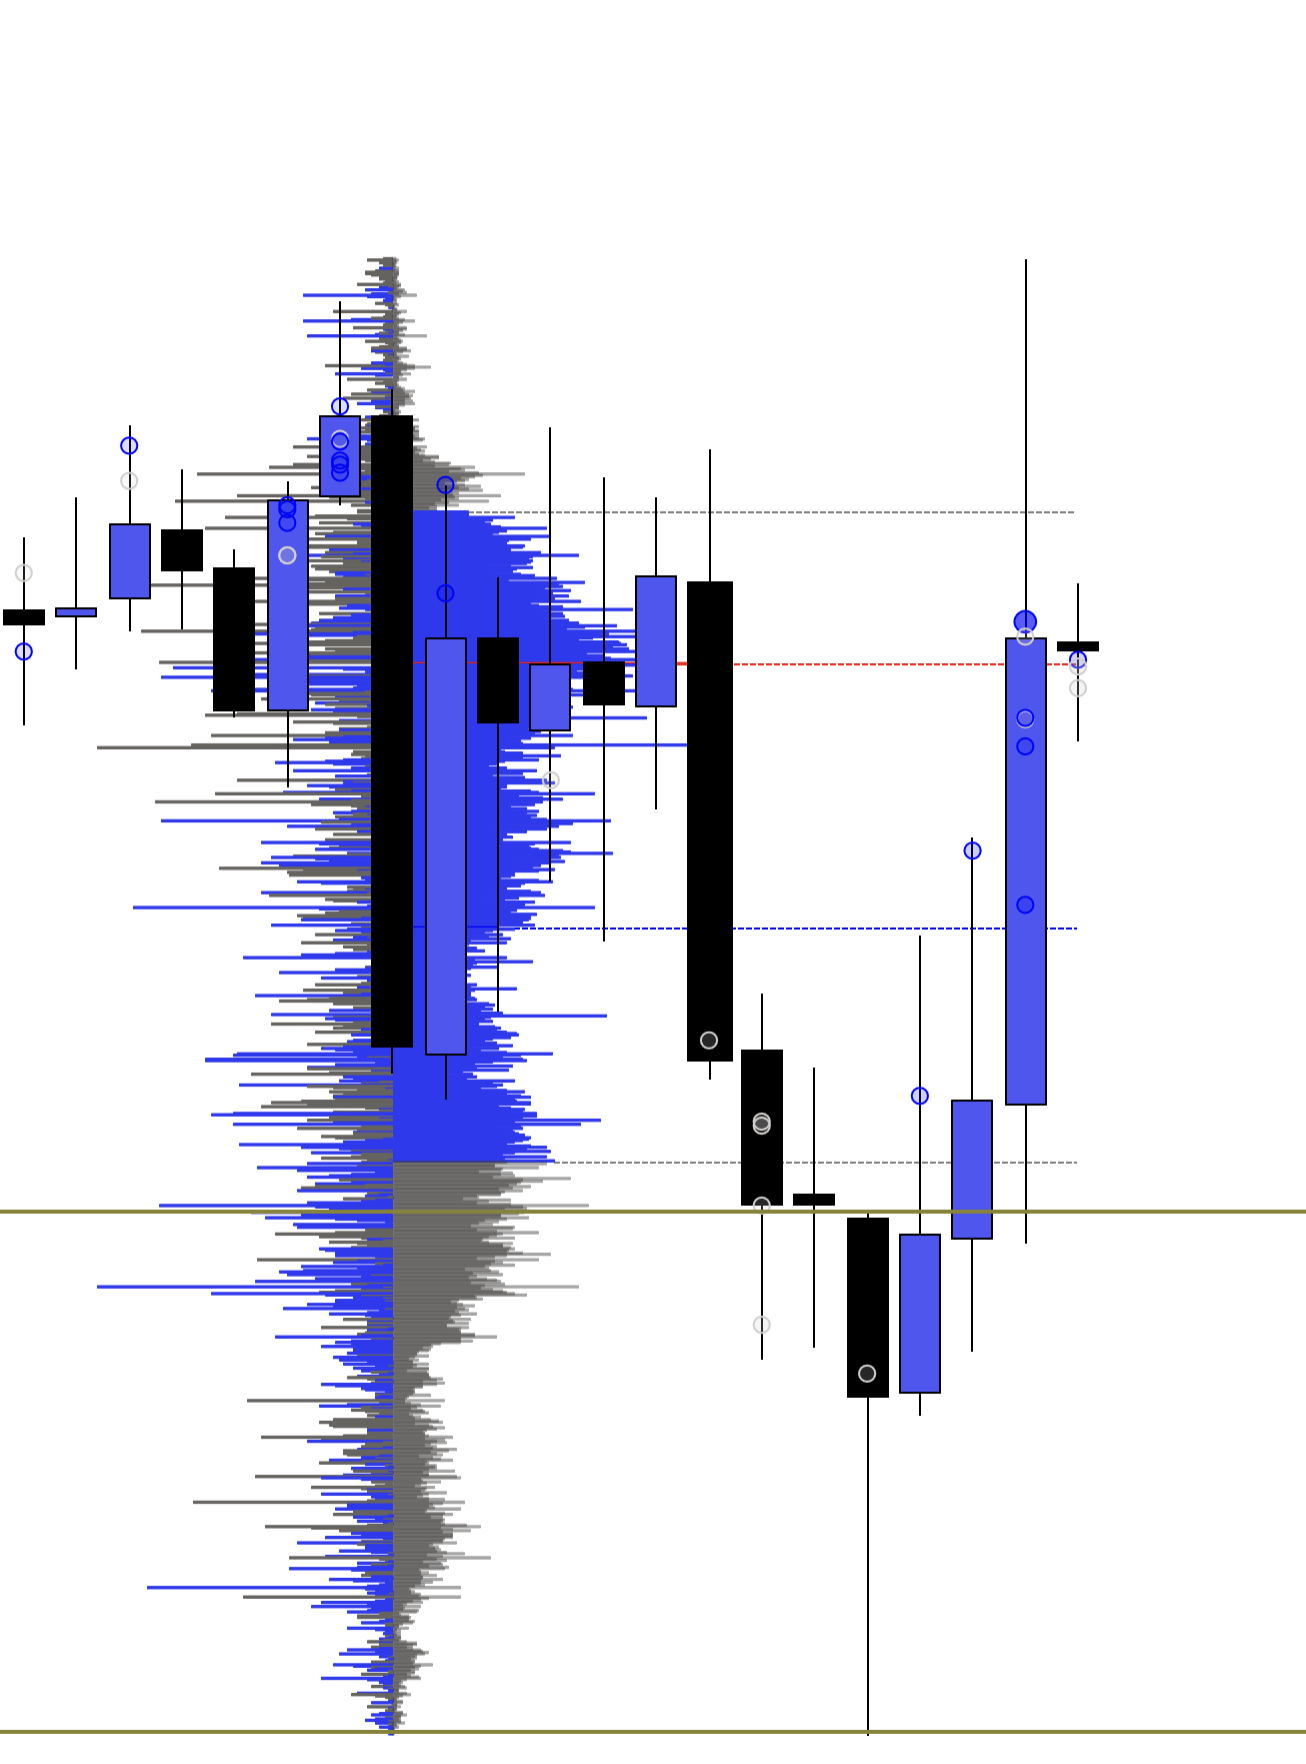
I moved the stop to the 7:26 candle on my Bookmap clock, directly under where the sharp move began. This was more aggressive than leaving it under the full auction because the new cluster of buyers created squeeze risk. If price held below their entries, aggressive sellers could force trapped buyers out and accelerate the move lower.
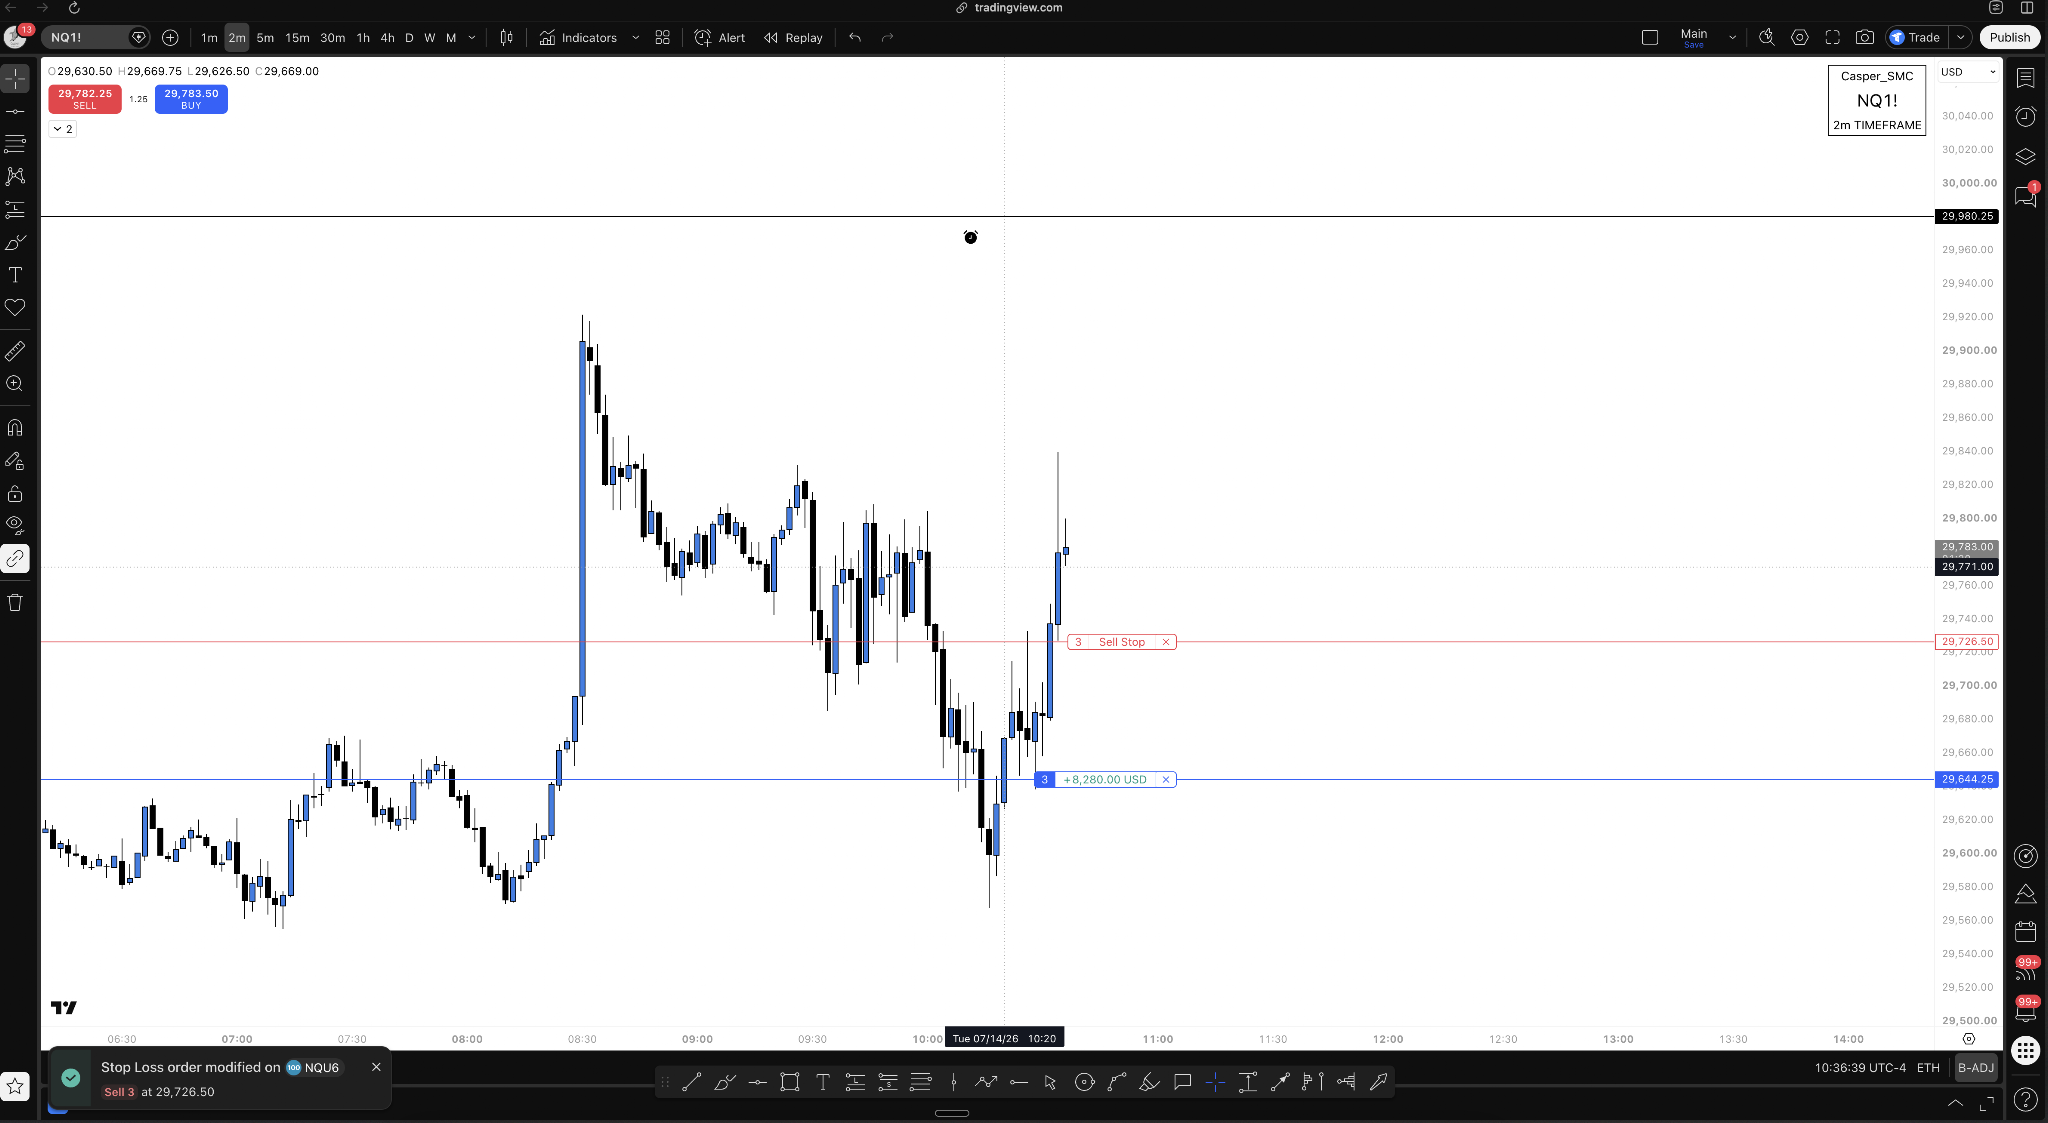
The stop took me fully out. I still liked the broader long condition, but liking it did not justify ignoring changed risk. A fresh long would need a fresh setup.
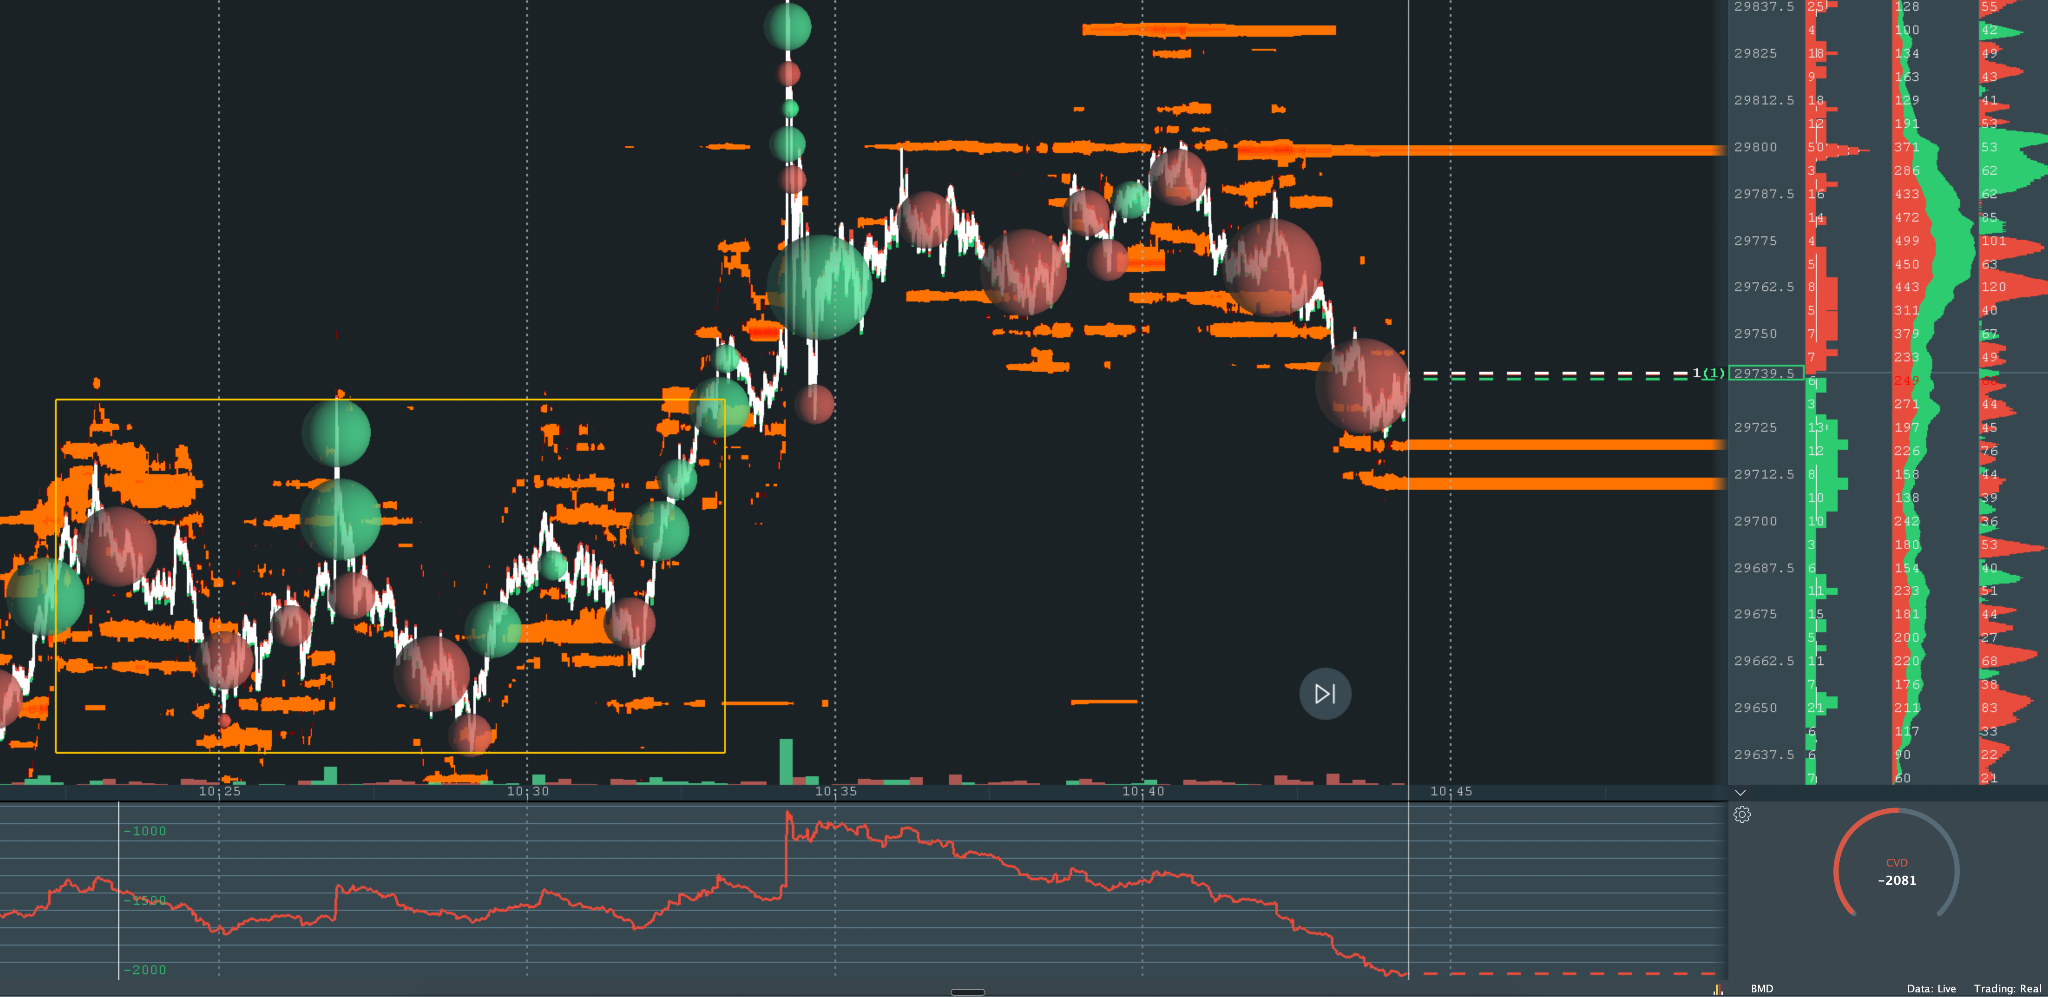
A floating P&L screenshot is one moment inside a live trade. It is not a realized result. Management decides what survives. I never let an open number become permission to abandon the read.
Notice that the exit did not make the original trade wrong. Buyers had controlled the move, then the structure of the risk changed. This is another place where traders create unnecessary psychology problems. They treat an exit as a verdict on their intelligence, then cling to the position so they do not have to feel wrong. I treat it as new information. The first trade had completed its current job. If the bullish condition produced another clean auction later, I could participate again without pretending the first stop never happened.
Phase 5: Reset, Beat FOMO, and Wait for Trade Two
After the exit, price rotated toward the pivot where the earlier aggressive move began. Passive buyers lined up, but sellers were currently in control. I was out and could demand another clean trigger.
The branch was specific. If price popped back up and accepted above the highs, many current sellers could become wrong. Volume was not tremendous, so I was not predicting that outcome. I was describing what would restart the process.
At 9:55 AM, a pop began. Maybe it would run without me. I still wanted increasing volume and aggression. Seeing a setup begin is not the same as receiving the trigger.
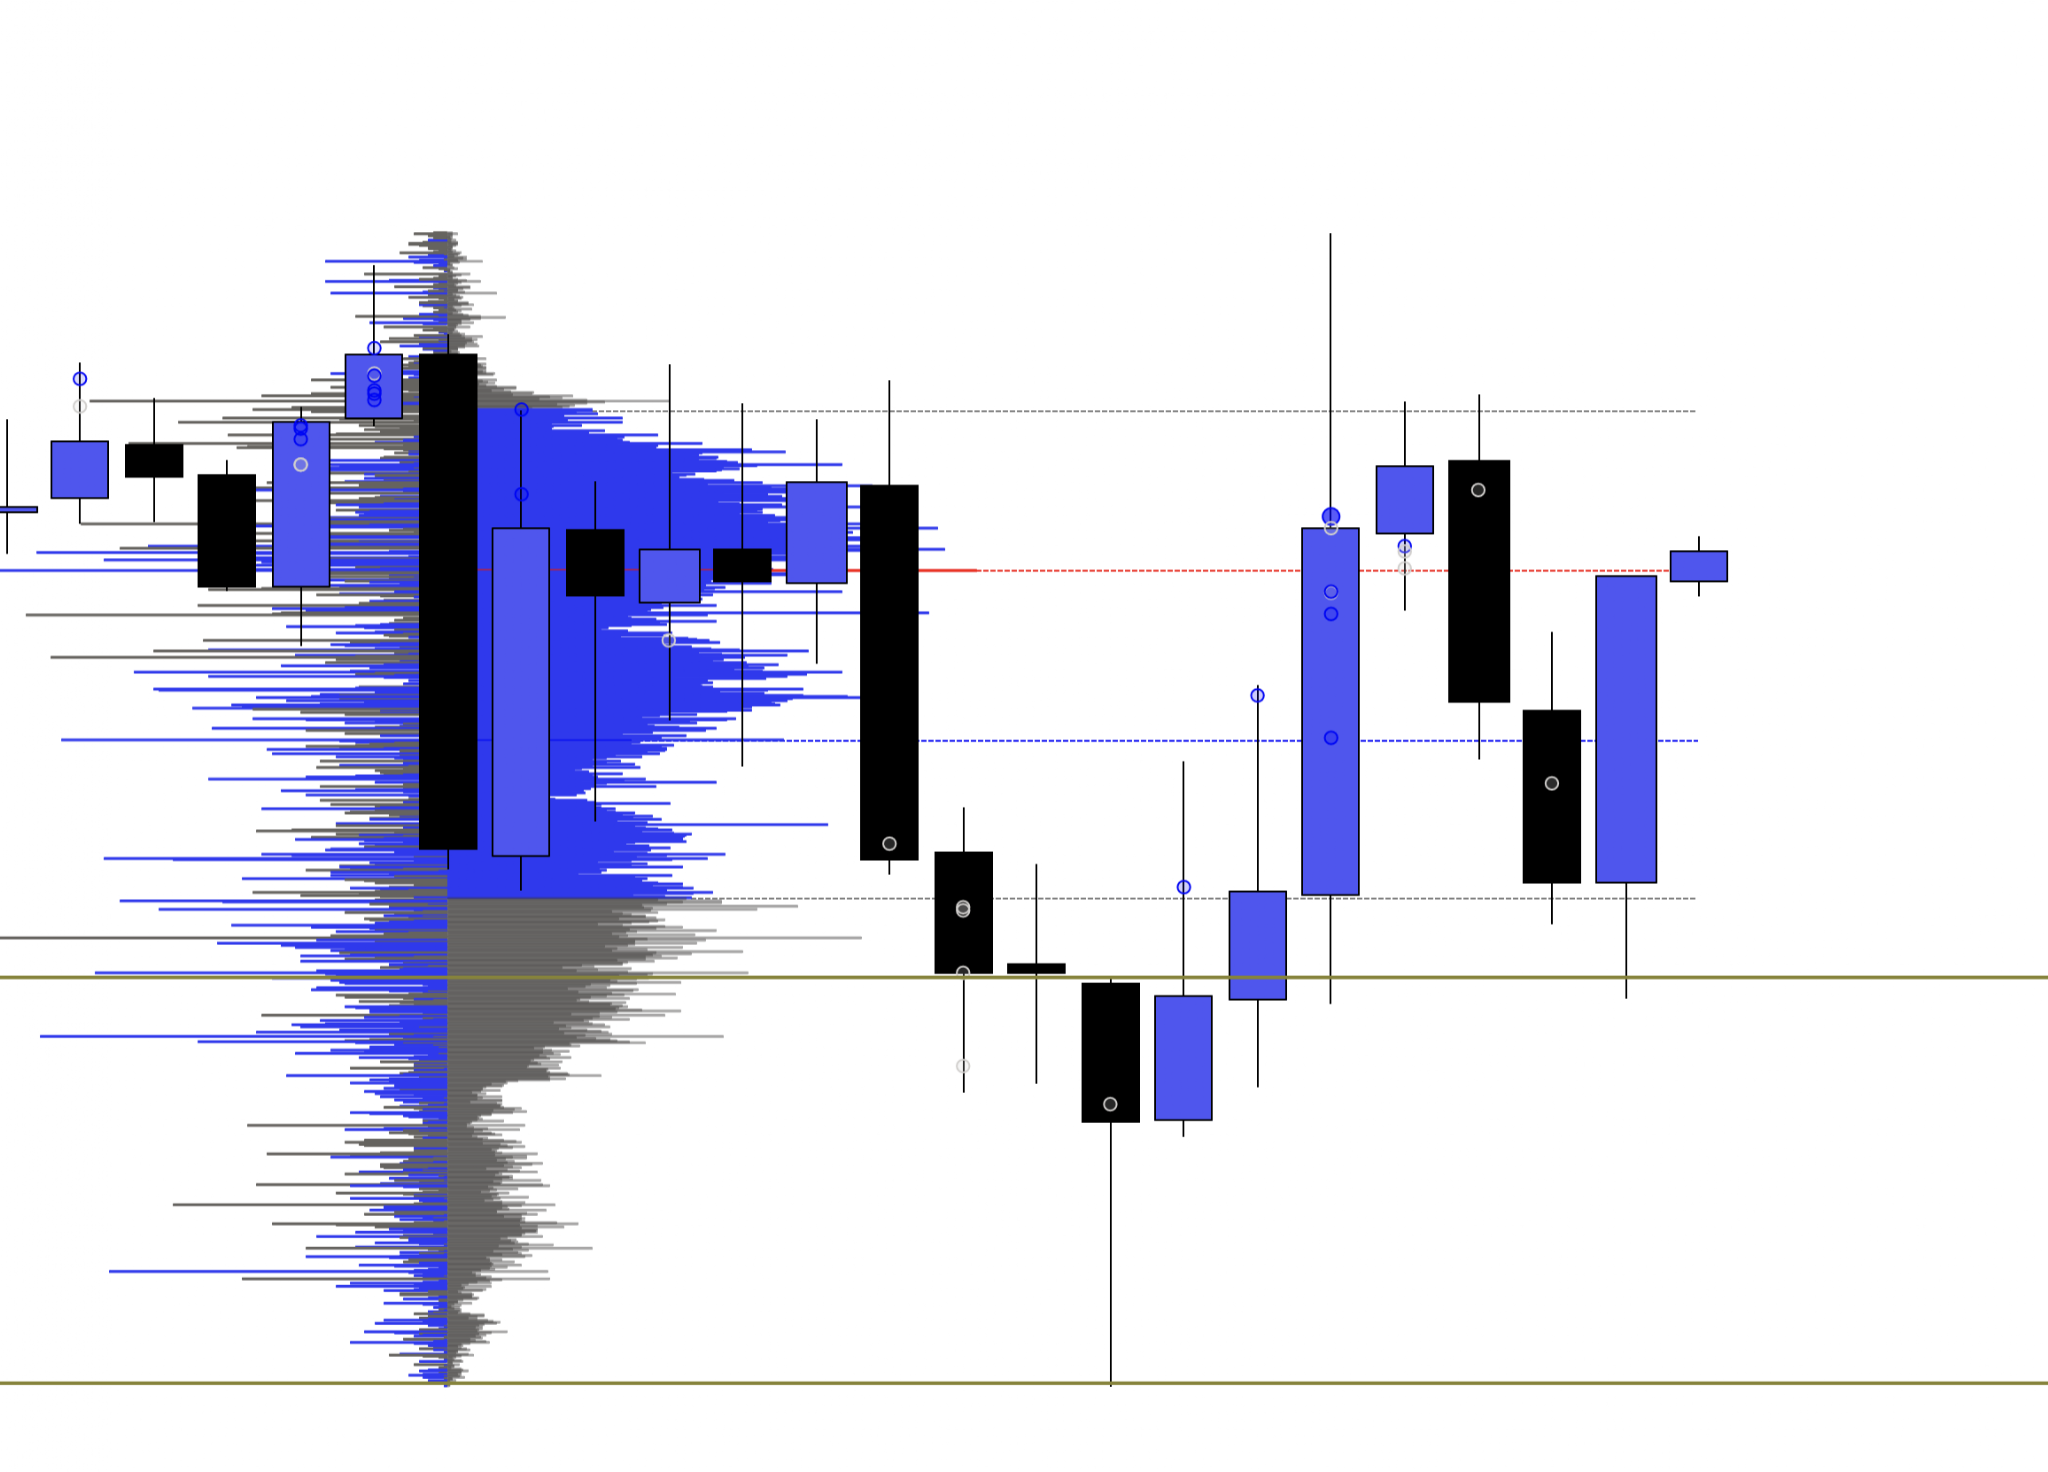
This is where fear of missing out, or FOMO, destroys traders. It is better to miss a winner because I refused an unsupported entry than to make money on a click with no logic. The first outcome rewards professional behavior. The second trains me to repeat bad behavior.
Price was around the POC in high volume. Many traders were positioned there, so chop was more likely until price cleared the range and entered lower volume. I did not need the first inch. If the move became real, another entry could appear after confirmation.
That self-dialogue is not motivational fluff. It changes execution. When I know what a real trigger looks like, I can watch price move without me and still believe there will be a valid place to act. Scarcity says I must chase because this is the only move. Skill says the market has to pass through another battle, and if buyers truly control it, they can prove that beyond the wall.
Passive buyers improved and buyer aggression rose slightly, but a large sell wall remained overhead. Buyers still needed to consume it and prove one-sided control.
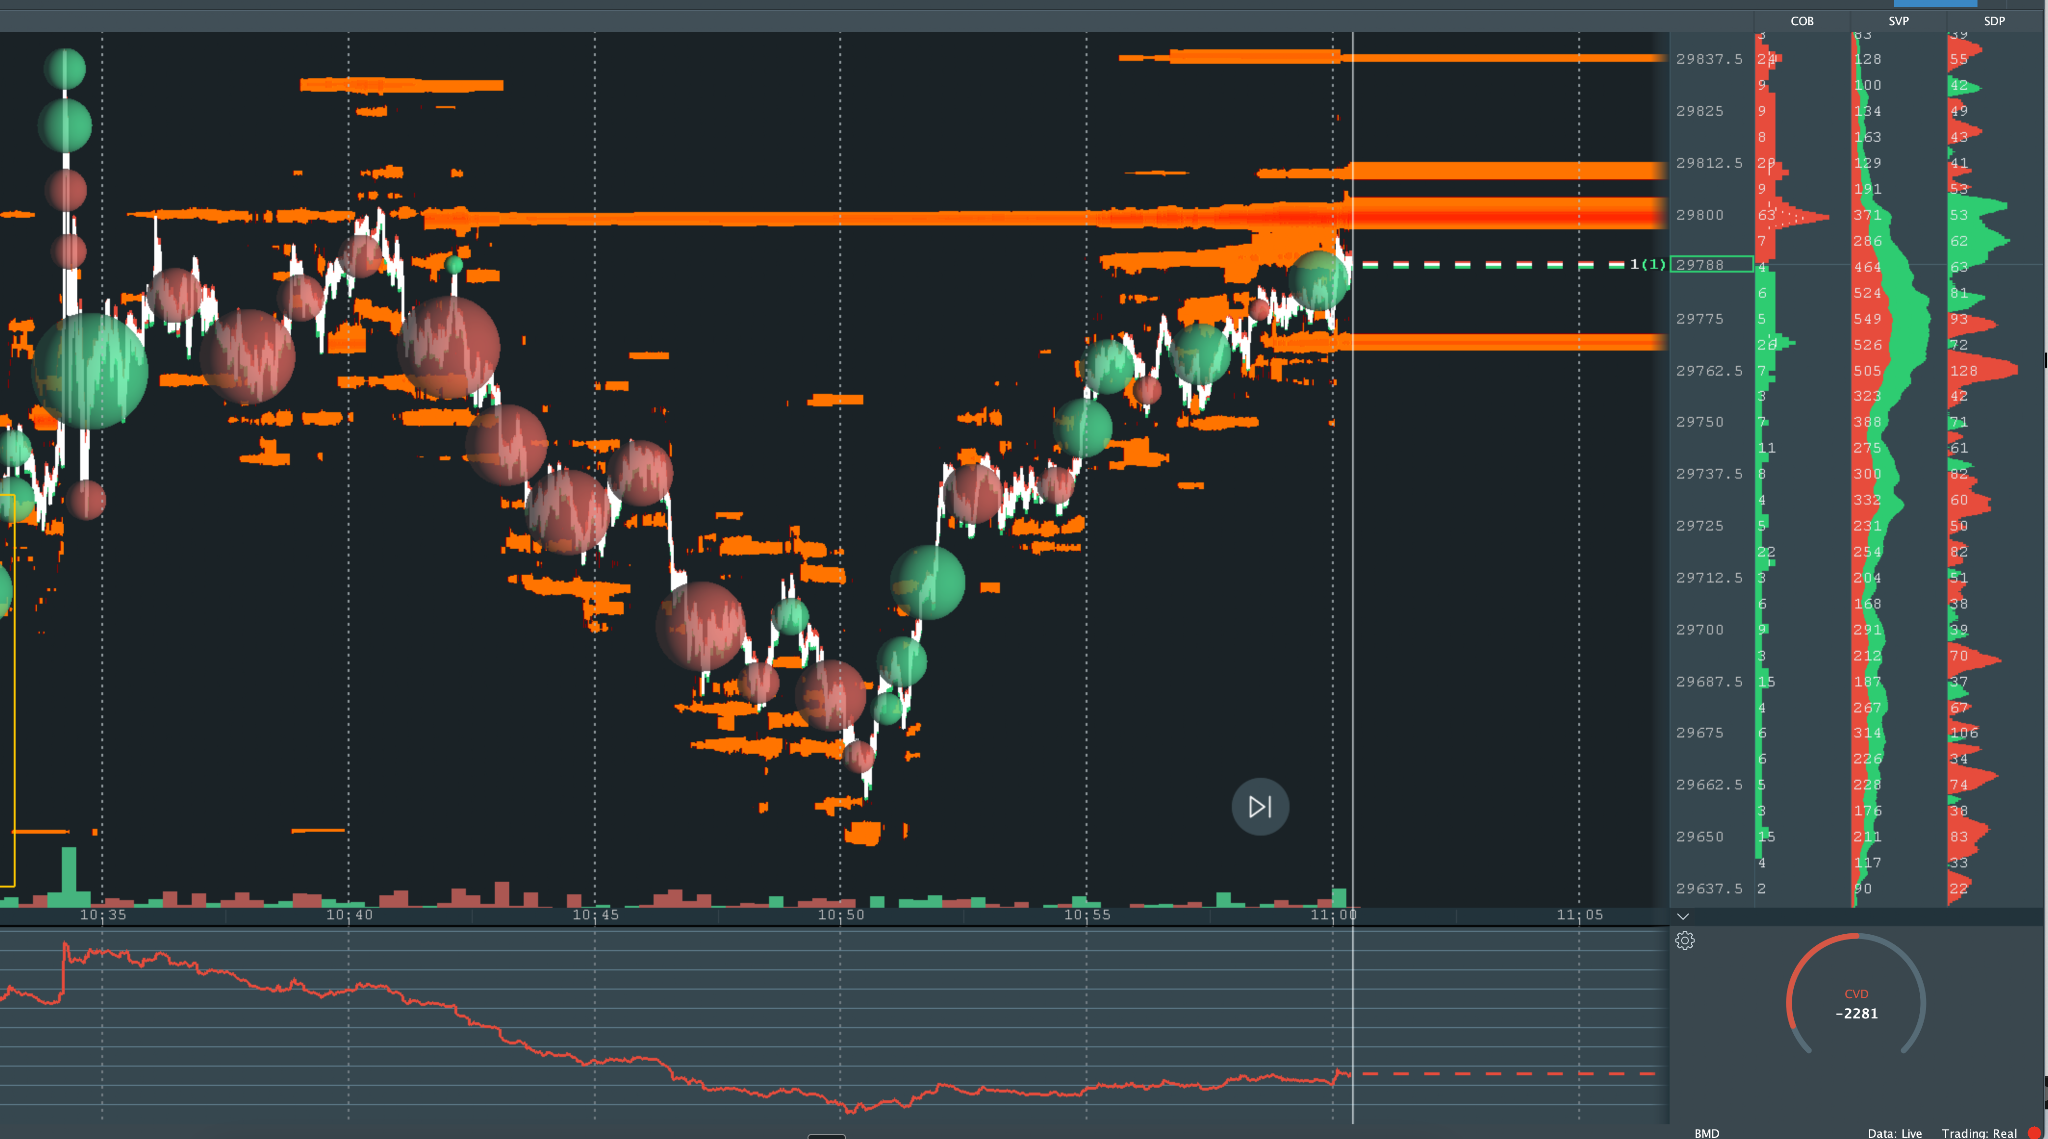
At 10:08 AM, price accepted beyond the sell wall. That was a new trigger and a new trade.
Phase 6: Manage the Continuation With More Pickiness
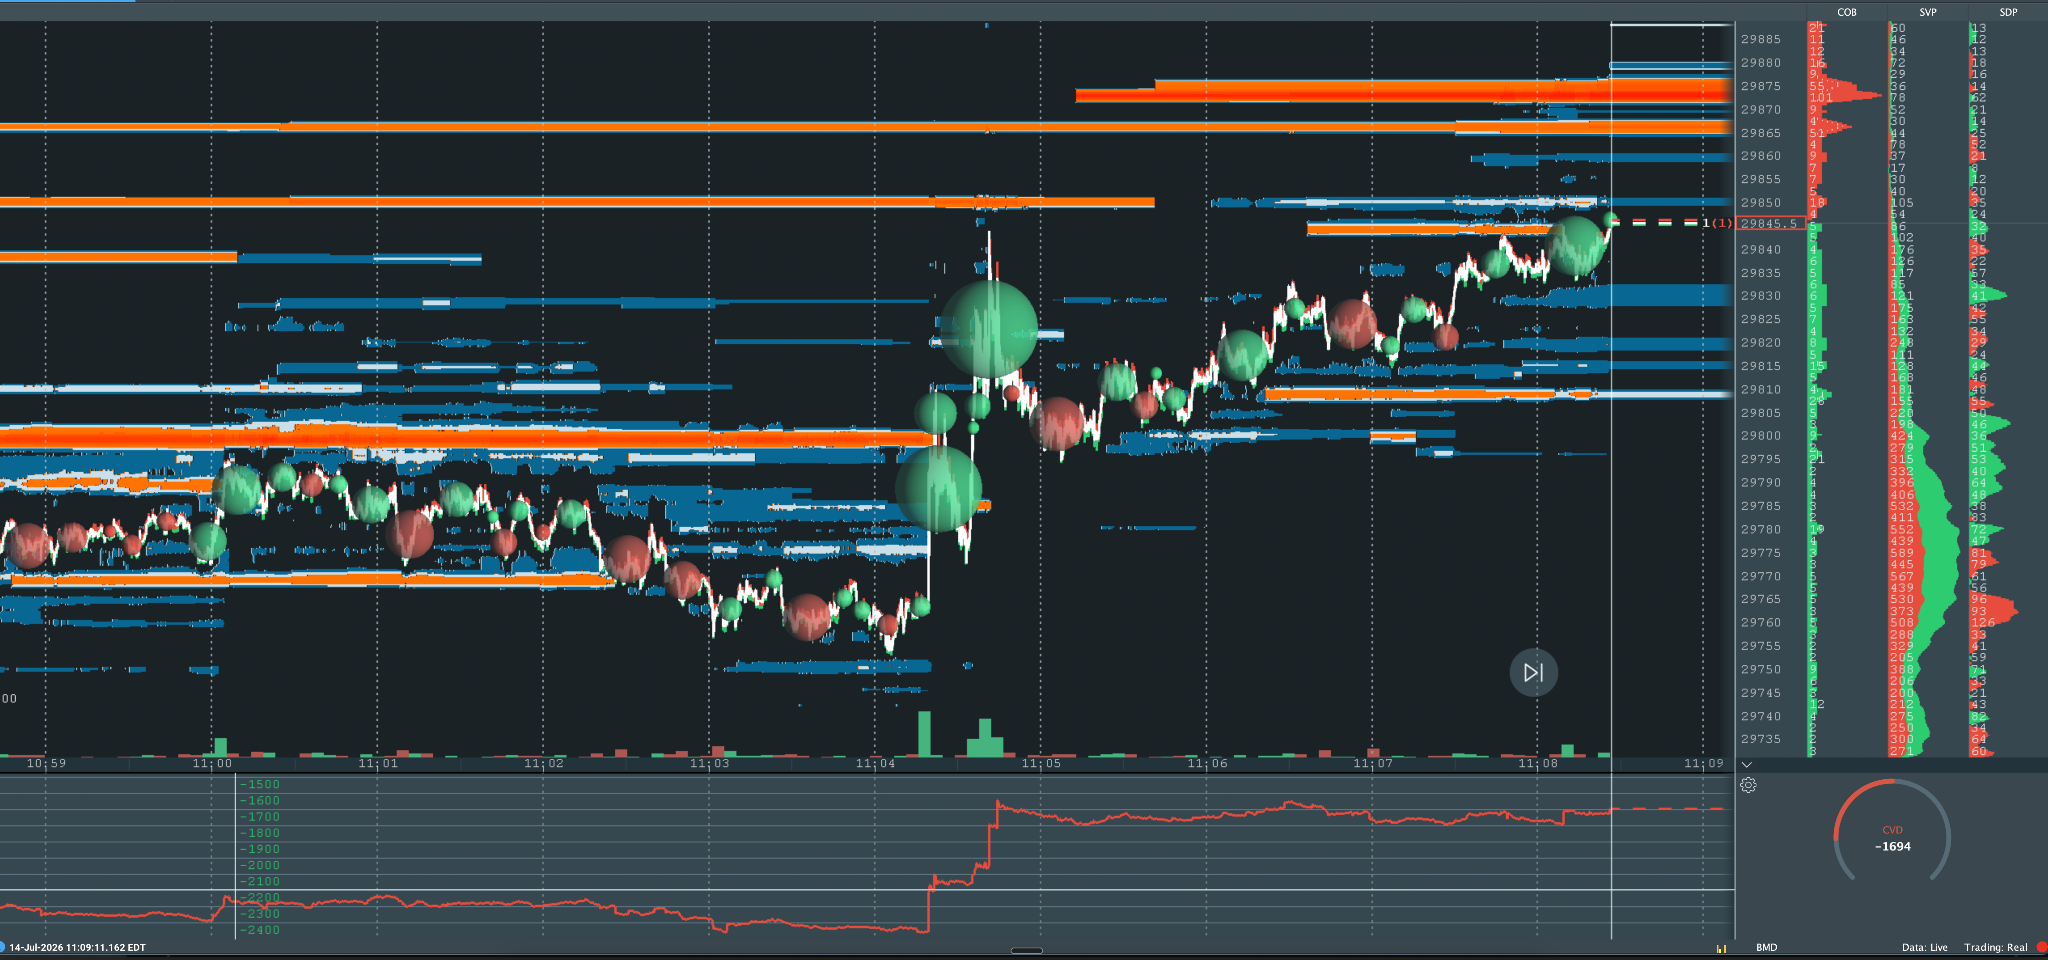
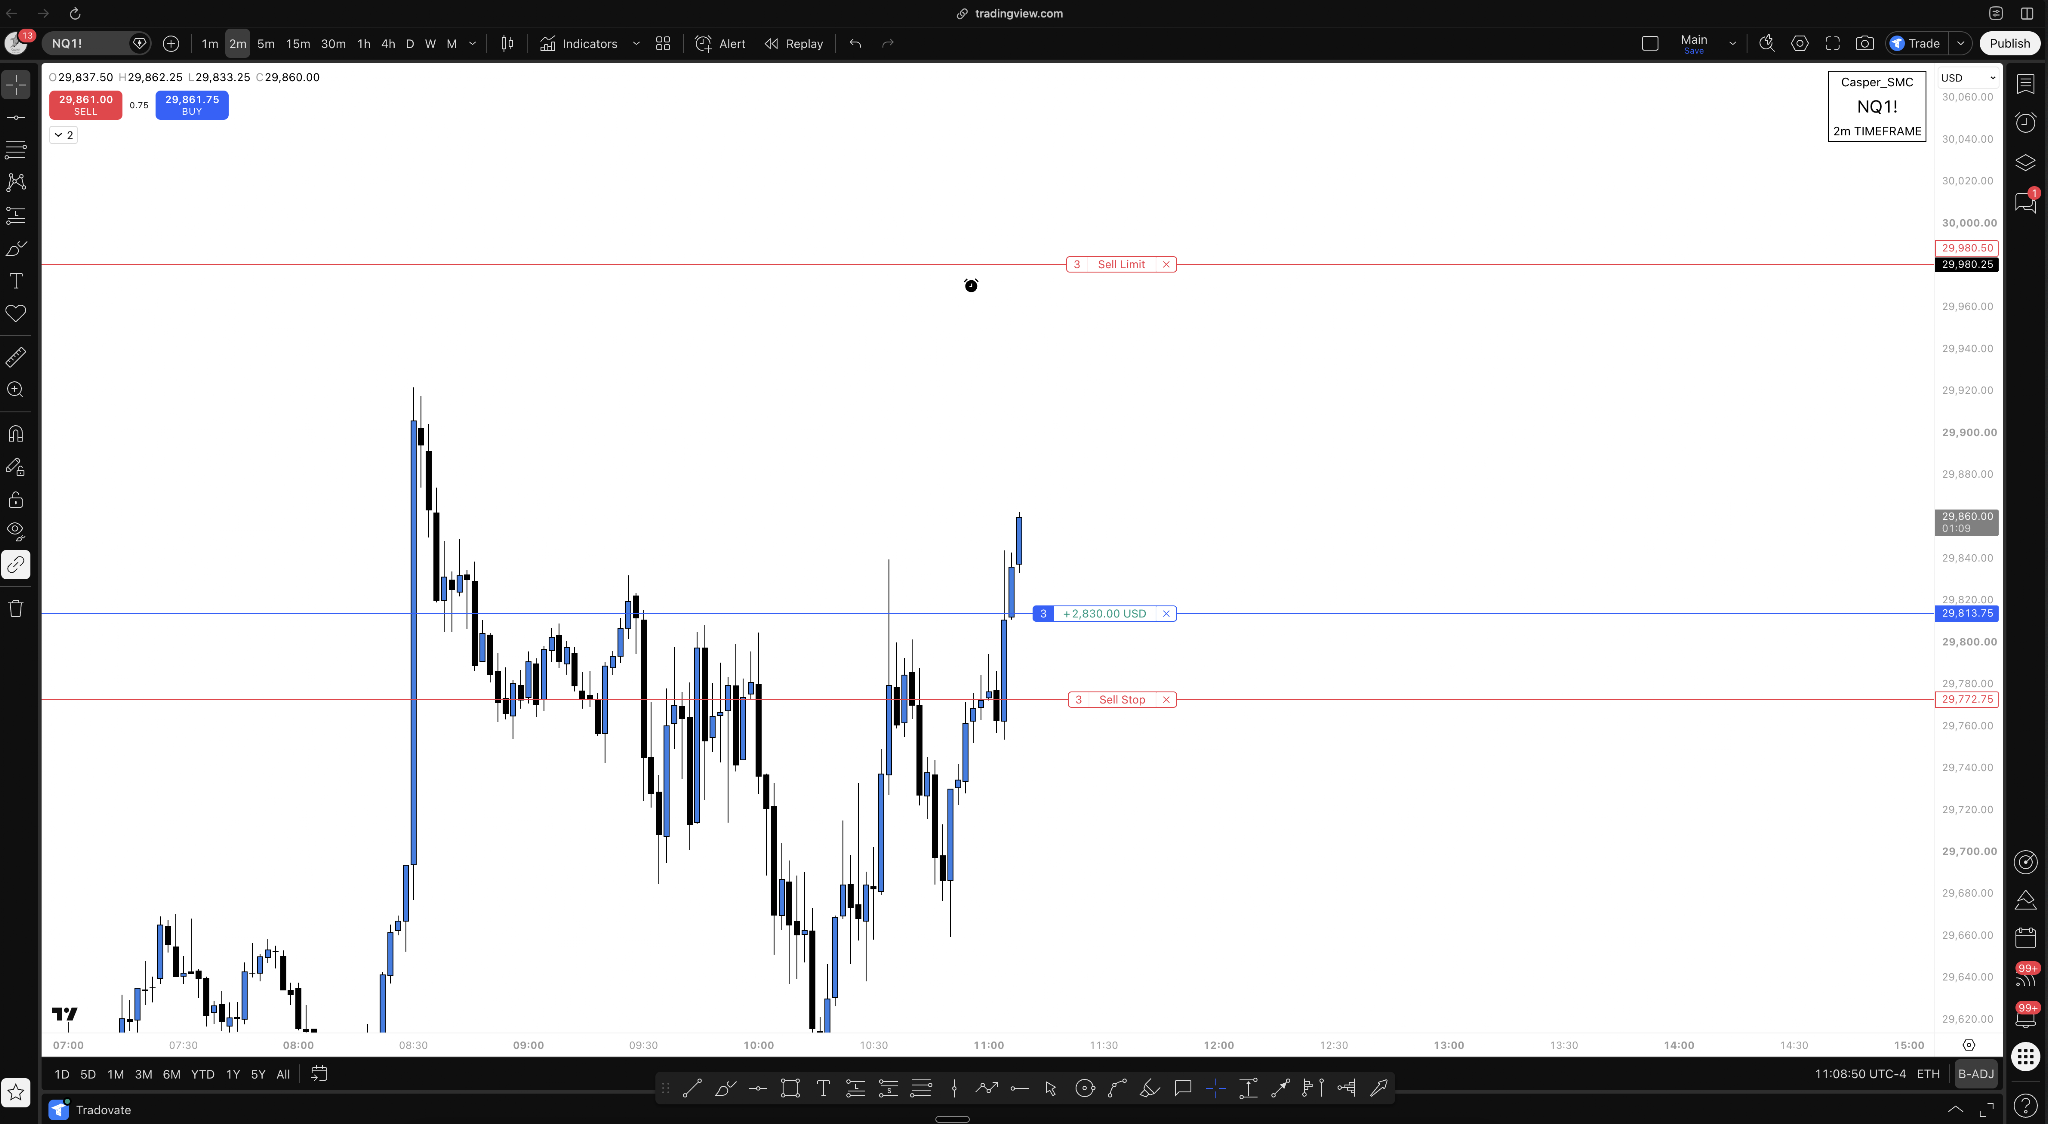
NQ traded around 29,800, so my live shorthand dropped the handle. The stop "824" means 29,824. "850" means 29,850. "873.25" means 29,873.25.
Trade two was a continuation after the market had already extended. A strong key level was ahead, price was moving through low volume, and buyer aggression was not tremendous. That context meant I gave the trade less room than the earlier reversal.
At 10:11 AM, I moved the stop to entry, around 29,813, as price approached the strong level. The worst case for this trade was now a scratch.
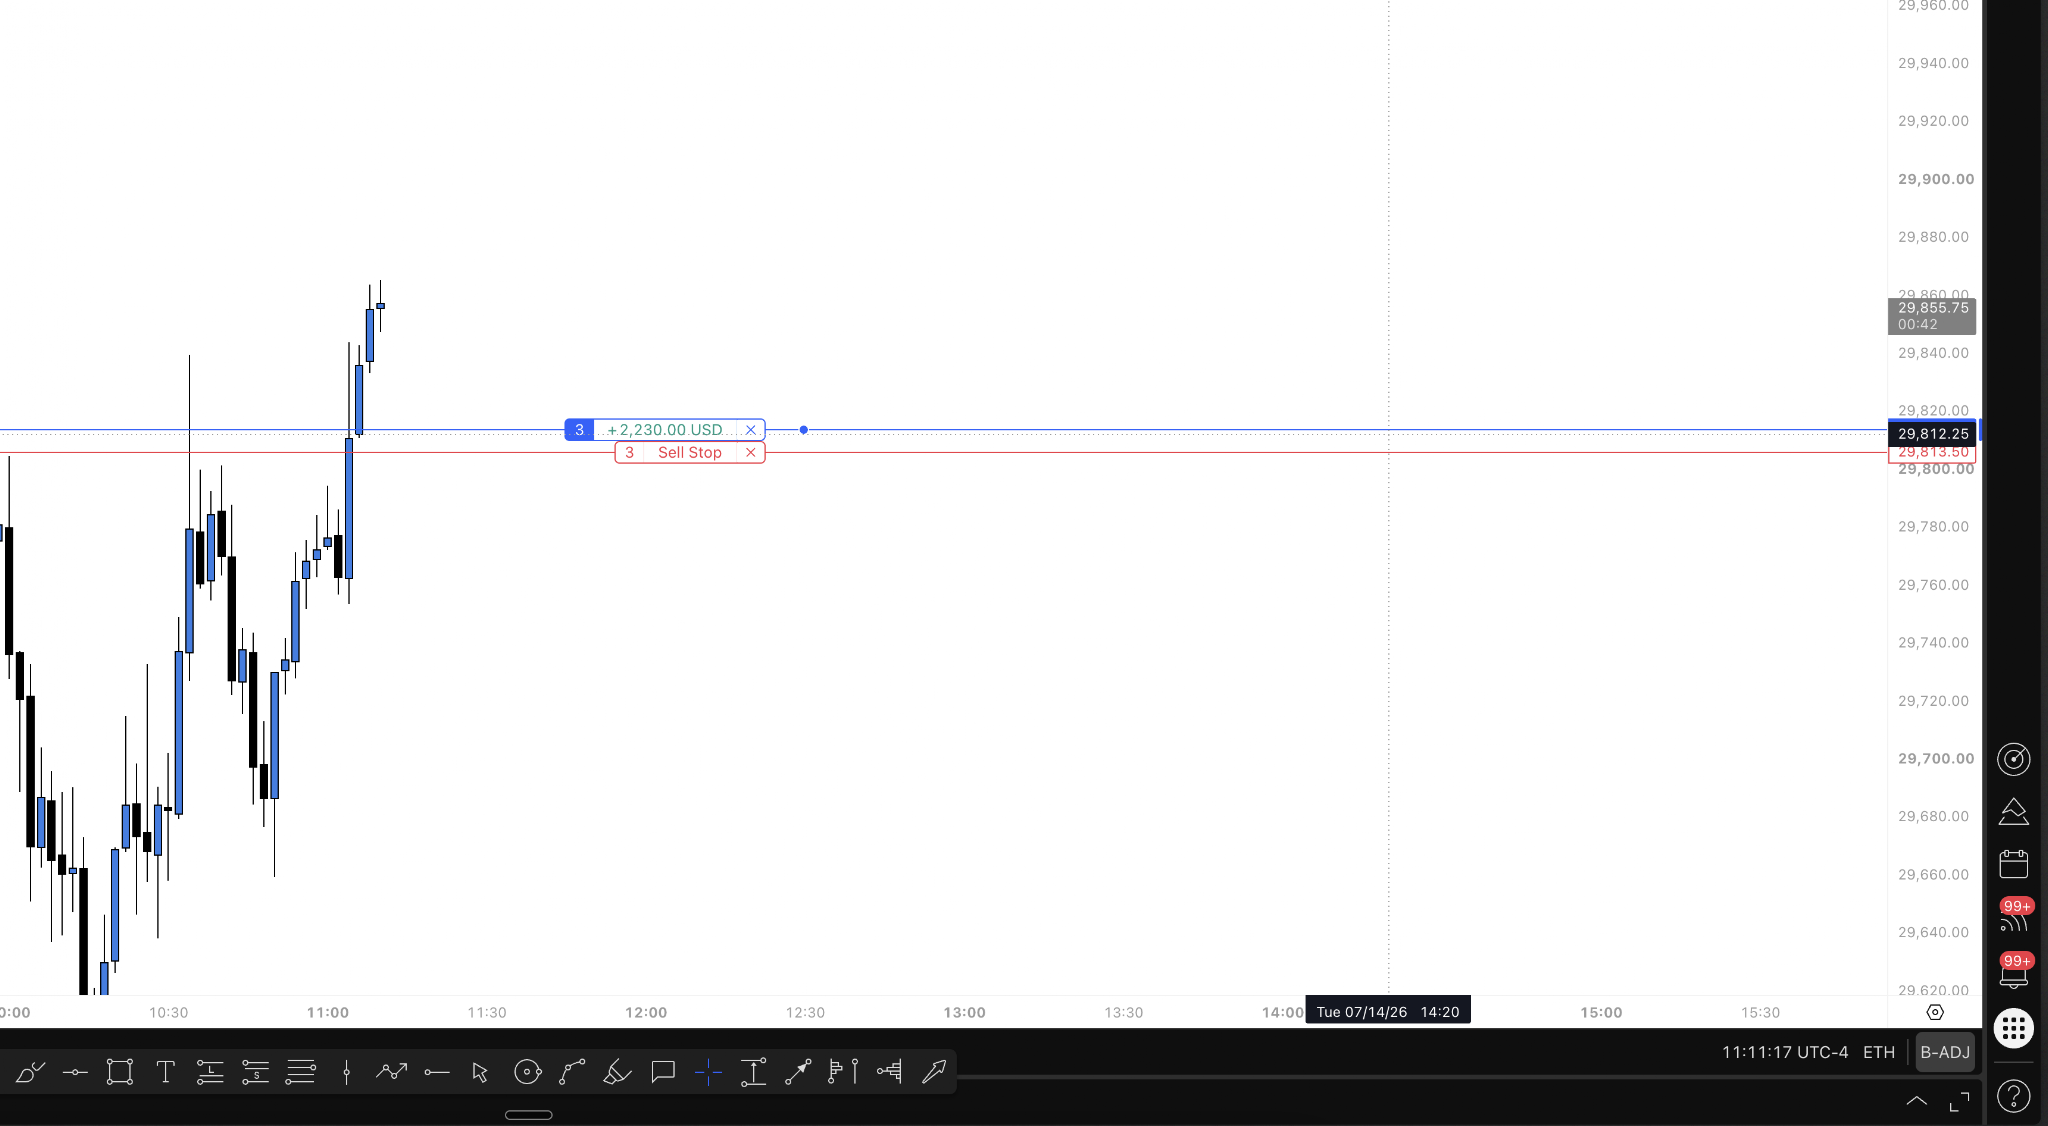
Large trade bubbles printed above VAH. That suggested some acceptance of higher prices and marked buyers I did not want trapped. The lowest bubble was near 29,830, but I did not move immediately because these positions can be tested.
The 29,830 area was tested. If buyers launched upward, they were defending and could become fuel for continuation. If they failed, my entry stop was likely to get hit. Sellers attacked with increasing volume and aggression, then price snapped back. Because we were already beneath major resistance, I protected more aggressively and moved the stop to 29,824.
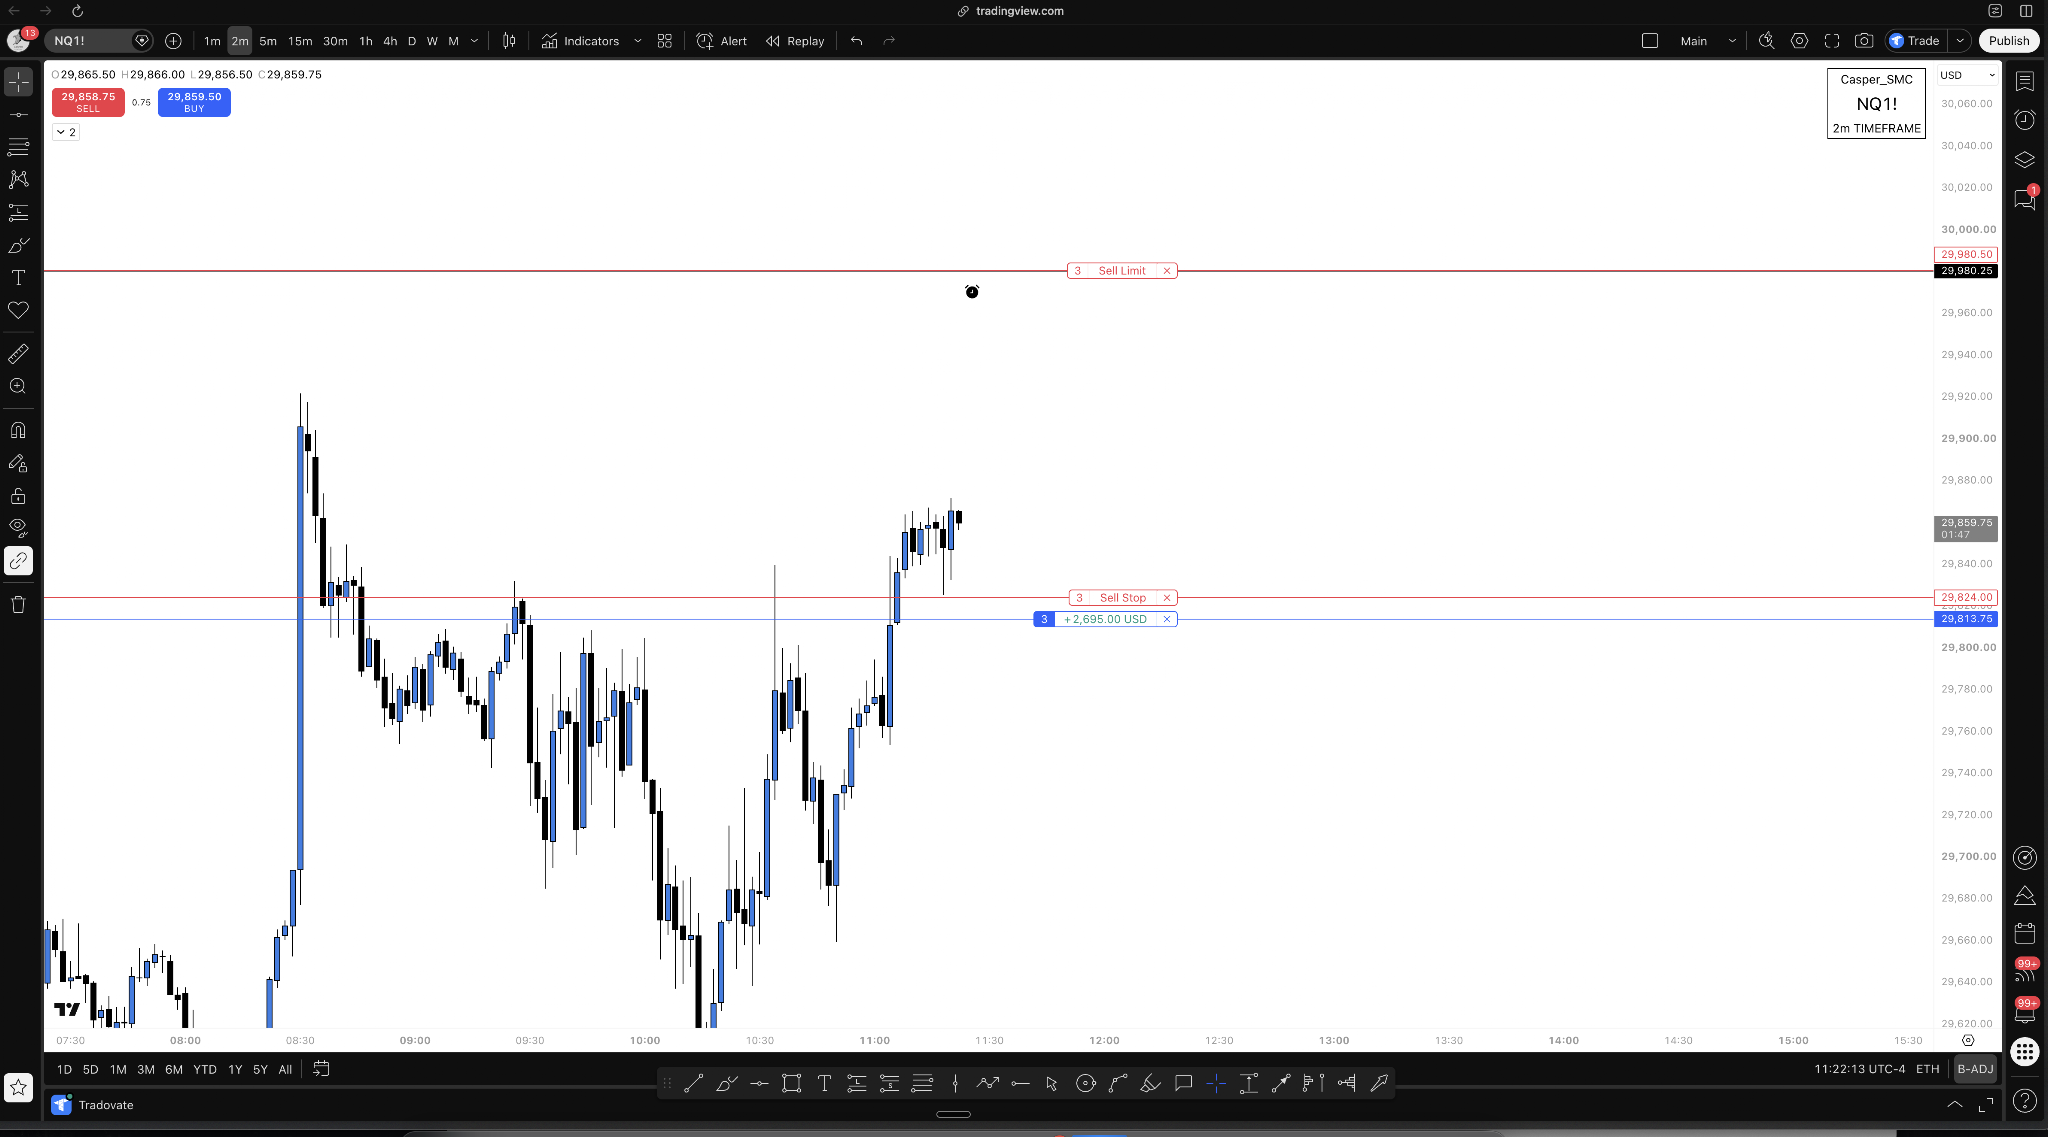
Losing 29,824 would likely rotate price toward 29,813. The stop was tied to the consequence of losing the battle, not an arbitrary desire to lock in money.
Buyers then ate through much of the passive sell wall. I did not see sellers reloading yet. If aggressive buying continued, price could spike toward 29,900.
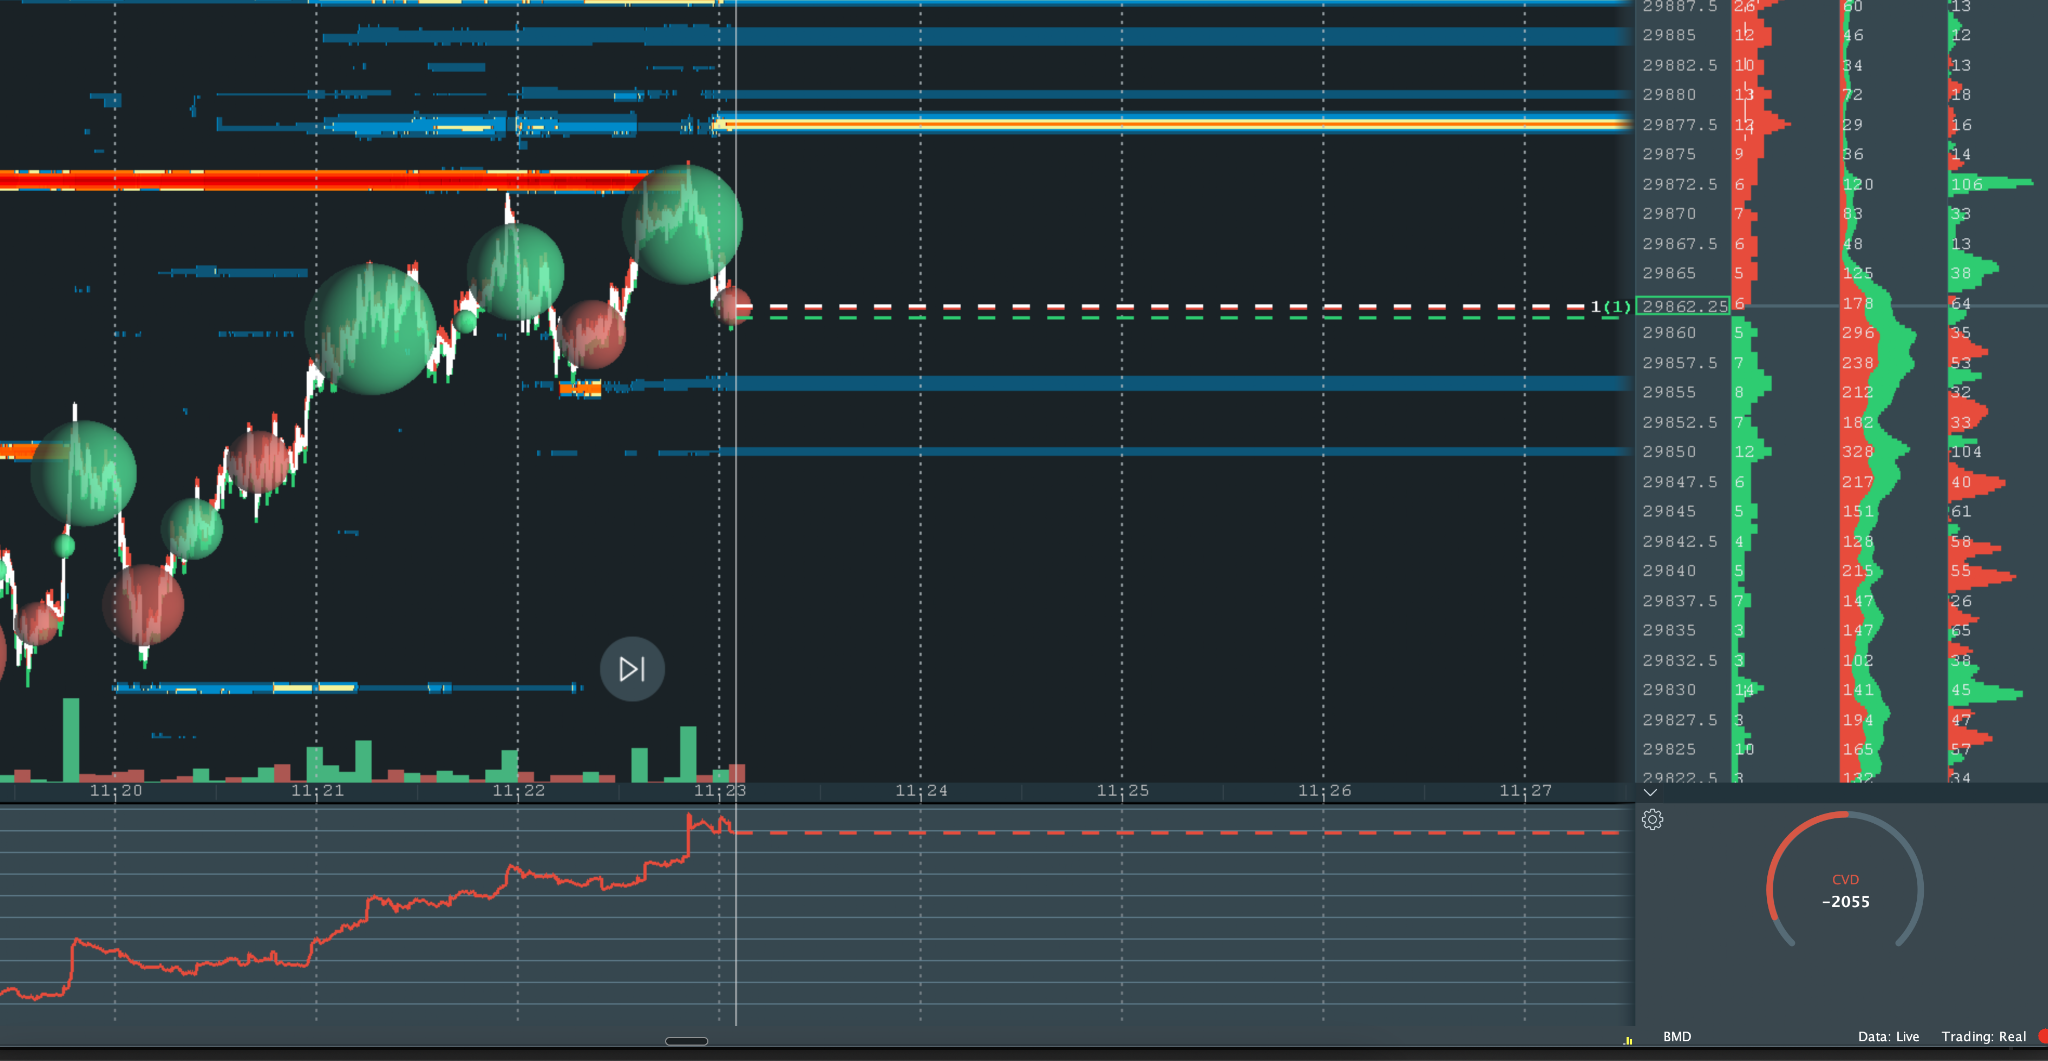
I moved stops to 29,850. Price was in extremely low volume, but buyers began to flatline on CVD. That did not guarantee reversal. It made me pickier. The pivot behind the stop was the point that launched price into the wall.
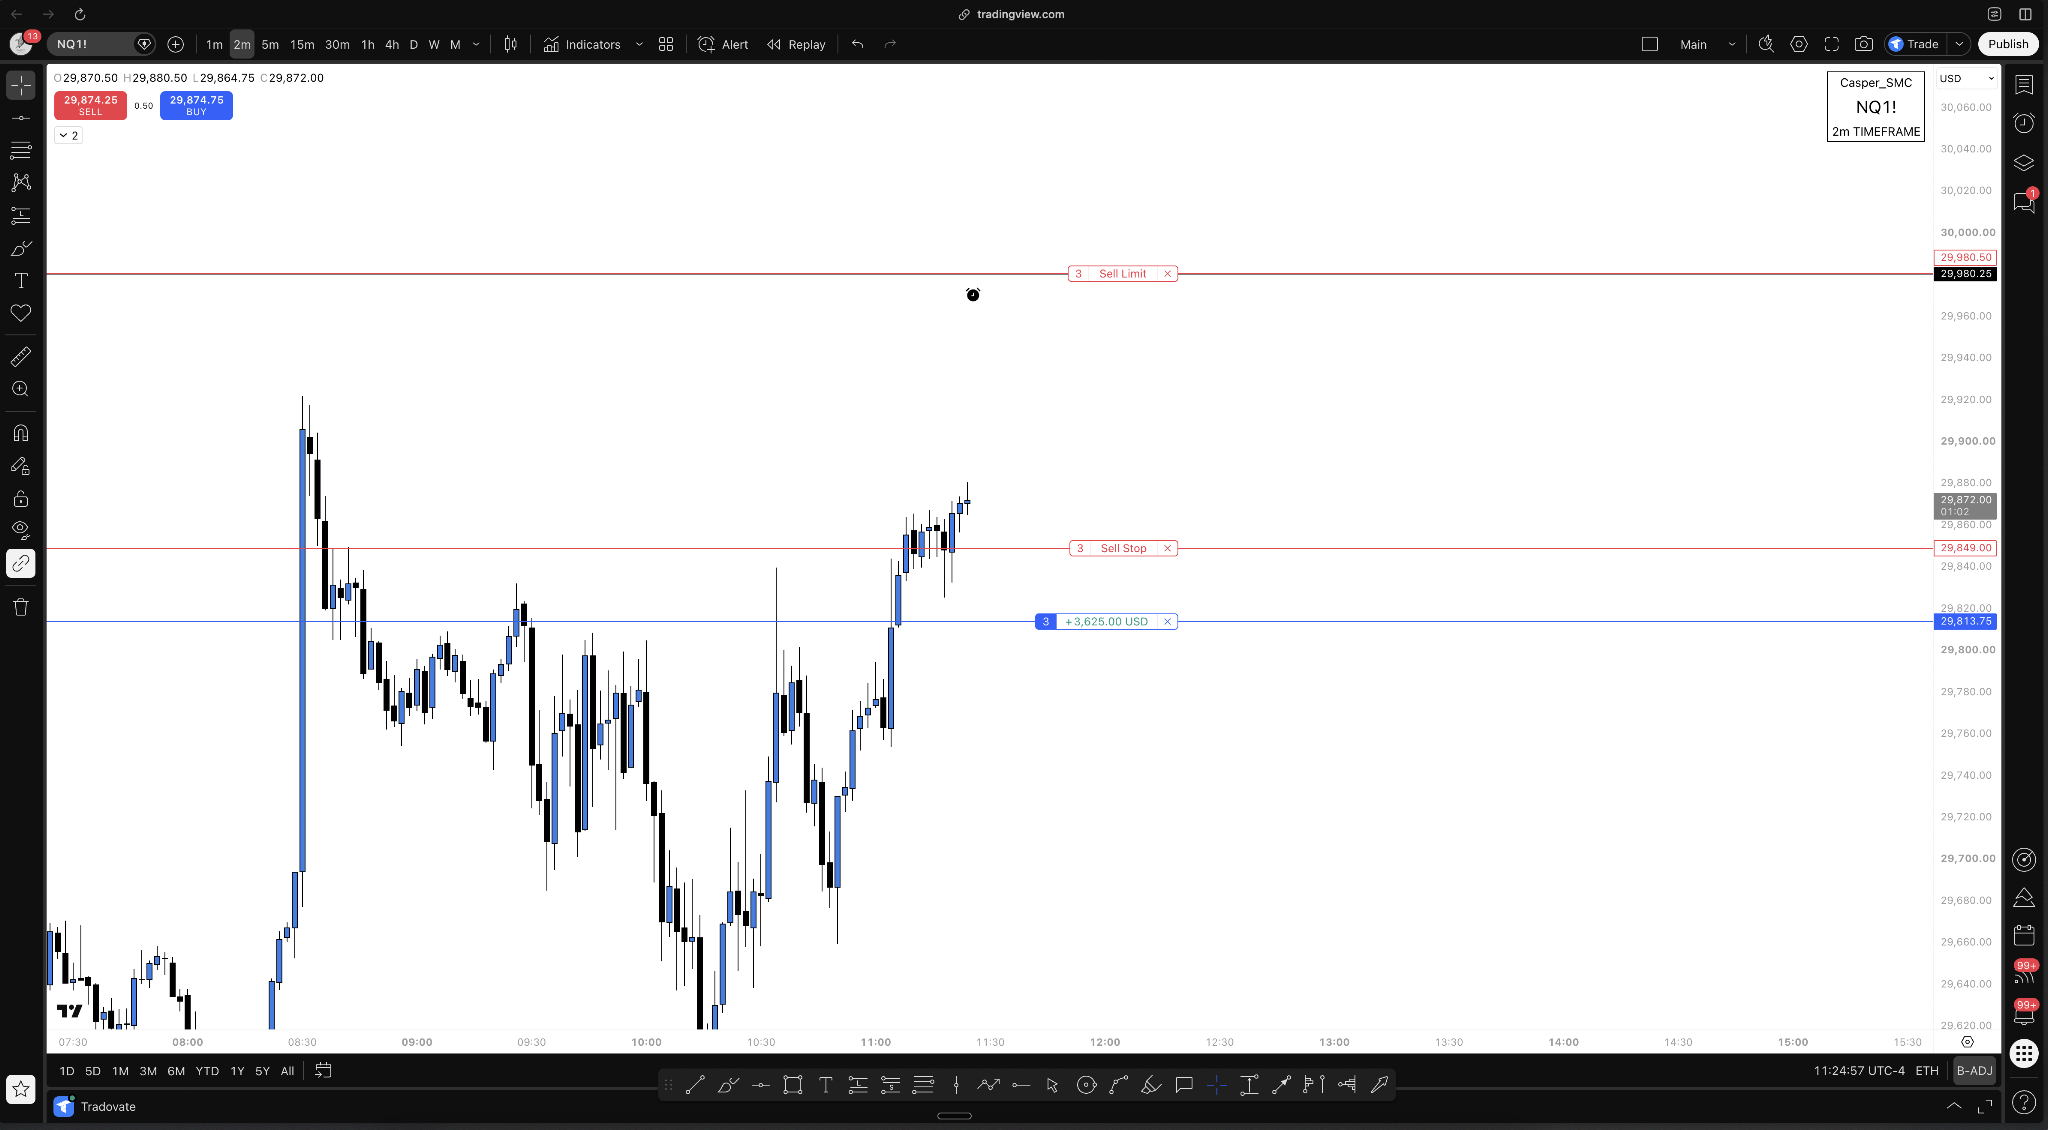
Normally I might have left room toward 29,830. Here the day was extended and buyers were less aggressive and less present. Rigid stop rules fail because the same reference can deserve different room depending on the strength of control and obstacles ahead.
Price made another move up, so I trailed under the newest defended low to 29,857.25.
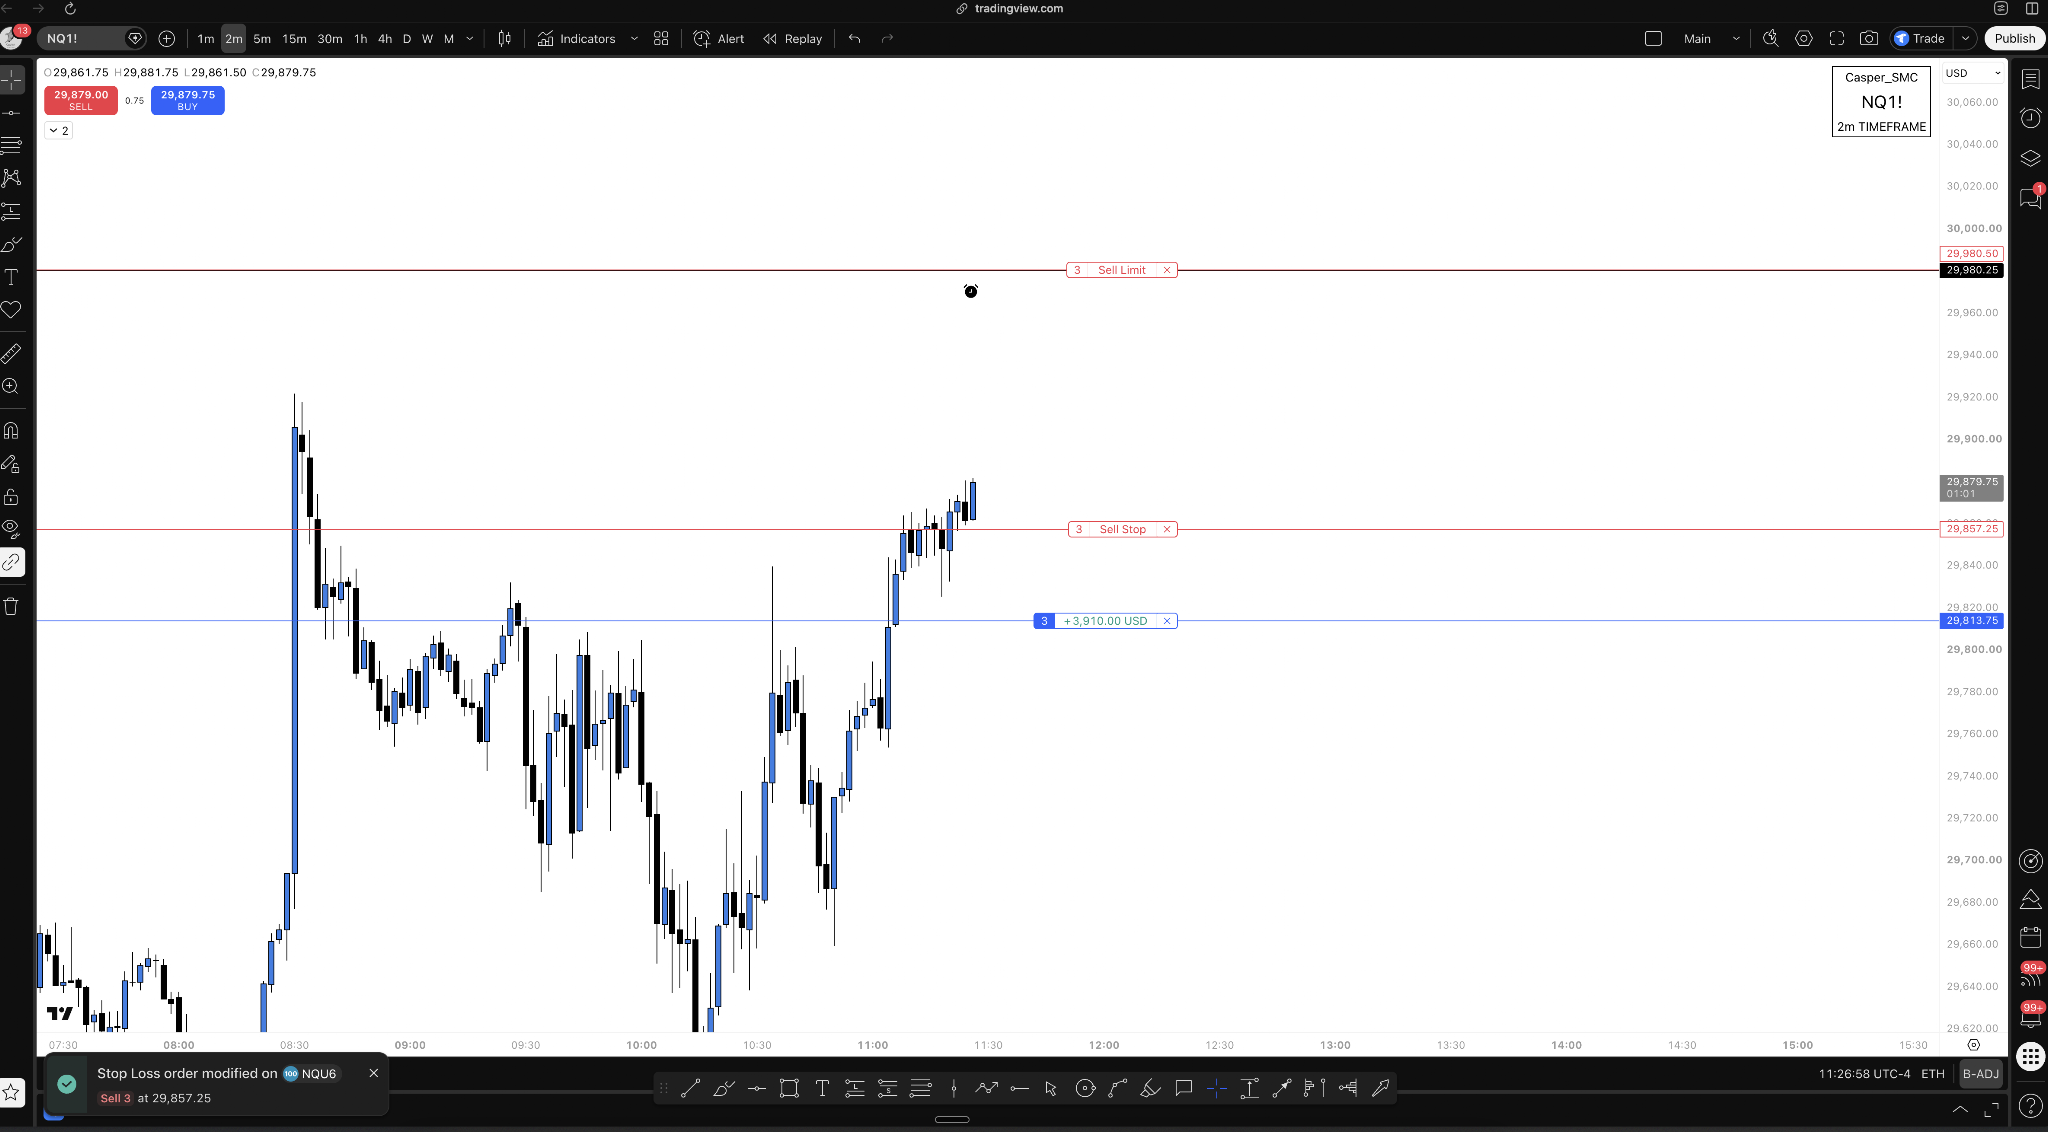
A large spike of aggressive buyer volume arrived. I moved the stop beneath recent lows to 29,862.25. As the move extended, I tightened beneath 29,874, then corrected the precise posted stop to 29,873.25.
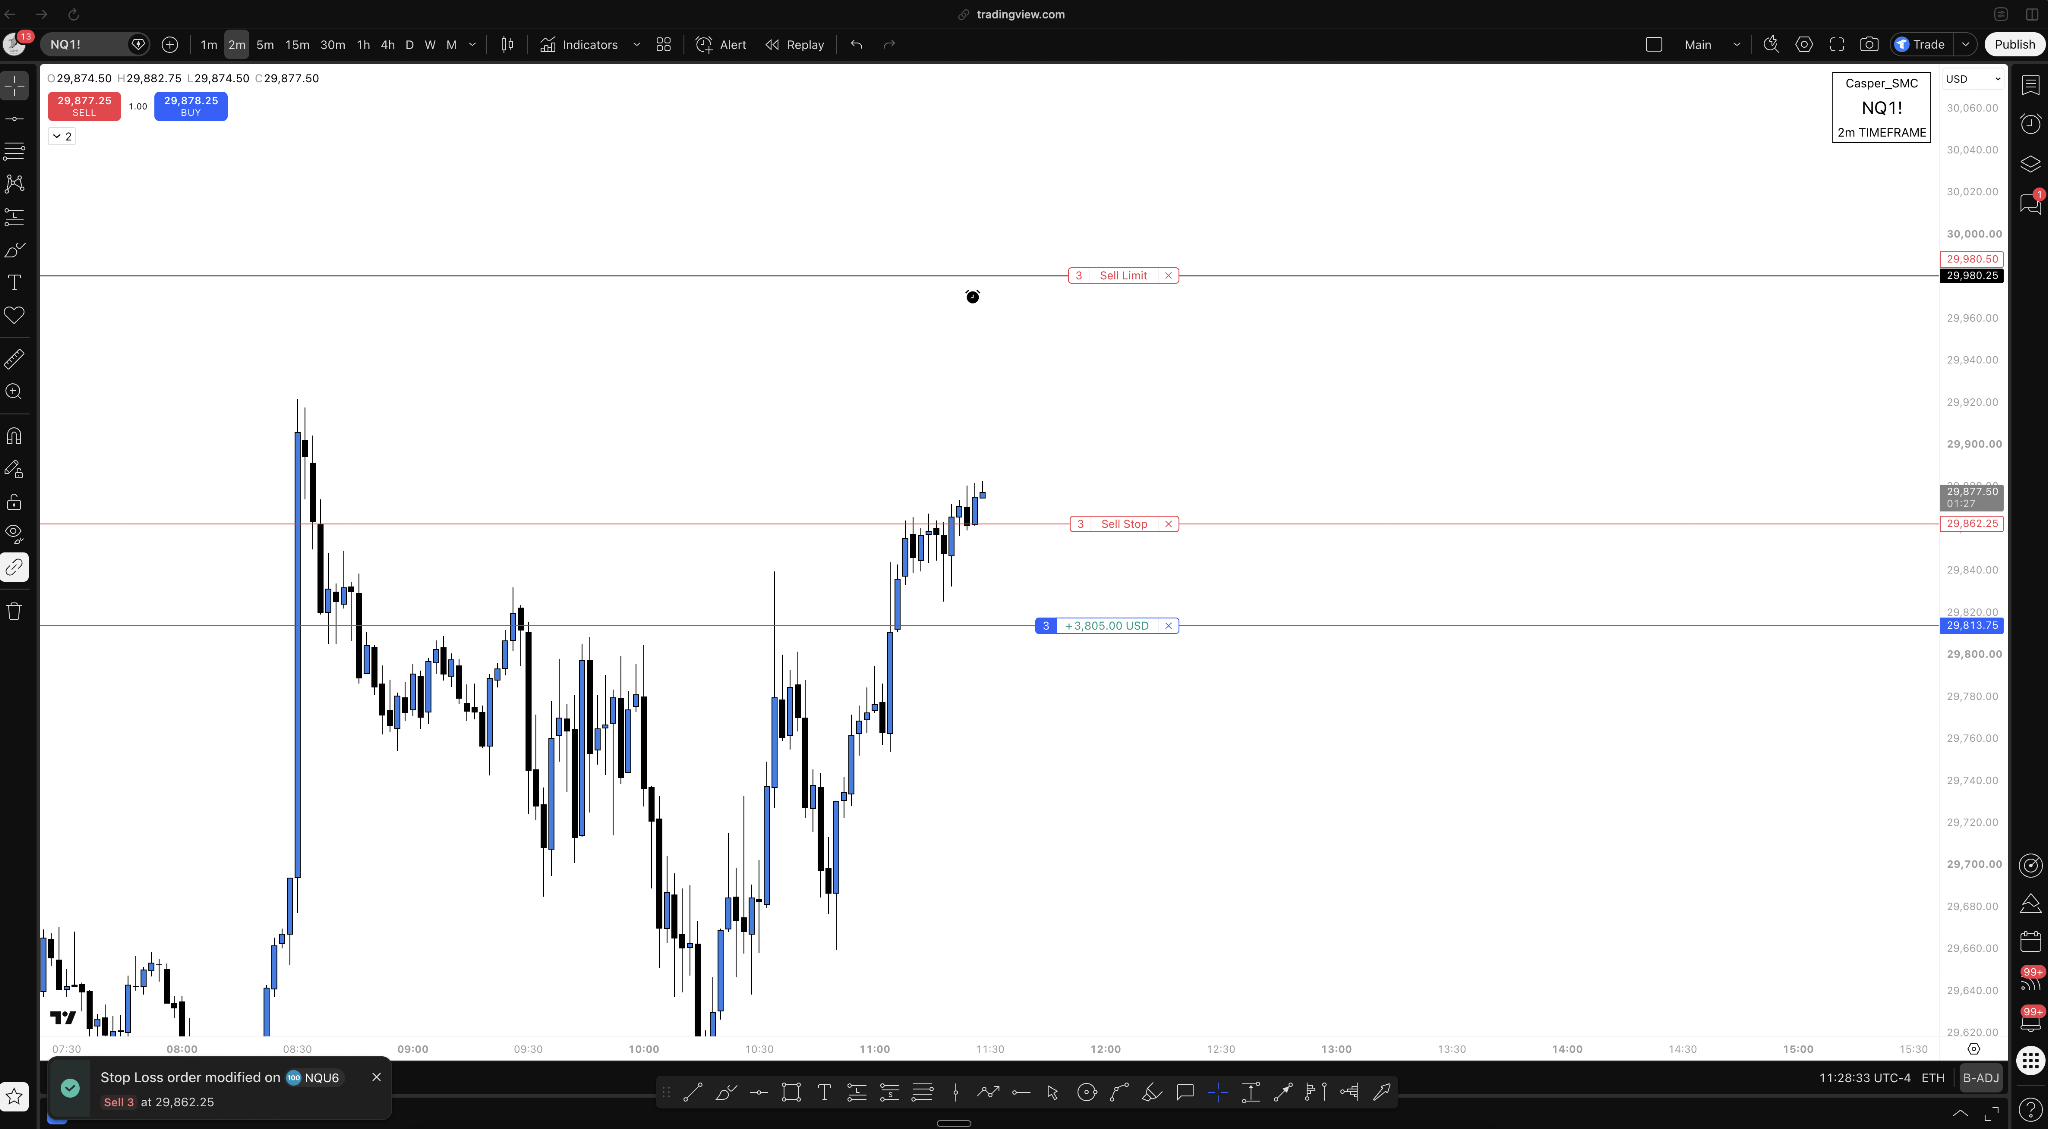
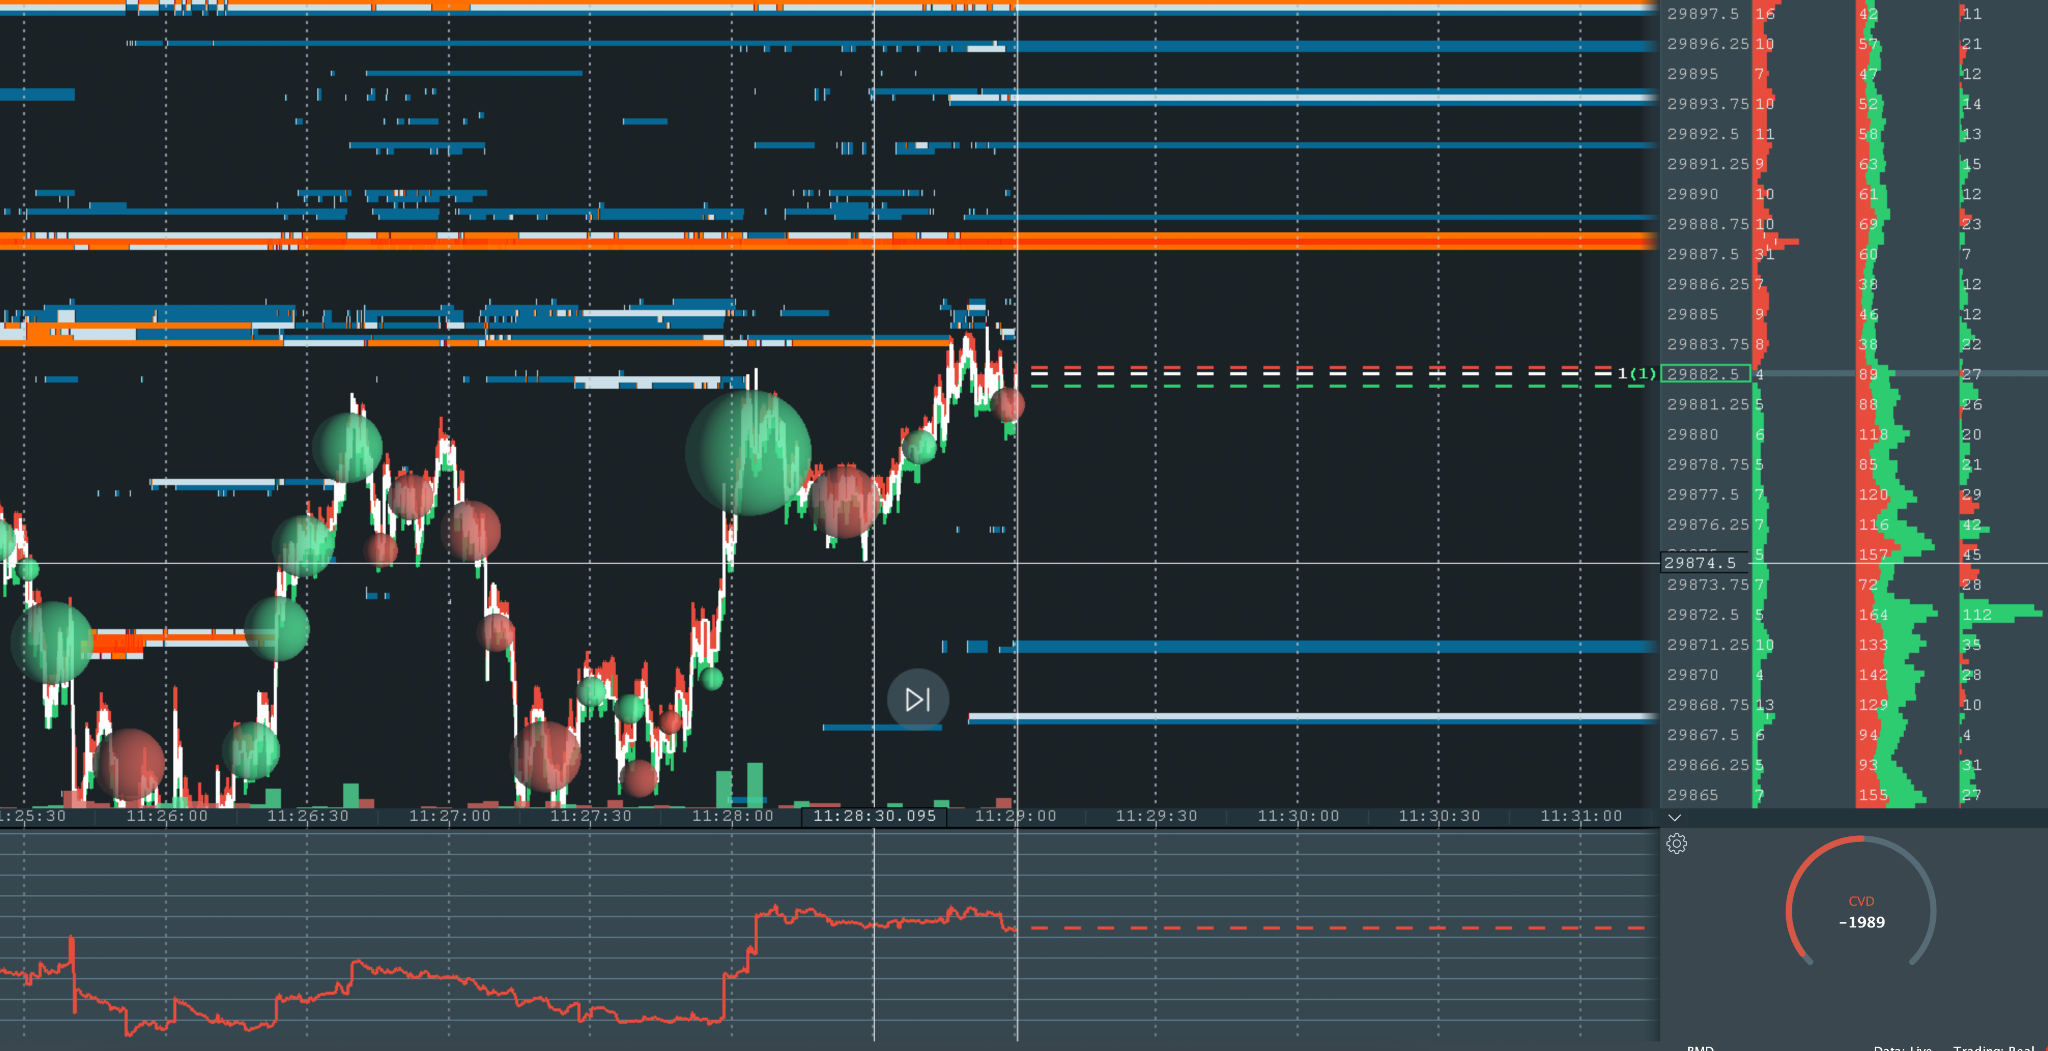
The full ladder was entry near 29,813, then 29,824, 29,850, 29,857.25, 29,862.25, under 29,874, and the corrected 29,873.25. Entry protected against the strong level. The 29,824 stop followed a defended test. The 29,850 stop responded to the eaten wall, thinning volume, and flatlining CVD. The next stops followed newly won battles while the extended context justified tighter protection.
This is why a rigid instruction like "always trail beneath the last low" is incomplete. Which low matters depends on the battle. Early in a fresh reversal, I may need the full auction because the market is still establishing control. Late in an extended continuation, directly beneath resistance with weaker aggression, the newest small defense can matter more. The geometry looks similar, but the condition changes the meaning and the room I am willing to give it.
Six moves after entry. Not one happened because the P&L number looked nice. Every move came from a new reference about control.
Late in the ladder, the screen showed roughly $4,000 floating. Floating means open, not realized.
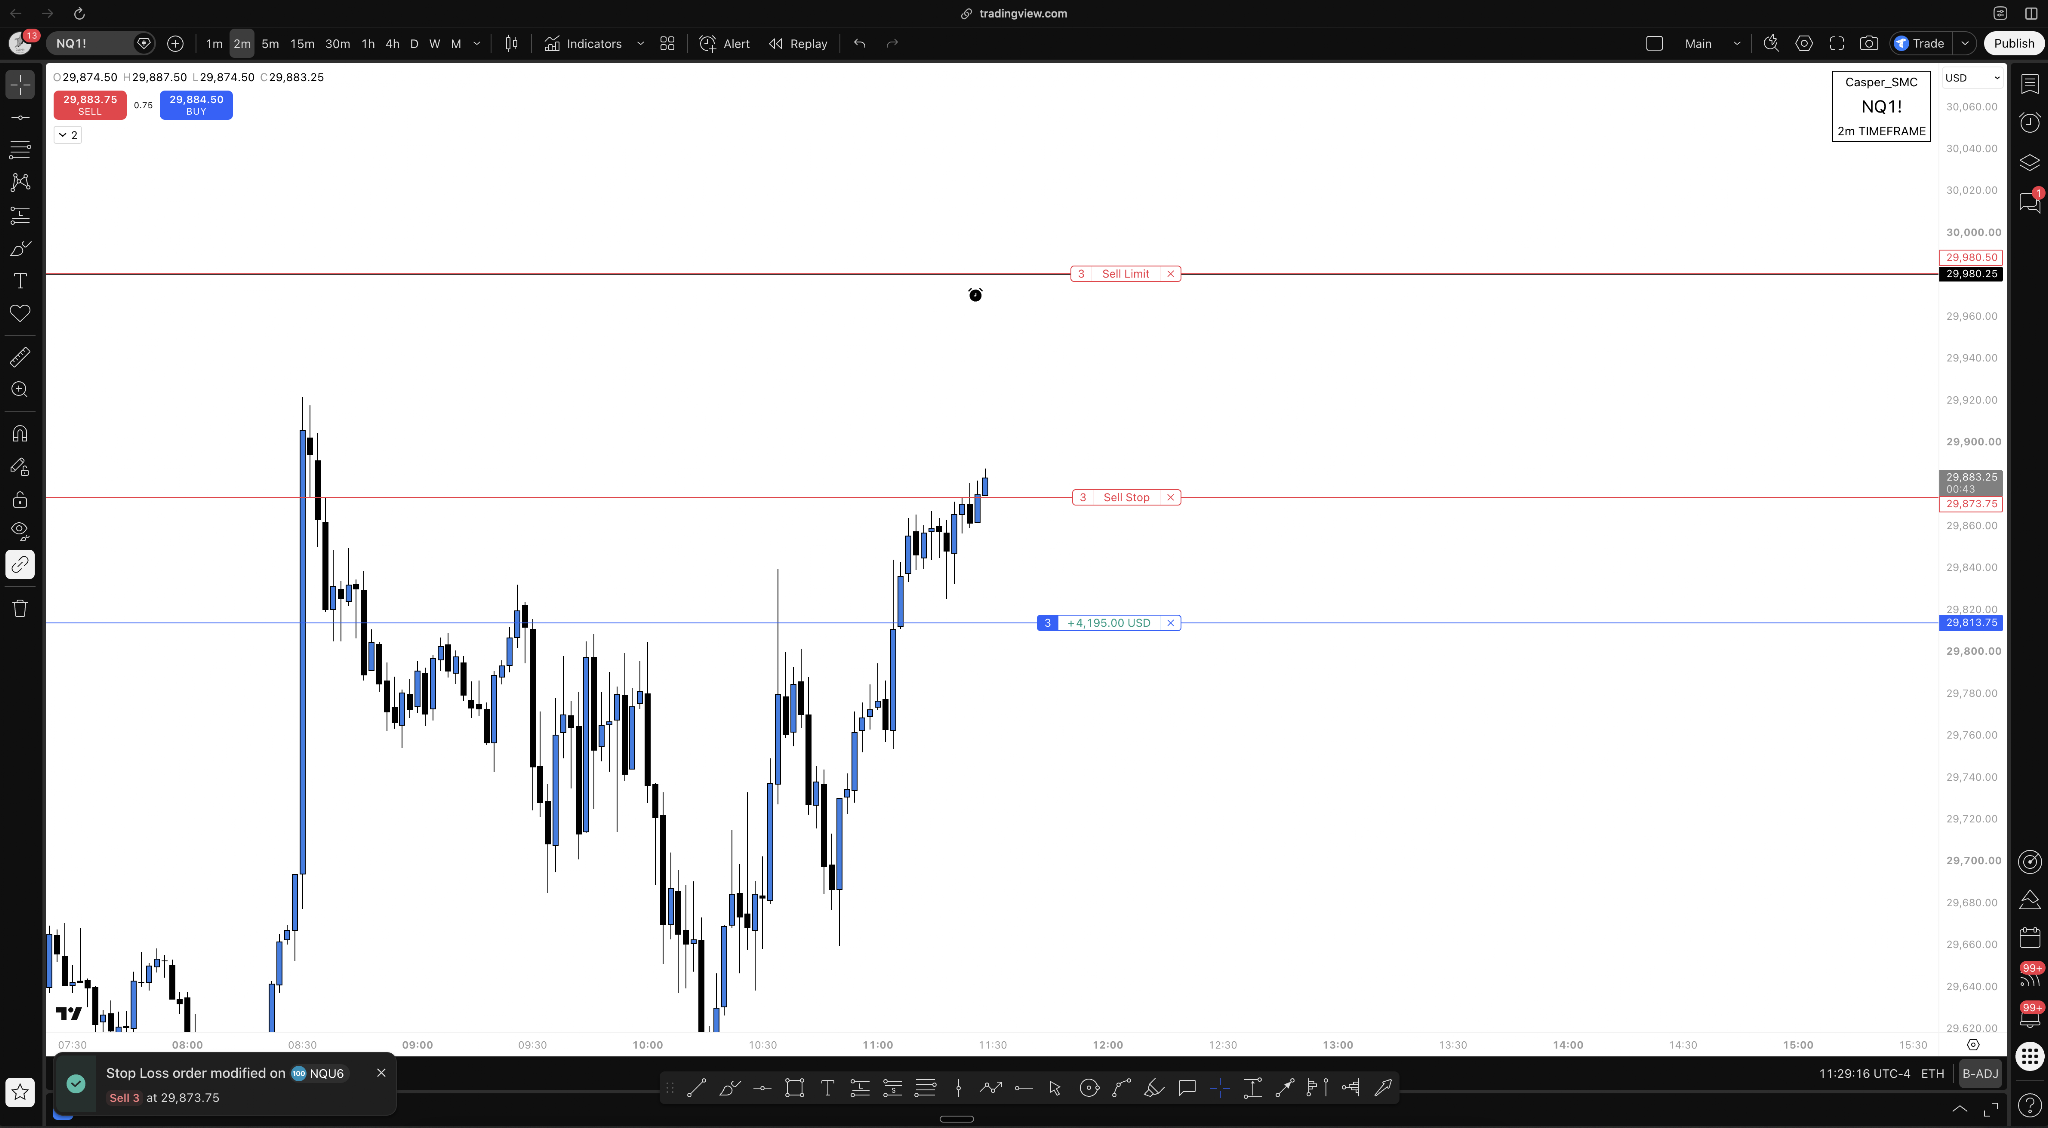
The entry was not the main skill. Management let the winner continue while buyers won, then reduced room as context weakened. That ability to read and manage has mattered far more to my trading than trying to collect sniper entries.
Phase 7: Exit and Protect the Next Decision
The stop finished trade two and I was fully out at 10:31 AM. I immediately said I was done. A good sequence can create its own tilt if I turn being right into permission to keep firing.
The reversal afterward showed why the ladder mattered. A stop left beneath the original 29,830 area would have been toasted by the round trip.
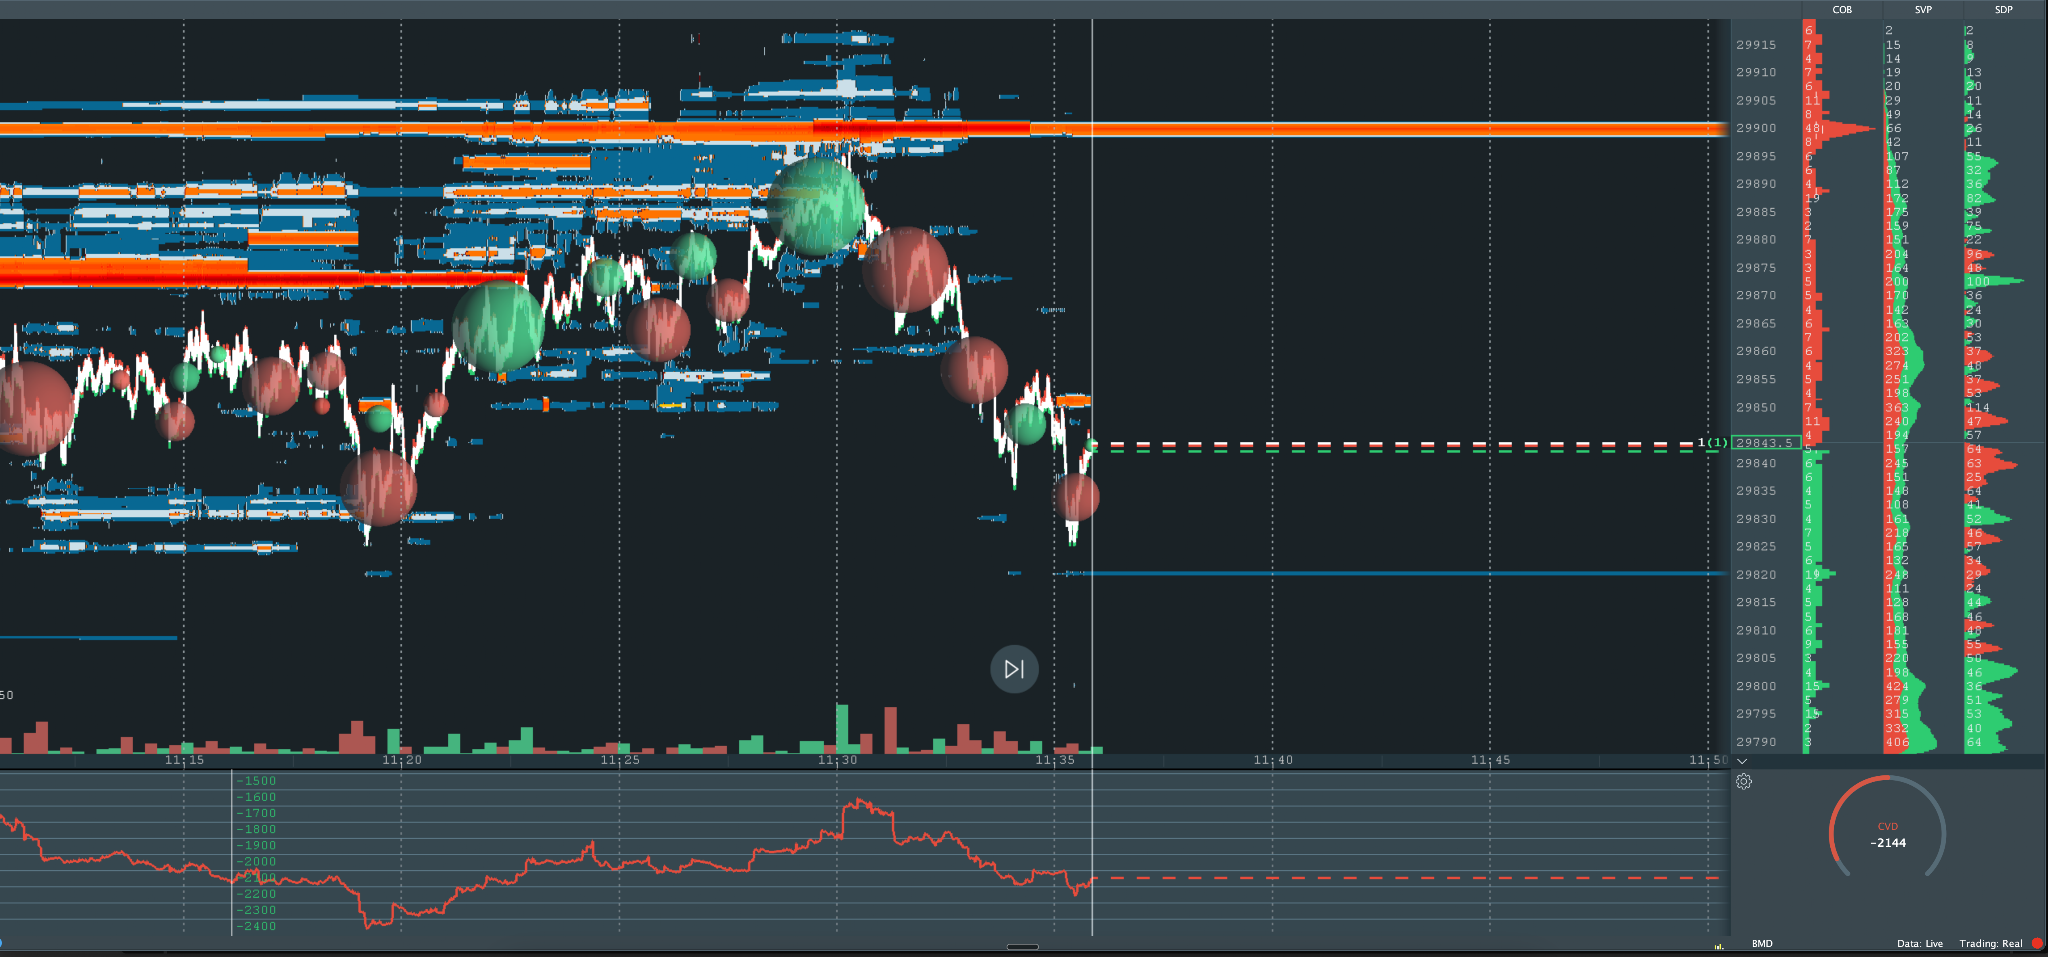
The ladder protected profit, but it also protected mental capital. Watching a strong winner reverse can drain the state needed for the next decision. That second-order effect matters. A FOMO trade that pays rewards FOMO. A professional pass that misses strengthens patience. Evidence-based management protects both the account and the operator.
I think about that like chess. I do not only ask what one move produces right now. I ask what it makes me more likely to do next. An unsupported winner can be more dangerous than a disciplined pass because it rewards the exact habit that will eventually hurt me. A well-managed exit can be valuable beyond its realized result because it keeps my next decision clean.
I still thought the market was more likely to continue higher. I signed off and went to have a light lunch with my daughter. Directional bias is not an obligation to trade. If you won both trades, do not be a greedy fucker. Pigs get slaughtered. A fresh valid setup can still be taken, but being on a high is not a setup.
Part V
The Rules and Your First Session
Rules I Carry Into Every Trade
Know which edge I am trading. A familiar pattern is not enough. I name the pressure, constraint, trapped position, hedging behavior, or failed auction that can create forced flow.
If nobody is forced, I often do not have a trade. No pressure means no urgency. I can wait for a better war.
Start with condition. I write where price is relative to yesterday's value, whether gamma supports expansion or contraction, and what stands in the path. Bias is a filter, not certainty.
Mark objective zones before the open. VAH, VAL, POC, VWAP, and meaningful profile areas tell me where to pay attention. A zone is not a command to click.
Require the trigger. I read balance, aggression, resting liquidity, absorption, and acceptance together. If one piece is missing, the factory line stops.
React to the level that holds. I do not predict that every marked line must reverse price. A failed zone can point to continuation, or it can simply send me to the next area.
Place the stop where control changes. A valid trade needs an invalidation point. I never widen the stop to protect my opinion after the market proves it wrong.
Wait for a new battle before normal trailing. A favorable wiggle and floating profit are not new information. My side must win another meaningful auction before the stop earns a new reference.
Tighten when context weakens. Major resistance, extension, trapped-position risk, weak aggression, or a reloading wall can justify less room. The market still chooses the stop reference.
Reset after every exit. The original bias may remain, but the next trade needs its own zone and trigger. Liking the direction does not authorize a revenge entry.
Judge behavior before outcome. Missing a FOMO winner is better than reinforcing an unsupported click.
End deliberately. Being right, profitable, or excited is not a reason to keep trading. I choose a sign-off condition before the session and protect the next day.
Run Your First CZT Session
Before the open, write one sentence for Condition. State where price is relative to yesterday's value, whether gamma is positive or negative, and whether the path leads into low volume, high volume, or a major level. Expansion favors continuation. Contraction favors a fade. Mixed context earns caution or no trade.
Mark only the Zones you can defend. Include yesterday's VAH, VAL, POC, VWAP, and any major profile level that changes the path. Beside each zone, write what buyers and sellers must do and whether enough room exists.
Build your Trigger checklist beside the chart. Write: balance forms, opposing effort fails, passive liquidity proves real, volume and CVD improve, and price accepts beyond the range. Define acceptance before emotion can redefine it. Increased volume and a hold beyond the area are required. A wick is not enough.
Keep the order flow view consistent. Do not zoom until a tiny range gives you the answer you wanted. Before entry, identify where the thesis changes. If you cannot name the invalidation, you cannot name the trade.
Once in, log every stop move with the latest won battle and the new information that justified it. If you cannot name new information, do not move the stop. Label every P&L screenshot floating or realized.
Run the FOMO test whenever price leaves without you. Ask whether you have complete CZT logic or are trying to escape the pain of missing. If it is pain, let the move go.
After the session, review more than P&L. Ask what each decision rewarded. Did the pass strengthen patience? Did an early stop reward anxiety? Did management protect mental capital? This turns chart review into professional development instead of a scrapbook.
Use the separate Sizing SOP to grade and size every valid trade. This playbook decides whether the machine produced a trade. The Sizing SOP decides how much risk its grade deserves.
Finally, remember the point. I am not trying to predict every turn. I am selecting a war, waiting at a place that matters, and requiring the market to show who controls it. Condition. Zone. Trigger. Then I manage the newest battle until control changes or I deliberately sign off.
Take This Further
This playbook gave you the decision order. Now let an AI-powered roadmap adapt it to your specific experience, goals, and risk profile. Answer a few questions and get a personalized plan that connects CZT to your next step as a trader.
Get Your AI Roadmap